RTS Terrain Studio
Build classic-style RTS maps with plateaus, crisp cliffs, ramps, painted ground, forests, water and decor, in the Unity Editor and inside your game. Fog of war, pathfinding and terrain queries are built in.
Overview
RTS Terrain Studio is a map editor for classic-style real-time strategy games, built for Unity 6.3 LTS and the Universal Render Pipeline (URP) 17.3. You use it to sculpt plateaus with crisp vertical cliffs, paint the ground, plant forests, flood lakes and rivers, place decoration, mark player start locations and check where units can walk and buildings can stand. When you are done, the same map is ready for gameplay: there are fog of war, pathfinding and terrain queries, and you never need a collider for them.
The editor works in two places, and both use the same tools and the same map file format (.rtsmap):
- In the Unity Editor, through the and the Scene View. Here you build the maps that ship with your game.
- In-game, through the
RTSRuntimeEditorcomponent. It is a complete editor with a UI Toolkit interface. Your players and modders can use it in your shipped game to make maps, save and load them and play-test them.
Apart from two open-licence fonts for its interfaces, the package contains no third-party content. Instead, one menu command generates a full set of demo content: textures, low-poly trees and props, two tilesets, three maps and three ready-to-play scenes. Within a minute of importing the package you have something to explore.

This manual is written for everyone, from your first map to extending the source code. If you are new, follow Your first five minutes below and then read the chapters in order. If you are a programmer, the source code is fully commented, every public type has XML documentation, and the folder structure section shows where everything is.
How a map is built
If you have used the map editor of a classic RTS game, most of these ideas will feel familiar. A map is a grid of square cells (2 m wide by default). The corners of the cells are vertices, and most data is stored per vertex or in high-resolution textures that cover the map.
| Concept | What it is |
|---|---|
| Cliff level | A whole-number height step from 0 to 15 for each vertex. Neighbouring vertices on different levels form a vertical cliff wall. The default level height is 2 m, and new maps start on level 2, so you can dig down for lakes and rivers. |
| Fine height | A smooth height offset on top of the cliff level for hills and valleys. The ground height of a vertex is CliffLevel × CliffLevelHeight + Height. |
| Ramp | Cells whose corners are flagged as a ramp blend smoothly from one level to the next, so units can walk up. |
| Cliff type | The material of the cliff walls (for example rock or grassy cliffs). A tileset has up to 4. |
| Ground layer | One of up to 16 painted ground textures (grass, dirt, rock…), stored in splat maps. |
| Water | A water surface height per vertex. The depth decides between shallow water (walkable) and deep water (not walkable). |
| Details and trees | Painted grass and flowers (density per texel), plus individually placed trees. |
| Decor | Any prefab you place on the map: rocks, ruins, crates, fences, buildings. |
| Pathing | For each pathing cell: walkable, buildable, flyable, shallow or deep water, cliff, blocked or steep. It is derived automatically from the map, and you can paint overrides on top. |
| Markers | Named regions (rectangles with key/value properties for your game logic), player start locations and named points such as camera positions. |
| Tileset | An RTSTileset asset that defines the look: ground layers, cliff types and the water style, like the “Summer” or “Winter” tilesets of classic RTS map editors. |
| Libraries | An RTSVegetationLibrary (details and trees) and an RTSDecorLibrary (decor prefabs). They are the palettes that you paint and place from. |
In a scene, a map lives on a GameObject with the RTSTerrain component. The menu
also adds the subsystem components to it
(RTSVegetationRenderer, RTSWaterRenderer and RTSDecorManager). The terrain reads the
map from an .rtsmap file in your project (an RTSMapAsset). The chunk meshes, grass and water
it shows are generated from that file. They are never saved into the scene, so your scenes stay small.
Your first five minutes
This is the quickest way to see everything working. It takes no setup beyond importing the package.
- Open and click Fix All. This sets up URP, the fog of war renderer feature, the camera textures used by water and the colour space. A confirmation dialog explains the changes before anything is changed.
- Run . A progress bar appears while textures, models, tilesets, maps and scenes are generated. When it finishes, the scene RTS Terrain Studio - Gameplay Demo is selected in the Project window.
- Double-click that scene to open it, then press Play.
- Select your units with the left mouse button (click, or drag a box) and right-click the ground to move them. Pan with WASD or the arrow keys, zoom with the mouse wheel, and press F1 to see all controls.
- Stop Play mode and open the scene RTS Terrain Studio - Editor Playground. Open , choose a tool and paint in the Scene View. Hold Shift to do the opposite (for example lower instead of raise). Press Ctrl+Z to undo.
- Open the scene RTS Terrain Studio - In-Game Editor Demo and press Play. This is the editor that your players get. Press F5 to play-test the map with units, and F2 to show or hide the editor.
The window opens once per project and shows the same steps as buttons. Reopen it from the menu whenever you like.
Where to start
| I want to… | Start here |
|---|---|
| Set up a project correctly | Setup and |
| Make my first map step by step | Quick Start and |
| Learn the editor window and every tool | Editor Window and Scene View |
| Let players build maps in my game | In-Game Editor |
| Publish my game or the map editor in a web browser | Web (WebGL) builds |
| Hide the map until units explore it | Fog of War |
| Use Mirror, A* Pathfinding Project or Unity NavMesh | Integrations |
| Query the terrain or write my own tools in C# | Scripting |
| Build a complete game: store game data in maps, add my own editor tabs, run my own match in the play test | Building a game on RTS Terrain Studio |
| Fix something that does not look or work right | Troubleshooting |
Features
Every editing tool below exists both in the Unity Editor and in the in-game editor, because both use the same
tool classes (subclasses of RTSTool). The names in this list are the names you see in the user interface.
Terrain and cliffs
- Maps from 16 to 1024 cells per side, in steps of 16. The New Map Wizard offers the presets Tiny (64), Small (96), Medium (128), Large (192), Huge (256), Epic (384) and Epic XL (512), or any custom size. The cell size and the cliff level height can be set freely.
- 16 cliff levels (0–15) with procedurally generated, rounded cliff walls. A contour is traced on a sub-grid
inside every cliff cell, and noise and slant make the walls look like natural rock (all of this is set in
RTSTerrainSettings). - Fine height on top of the levels, so plateaus can have hills. Smooth ground can use 1 to 4 quads per cell side: 1 gives the classic RTS look, and 2 to 4 give smoother hills.
- Height tools: Raise / Lower, Smooth, Flatten, Set Height, Noise, Terrace, Erode.
- Cliffs tools: Raise / Lower Level, Set Level, Ramp, Cliff Type, Clean Cliffs.
- Up to 4 cliff types per tileset, painted per vertex, with triplanar texturing on the walls.
- An optional
MeshColliderper chunk on a layer you choose. Physics-free queries also work without it:GetHeight,GetNormal,Raycast,GetCliffLevel,IsWater,GetPathing,IsWalkableandIsBuildable. - Any number of terrains in one scene. Each terrain has its own position and Y rotation.
RTSTerrain.FindAt(worldPosition)andRTSTerrain.RaycastAll(ray, out hit)find the right one. - Resize a map in either direction (grow or shrink it) with an anchor. Import and export heightmaps as 16-bit PNG or 16-bit RAW, and export the splat maps as PNG.
Painting
- 16 ground layers per tileset, painted into four RGBA splat maps. By default there are 4 splat texels per cell (you can choose 1 to 8), so painted borders are much finer than the cell grid.
- Paint tools: Paint Layer (soft brush), Tile Paint (hard, cell-aligned painting in the classic RTS style), Fill / Replace, Smooth Paint and Auto Paint.
- Auto Paint paints by rules stored in an
RTSAutoPaintProfileasset. A rule can test height, slope, cliff level, distance to cliffs, distance to water and noise. Use the Auto Paint tool as a brush, or let the map generator apply a profile to the whole map. - Height-based blending between layers, per-layer anti-tiling, a tileset-wide macro variation, and per-layer tint, smoothness, metallic and normal strength.
- A layer can change pathing where it dominates. For example, the demo tilesets make Rock and Blight unbuildable, like the unbuildable tiles of classic RTS games.
- Brushes: Circle, Square, Diamond, or Custom with any texture as a stamp (
RTSBrushShapeassets). You can set the radius, strength, hardness, an optional falloff curve, rotation, random rotation, spacing and jitter. - Symmetry painting for fair competitive maps: Mirror X, Mirror Z, Mirror XZ, Rotate 2 (180° point symmetry), Rotate 4 (90°, square maps only) and Mirror Diagonal (square maps only). Symmetry works with every tool, including object placement.
Vegetation
- Details such as grass, flowers and small plants, painted as a density per layer and drawn on the GPU as meshes or crossed quads, with wind.
- Trees placed one by one or scattered with a brush. A tree can be drawn with GPU instancing (with an optional collider proxy) or spawned as a GameObject for gameplay such as harvesting wood.
- Trees block pathing automatically through their footprint.
- Trees can be hidden for one match without changing the map (
RTSTerrain.SetTreeHidden), so felled trees open the pathing and come back for the next match. - Vegetation tools: Paint Details, Erase Details, Place Trees, Erase Trees.
- The shader
RTS Terrain Studio/Vegetationadds wind, translucency and a tint for each instance. Any other material with GPU instancing also works. - Quality settings on
RTSVegetationRenderer: detail density, detail distance and tree distance multipliers.
Water
- A water height per vertex, so lakes can sit at different heights. Water is drawn as chunked, transparent meshes that are built by Burst jobs.
- Shallow and deep water come from the depth (
WaterProfile.shallowDepthLimit). Shallow water is walkable and deep water is not, as in classic RTS games. - The shader
RTS Terrain Studio/Waterhas colour by depth, scrolling normals, waves, refraction, shore foam and soft shore fading. The style comes from the tileset'sWaterProfile. - Water tools: Paint Water, Erase Water, Flood Fill.
Decor (doodads)
- Any prefab can be decor. Prototypes live in an
RTSDecorLibrarywith thumbnails that are generated automatically. - Each prototype is spawned as a GameObject (for objects that gameplay interacts with) or drawn with GPU instancing (for many static props).
- Random rotation, scale and tint, alignment to the slope, grid snapping and a pathing footprint (circle or box).
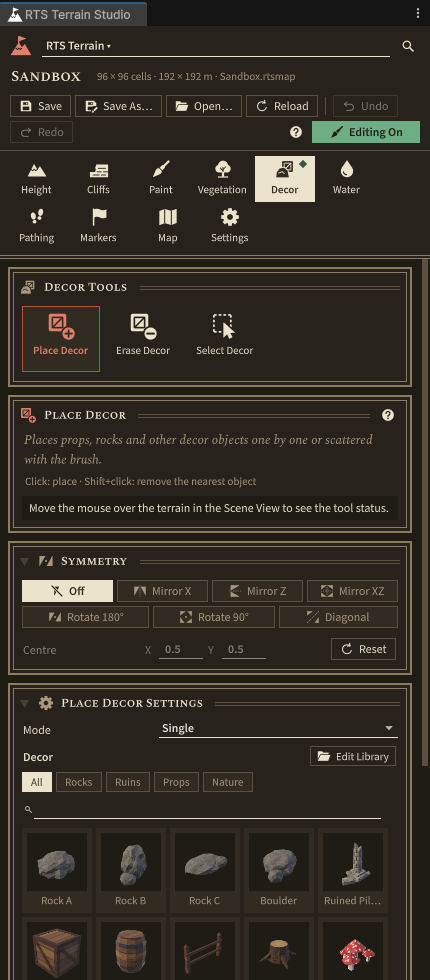
- Decor tools: Place Decor (single or scatter), Erase Decor, Select Decor (move, rotate, scale, duplicate, delete).
Pathing and pathfinding
- A pathing map that is derived automatically and kept up to date while you edit. It takes cliffs, slope, water depth, tree and decor footprints and ground layer rules into account.
- Pathing tools: Paint Pathing (overrides such as unwalkable, unbuildable or force walkable) and Clear Pathing. Pathing overlays in the editors show the result.
- A built-in pathfinder (
RTSPathfinder): Burst-compiled A* on the pathing grid with 8 neighbours, no corner cutting, unit radius (clearance) awareness and path smoothing. It needs no third-party package. - Asynchronous path requests for many units through
RTSPathfindingService. - A runtime pathing layer for buildings, gates and bridges (
RTSTerrain.SetDynamicPathing) that is never saved into the map. - A fixed byte layout of the pathing flags and a CRC-32 checksum (
PathingMap.ComputeChecksum) for lockstep games.
Fog of war
- Classic RTS rules: every team has its own visibility, and explored areas are remembered. By default, a unit
sees its own cliff level and lower levels only. Trees and decor can also block sight
(
LineOfSightModeand theblocksVisionoption of a prototype). - Up to 32 teams, shared vision between allies (
RTSFogOfWarManager.SetAlliance), a smooth blurred fog texture and minimap support. - A URP renderer feature (
RTSFogOfWarRendererFeature) darkens everything on screen, whatever material it uses. When the feature is missing, the package's own shaders apply the fog themselves. - Units with
RTSFogOfWarRevealerreveal the map, and objects withRTSFogOfWarHideableare hidden while they are not visible. Buildings and props can stay visible as “ghosts” once they have been discovered. - Visibility is computed by Burst jobs, or comes from your own simulation or server through an external
visibility source (
RTSFogOfWarManager.ExternalVisibilitySource).
In-game editor
- Add it with . It is a UI Toolkit interface with a menu bar, category and tool bars, a tool panel with palettes and thumbnails, a status bar, tooltips and notifications.
- New, Open, Save and Save As with a map browser. Maps are stored under
Application.persistentDataPathby default, and in web builds in the storage of the browser, with Download and Import to move them to and from the computer. You can also generate a map, edit the map info and resize the map. - Undo and redo with a memory budget, keyboard shortcuts, symmetry, and grid, pathing and marker overlays.
- A play-test toggle (F5) that starts the sample gameplay on the map you are editing and returns to the editor afterwards. Your game can take the play test over and run its own match.
- Your own tool categories, panels and menu commands (
RegisterPanel,RegisterMenuItem). - Its own editor camera (
RTSRuntimeEditorCamera) and gizmos, and no dependency on theUnityEditorAPI, so it works in player builds.
Map generator
- A seeded procedural generator (
RTSMapGenerator) with the style presets Plains, Hills, Highlands, Islands, Canyon and Arena. - It creates plateaus and cliffs, ramps (with connectivity checks), lakes and seas, a map border, auto painting, details, forests, decor and start locations, with any symmetry mode.
- The same seed always gives the same map. You can save settings as
RTSMapGeneratorPresetassets. - You can run it from the New Map Wizard, the editor window, the in-game editor or your own code.
Sample gameplay
- An RTS camera (pan, edge scrolling, zoom, rotation, map bounds), unit selection (click, box, Shift, double-click, control groups) and orders (move in formation, queue, stop, hold, patrol).
- Placeholder units that follow the terrain height, reveal the fog of war and use any path provider.
- A minimap with click-to-move camera, a HUD, a building placement demo that respects the buildable flag, and a tree harvesting demo.
RTSDemoGamesets all of this up on any terrain with start locations. Add it with .
Extension points for your game
- Map extensions (
MapDataExtension): your own data, such as pre-placed units, player slots or triggers, saved inside the map file and copied, resized and undone together with the map. Sections of games and tools that are not in the project pass through unchanged. - Custom header fields that map browsers and lobbies read without loading the map, and
RTSMapSerializer.TryValidateto check maps from other people. - Custom tool categories, in-game editor panels and menu commands, and tabs of your own in the RTS Terrain Studio window.
- Play test hand-over to your own match, a registry that keeps the sample gameplay out of the way of your
gameplay, and the scripting define symbols
RTS_TERRAIN_STUDIOandRTS_TERRAIN_STUDIO_1_0_OR_NEWERfor integrations.
Integrations
These are optional. Each one compiles only when its dependency is installed, so removing the dependency never breaks your project.
| Integration | What it adds |
|---|---|
| Mirror (multiplayer) | The host streams its map to clients that join, so players can play user-made maps online, and downloaded maps are cached. Units are server-authoritative, every client has its own team's fog of war, and RTSFogOfWarInterestManagement never sends enemies hidden by the fog (anti-maphack). |
| A* Pathfinding Project | Grid graphs generated from the RTS pathing map and updated incrementally after every edit, one graph per unit size, and units moved by AIPath with RVO local avoidance. |
| Unity AI Navigation (NavMesh) | A NavMesh built from the terrain chunks and the pathing map, updated incrementally after edits, and a path provider that returns NavMesh paths or drives NavMeshAgents. |
Editor workflow
- One dockable RTS Terrain Studio window with tabs for the 8 tool categories, plus Map and Settings, and tabs of your own for custom categories. It has large tool buttons with icons, contextual settings, palettes with thumbnails and a status bar.
- Scene View integration. The brush is drawn by the terrain shader and projected onto the terrain. There are also grid and pathing overlays, symmetry guides and shortcuts: [ / ] brush size, - / = strength, 1–8 tool categories, G grid, P pathing overlay and R random rotation. You can rebind them in (on macOS ).
- Map edits are part of Unity's undo history, so Ctrl+Z and Ctrl+Y work as usual and show the names of the steps. The undo memory budget can be configured.
- Custom inspectors for tilesets (drag-and-drop layers, previews, automatic texture array builds), vegetation and
decor libraries, brush shapes, auto paint profiles and the
RTSTerraincomponent. The.rtsmapimporter shows a minimap preview. - A Welcome window, a New Map Wizard and a project validator with one-click fixes.
Performance
- Terrain meshes are split into chunks of 16, 32 (default) or 64 cells. They are built with
Mesh.MeshDataArrayin Burst jobs, and only the chunks you edit are rebuilt. - The heavy work runs in Burst-compiled jobs (Unity Jobs System): brush operations, mesh generation, pathing derivation, clearance, A*, fog of war, vegetation instances, water meshes, the map generator, auto painting and minimap baking.
- Details are drawn procedurally with
Graphics.RenderMeshPrimitives. Trees and instanced decor useGraphics.RenderMeshInstanced. All of them are culled per patch by frustum and distance. - The shaders are SRP Batcher compatible, and one terrain material is shared by all chunks.
- Texture arrays are compressed for the active platform (BC7, ASTC 6×6, ETC2 or DXT5) at a resolution you choose (256–2048).
- No per-frame garbage allocations in the hot paths, and all native memory is released when components are disabled.
Design decisions at a glance
These are the questions people ask most often about RTS terrain tools, and how RTS Terrain Studio answers them.
| Question | Answer |
|---|---|
| How many ground textures can a map use? | 16 ground layers and 4 cliff types per tileset, and you can have as many tilesets as you like. The limit has a technical reason: 16 layers fit exactly into 4 RGBA splat maps (one channel per layer), and all 16 ground layers and 4 cliff layers are packed into two texture arrays (albedo/height and normal, 20 slices each), so a single terrain material renders every chunk. |
| Does the terrain have colliders? Can I query it without physics? | Both. Each chunk can get a MeshCollider on a layer you choose (RTSTerrainSettings.colliderMode).
The query API (GetHeight, GetNormal, Raycast, GetCliffLevel,
IsWater, TryGetWaterHeight, GetPathing, IsWalkable,
IsBuildable) does not use physics at all. It works in edit mode, at runtime and with colliders
switched off, and it returns exactly the surface that you see. |
| Can I build large worlds from several maps? | Yes. Any number of RTSTerrain components can be in a scene, each with its own position and Y rotation.
RTSTerrain.All, RTSTerrain.FindAt and RTSTerrain.RaycastAll work across all of them.
Chunked rendering makes maps of 512×512 cells practical. |
| Does the brush land where the cursor is, even with display scaling? | Yes. The Unity Editor uses HandleUtility.GUIPointToWorldRay, which handles DPI scaling correctly, and the
in-game editor uses Camera.ScreenPointToRay with the pointer position from the Input System. The brush
cursor is drawn by the terrain shader, projected onto the surface, so what you see is exactly where you paint. |
| Which texture formats and sizes can I use? | Ordinary Unity textures of any size and format. The tileset inspector resizes and packs them into
Texture2DArrays for you (256 to 2048 pixels per slice, compressed or uncompressed). The channel layout is
documented: albedo RGB with an optional height in alpha or in a separate height map, plus a normal map. |
| Do I have to put the package in a fixed folder? | No. The editor finds the package root through its runtime assembly definition, so you can move
RTSTerrainStudio anywhere under Assets (for example Assets/Plugins/RTSTerrainStudio). |
| Can I change the map size later? | Yes. Choose any size in the New Map Wizard and grow or shrink it later with Resize. You choose an anchor that decides on which sides cells are added or removed. |
| Can I read and change the code? | Yes. The code is split into assembly definitions with one namespace each. The public API has XML
documentation, the internals are commented, the Burst jobs live in separate *Jobs.cs files, and
there are EditMode unit tests. |
| Can my game keep its own data in the map files? | Yes. Derive a class from MapDataExtension, and the map saves it as a section of its own, copies
it with the map, moves it on resize and records it for undo. Tools and games that do not know your data keep it
unchanged. See Map extensions. |
A first look at the API
To give programmers an idea of the API, here is a complete script. It asks the terrain about the point you click
and plans a path to it with the built-in pathfinder. It needs no colliders and no extra components: put it on any
GameObject in a scene with an RTSTerrain.
using System.Collections.Generic;
using RTSTerrainStudio;
using UnityEngine;

/// <summary>Click on the ground: logs what the terrain knows about that point and plans a path to it.</summary>
public class ClickInfoExample : MonoBehaviour
{
    // Reused for every click, so no new list is allocated each time.
    readonly List<Vector3> path = new List<Vector3>();

    void Update()
    {
        // RTSInput works with the Input System package and with the old Input Manager.
        if (!RTSInput.GetMouseButtonDown(0) || Camera.main == null) return;

        Ray ray = Camera.main.ScreenPointToRay(RTSInput.PointerPosition);

        // Analytic ray cast against every RTSTerrain in the scene. Colliders are not needed.
        if (!RTSTerrain.RaycastAll(ray, out RTSTerrainHit hit)) return;
        RTSTerrain terrain = hit.terrain;

        // Gameplay questions, answered from the map data and the pathing map.
        int level = terrain.GetCliffLevel(hit.point);
        bool buildable = terrain.IsBuildable(hit.point);
        bool water = terrain.IsWater(hit.point, out float depth);
        Debug.Log($"Cell {hit.cell}: cliff level {level}, buildable {buildable}, water {water} ({depth:0.00} m)");

        // Built-in Burst A* on the pathing map, for a unit with a radius of 0.6 m.
        PathStatus status = RTSPathfinder.FindPath(terrain, transform.position, hit.point,
                                                   PathRequestOptions.ForUnit(0.6f), path);
        Debug.Log($"Path from {name}: {status}, {path.Count} waypoints");
    }
}
PathStatus is Success, Partial (the closest reachable point), NoPath or
InvalidStart. The Scripting chapter explains the whole API.
Requirements
Unity and render pipeline
| Requirement | Version | Notes |
|---|---|---|
| Unity | 6.3 LTS (6000.3) or newer | Developed and tested with 6000.3.3f1. |
| Universal Render Pipeline | 17.3 (the version that ships with Unity 6.3) | A URP asset must be active in Graphics and Quality settings. Developed with the Forward+ rendering path. The terrain shader also has a GBuffer pass for the Deferred path. |
| Colour space | Linear | Gamma works, but colours, lighting and water look washed out. |
| Graphics | Shader Model 3.5 or higher | The terrain, vegetation, detail and water shaders target #pragma target 3.5, so they also run on WebGL 2.0 and OpenGL ES 3.0. Only the terrain's GBuffer pass (Deferred rendering path) and the structured buffer path of the detail shader use 4.5, where the GPU supports it. |
The Built-in Render Pipeline and HDRP are not supported. All shaders are written for URP and the fog of war renderer feature uses the URP RenderGraph API.
Imported into a project without URP? Then the package stays inactive instead of filling the Console with errors: its scripts are not compiled, its shaders are skipped and your project keeps working as before. Once per editor session the dialog RTS Terrain Studio requires URP explains what to do:
- Built-in Render Pipeline: click Install URP. When Unity has compiled the package, open and click Use URP, which creates a URP asset and assigns it in the Graphics and Quality settings.
- URP older than 17.3: click Open Package Manager and update Universal Render Pipeline to the version that comes with your editor.
- Unity older than 6.3: URP 17.3 needs Unity 6.3 LTS, so the dialog only offers Open Manual and Later. Open the project with Unity 6.3 LTS or newer.
- HDRP or a custom render pipeline: import the package into a URP project instead, for example a new project created from the Universal 3D template.
shows the dialog again. Unity may also log warnings that the package shaders are not supported; they go away once URP is installed.
Required packages
These packages come from the Unity Registry (). The window detects missing packages and installs them with one click (check Burst, Collections and Mathematics).
| Package | Name | Tested version | Used for |
|---|---|---|---|
| Burst | com.unity.burst | 1.8.27 | Compiles the jobs to fast native code. |
| Collections | com.unity.collections | 2.6.2 | Native containers for map data and jobs. |
| Mathematics | com.unity.mathematics | 1.3.3 | Vector maths in jobs and the data model. |
| Universal RP | com.unity.render-pipelines.universal | 17.3.0 | Rendering. |
Input handling
All runtime input goes through the static class RTSInput. It supports both input back ends:
- Input System package (
com.unity.inputsystem, tested with 1.17.0). It is used when the package is installed and Active Input Handling is Input System Package (new) or Both. - Input Manager (old). It is used as a fallback when the project uses the old input handling.
You set this in . The Input handling check of the project validator shows which mode is active; see Input handling in Project Setup.
Optional packages for the integrations
| Integration | Dependency | Version | How it is detected |
|---|---|---|---|
| Mirror | Mirror (Asset Store or GitHub) | 96 or newer | Scripting define MIRROR, which Mirror adds itself. |
| A* Pathfinding Project | com.arongranberg.astar | Pro 5.4.4 up to (not including) 6.0, tested with 5.4.7 | Version define RTS_ASTAR. Add RTS_ASTAR_DISABLED to switch it off (needed for the free version, which uses the same package name). |
| Unity NavMesh | AI Navigation, com.unity.ai.navigation | 2.0 or newer, tested with 2.0.9 | Version define RTS_AI_NAVIGATION. |
The pathfinding integrations need the A* Pathfinding Project Pro version, because the integration
uses RVO local avoidance and TraversalConstraint. Before you delete Mirror, read
Removing Mirror: Mirror leaves its define symbols behind, and RTS Terrain Studio contains a small
editor assembly that cleans them up.
Recommended project settings
The project validator checks all of these and can fix them for you:
| Setting | Why |
|---|---|
| URP asset active | The package shaders render only in URP. |
| Depth Texture and Opaque Texture on the URP asset | Water uses the depth texture so that its depth colour, foam and soft shore follow objects standing in the water, and the opaque texture for refraction. A camera's own setting overrides the asset, and the water follows each camera. The demo cameras switch both on themselves, so the demo scenes look right in the Game view even without this setting (the Scene view always uses the URP asset). |
| Fog of war renderer feature on the renderer | Darkens everything in the fog, including your own materials. Without it, only the package shaders show fog. |
| Fog modes kept in player builds | Unity strips fog shader variants that no build scene uses, but RTSEnvironment turns fog on at runtime. Without the kept fog modes, maps with fog show no fog in builds. |
| Linear colour space | Correct colours and lighting. |
| Shader references and tileset texture arrays up to date | Shaders and compressed arrays are included in player builds. The shader reference asset is refreshed and outdated texture arrays are rebuilt automatically before every player build. |
Platforms
The runtime has no editor-only dependencies, so maps load, render and can be edited in player builds on every platform that URP supports, including Web builds (WebGL 2.0). The shaders target Shader Model 3.5, the lowest level with texture arrays. The terrain's GBuffer pass for the Deferred rendering path needs Shader Model 4.5 and is skipped on OpenGL based APIs, like the GBuffer pass of URP's own Lit shader. Detail grass picks its instance storage at runtime: structured buffers where the GPU supports them, and a float texture on WebGL 2.0 and OpenGL ES 3 (it looks the same).
The texture array bakery picks the compression for the active build target: BC7 for desktop and consoles, ASTC 6×6 for Android, iOS, tvOS and visionOS, the texture compression of the build for Web (DXT5, ASTC 6×6 or ETC2), and DXT5 for everything else. The in-game editor runs on all platforms and is made for mouse and keyboard. Its commands for showing the maps folder and for quitting the application appear only where the platform supports them: only desktop players and the editor can show folders, and WebGL, iOS and Android cannot quit the application. Web builds have a few more differences; see Web (WebGL) builds.
Folder structure
The package lives in one folder, by default Assets/RTSTerrainStudio. You can move or rename this folder:
the editor finds the package root through the location of RTSTerrainStudio.Runtime.asmdef, and the
demo content and documentation are found relative to it.
RTSTerrainStudio/
├── Runtime/                 Core, rendering, tools and runtime systems (RTSTerrainStudio.Runtime)
├── Editor/                  Editor window, Scene View, inspectors, setup, demo content (RTSTerrainStudio.Editor)
├── Shaders/                 URP shaders and HLSL includes
│   ├── Hidden/              Internal shaders (fog blur, minimap fog, gizmos, texture array blit)
│   └── Include/             Shared HLSL (fog of war, brush cursor, wind, terrain, vegetation, water)
├── Samples/
│   ├── Scripts/             Sample gameplay: camera, units, selection, orders, minimap, HUD (RTSTerrainStudio.Samples)
│   └── Scenes/              Demo scenes (created by Create Demo Content)
├── Integrations/
│   ├── Mirror/              Multiplayer (compiled only with Mirror)
│   ├── AStarPathfinding/    A* Pathfinding Project (compiled only with A* Pro 5.4.4+)
│   └── UnityNavMesh/        Unity AI Navigation (compiled only with com.unity.ai.navigation 2.0+)
├── Content/                 Generated demo content (empty until you run Create Demo Content)
├── Resources/
│   └── RTSTerrainStudio/    Runtime UI style sheets and theme, shader references, panel settings
├── Documentation/           This manual (index.html) and its images
└── Tests/
    └── Editor/              EditMode unit tests (RTSTerrainStudio.Tests.Editor)
Top-level folders
| Folder | Contents | Can I delete it? |
|---|---|---|
Runtime | Everything that runs in a game: the RTSTerrain component, map data, rendering, all editing tools, vegetation, water, decor, fog of war, pathing, generation, the in-game editor, icons and input. | No. |
Editor | Unity Editor features only. None of it is included in player builds. | No. |
Shaders | RTS Terrain Studio/Terrain, RTS Terrain Studio/Vegetation, RTS Terrain Studio/Water, Hidden/RTS Terrain Studio/Detail, Hidden/RTS Terrain Studio/FogOfWarFullscreen, the internal shaders in Hidden and the HLSL includes in Include (RTSCommon.hlsl holds the fog of war, brush cursor and wind globals). | No. |
Samples | Sample gameplay scripts and the demo scenes. The editor assembly and the integrations reference the sample assembly (for example for RTSUnit and RTSDemoGame). | Only together with the integrations. The scenes can be deleted at any time. |
Integrations | One folder per third-party integration, each with its own assemblies, a README.md and an Editor folder with demo scene builders. Demo scenes are created in a Demo sub folder. | Yes, each integration folder on its own. Read the Mirror steps first. |
Content | Demo textures, materials, meshes, prefabs, tilesets, libraries, brush shapes, maps and render settings. Everything here is generated. | Yes, you can regenerate it at any time. Your own maps must not use it then. |
Fonts | Spectral, Spectral SC and Source Sans 3, the typefaces of the editor window, the in-game editor and the sample HUD, with their licences (SIL Open Font License, see Third-Party Notices.md). | No: the interfaces would fall back to Unity's default font. |
Resources/RTSTerrainStudio | UI/RTSRuntimeEditor.uss and UI/RTSRuntimeTheme.tss (in-game UI style). The shader references asset (created and refreshed automatically by the editor) and UI/RTSRuntimePanelSettings.asset (created by Create Demo Content) are added here. They make sure the package shaders and the UI Toolkit runtime shaders are included in builds. | No. |
Documentation | This manual. and every ? button open it. | Yes, but the help buttons then have nothing to open. |
Tests | EditMode tests for map data, map extensions and header fields, geometry, brushes, symmetry, undo, the serializer, pathing, hidden trees, the fog of war, the generator, terrain queries, the tool registry, the editor extension points, the play test and icons. Run them in . | Yes. |
Inside Runtime
| Folder | Contents |
|---|---|
Core | RTSTerrain (main component, map lifecycle, change tracking, queries), MapData, MapTypes, MapGeometryView (the reference surface used by meshes, queries and pathing), PathingMap, RTSTerrainSettings, shader property ids, RTSShaderReferences, RTSRuntimeEditorEvents, MapDataExtension (your own data in the map) and RTSGameplayFramework. |
Data | Asset types: RTSTileset, RTSVegetationLibrary, RTSDecorLibrary, RTSMapAsset. |
Serialization | RTSMapSerializer: the binary .rtsmap format (sections, deflate compression) and file IO, RTSMapReadOptions and RTSMapSection (kept sections of other games and tools). |
Brushes | BrushSettings, RTSBrushShape, SymmetrySettings, BrushUtility. |
Tools | RTSTool (base class), RTSToolRegistry (tools and tool categories), RTSEditSession, MapUndo, and one sub folder per category: Height, Cliffs, Paint, Vegetation, Decor, Water, Pathing, Markers. |
Mesh | Chunk geometry generation and its Burst jobs. |
Rendering | The rendering part of RTSTerrain, RTSTerrainChunk, splat textures, layer data and RTSTextureArrayBuilder. |
Vegetation | RTSVegetationRenderer, RTSTreeInstance. |
Water | RTSWaterRenderer, RTSWaterChunk, water mesh jobs. |
Decor | RTSDecorManager, RTSDecorInstance. |
FogOfWar | RTSFogOfWarManager, RTSFogOfWarRevealer, RTSFogOfWarHideable, RTSFogOfWarRendererFeature, IFogOfWarVisibilitySource and FogOfWarVisibilityBuffer. |
Pathing | The pathing part of RTSTerrain, RTSPathingSettings, PathingMapBuilder, ClearanceMap, RTSPathfinder, RTSPathfindingService, pathing overlays. |
Generation | RTSMapGenerator, MapGeneratorSettings, RTSMapGeneratorPreset, RTSAutoPaintProfile, RTSAutoPaint, HeightmapIO, and the Auto Paint tool. |
Minimap | RTSMinimapBaker. |
Environment | RTSEnvironment (applies the map's sun, ambient light and fog). |
Validation | MapValidator (checks a map for problems such as unreachable start locations). |
RuntimeEditor | The in-game editor: RTSRuntimeEditor, RTSRuntimeEditorCamera, RuntimeToolGizmos and its UI Toolkit interface. |
Input | RTSInput and RTSKey. |
UI | RTSIcons: procedural icons shared by the editor and the in-game UI. |
Plugins/WebGL | JavaScript plugins (.jslib) that only Web builds use: browser storage, downloads, imports and the leave warning (RTSWebFileSystem.jslib), keyboard layouts and browser shortcuts (RTSWebKeyboard.jslib), and the pointer leaving the page (RTSPointer.jslib). |
link.xml | Keeps the editing tools in builds with code stripping (see Code stripping and custom tools). |
Inside Editor
| Folder | Contents |
|---|---|
Core | RTSEditorContext (the shared editing session and view options), RTSEditorPaths, tool settings persistence. |
Window | The RTS Terrain Studio window (RTSTerrainStudioWindow) and its pages. |
SceneView | Scene View painting, brush and gizmo drawing, overlays, shortcuts and the bridge to Unity's undo. |
Inspectors | Inspectors for the tileset, libraries, brush shapes, auto paint profiles and components. |
Importers | The .rtsmap importer, its preview, and . |
Building | The compressed texture array bakery, the check that rebuilds outdated texture arrays before player builds, the thumbnail generator and the asset factory. |
Setup | Welcome window, New Map Wizard, project validator, the GameObject create menu, the shader references updater, and the Web template (WebGLTemplate) with its installer. |
Requirements | The notice shown when the project has no URP 17.3 (see Unity and render pipeline). Apart from the Mirror define clean-up and Defines, it is the only part of the package that compiles without URP. |
Defines | RTSTerrainStudioDefines: writes the scripting define symbols RTS_TERRAIN_STUDIO and RTS_TERRAIN_STUDIO_1_0_OR_NEWER and removes them when the package is deleted (see Define symbols). |
RuntimeEditorSupport | The menu. |
DemoContent | The procedural demo content generator (RTSDemoContent). |
Assemblies
The code is split into assembly definitions, so it compiles quickly and the optional parts can be removed. Each assembly has one namespace.
| Assembly (asmdef) | Folder | Namespace | Platforms | Compiles when |
|---|---|---|---|---|
RTSTerrainStudio.Runtime | Runtime | RTSTerrainStudio | All | URP 17.3 or newer is installed (RTS_URP). Defines RTS_INPUT_SYSTEM when the Input System package is installed. |
RTSTerrainStudio.Samples | Samples/Scripts | RTSTerrainStudio.Samples | All | URP 17.3 or newer is installed. |
RTSTerrainStudio.Editor | Editor | RTSTerrainStudio.Editor | Editor | URP 17.3 or newer is installed. |
RTSTerrainStudio.Requirements.Editor | Editor/Requirements | RTSTerrainStudio.Requirements | Editor | Only while URP 17.3 or newer is missing. It shows the notice that the package requires URP. |
RTSTerrainStudio.Defines.Editor | Editor/Defines | RTSTerrainStudio.Defines | Editor | Always. It has no references and is not referenced automatically, so it still runs while the package is being deleted and removes the define symbols of the package. |
RTSTerrainStudio.Tests.Editor | Tests/Editor | RTSTerrainStudio.Tests | Editor | UNITY_INCLUDE_TESTS is defined (Unity Test Framework). |
RTSTerrainStudio.Integrations.MirrorRTSTerrainStudio.Integrations.Mirror.Editor | Integrations/Mirror | RTSTerrainStudio.Integrations.Mirror | All / Editor | MIRROR is defined. |
RTSTerrainStudio.Integrations.Mirror.DefineCleanup.Editor | Integrations/Mirror/Editor/DefineCleanup | RTSTerrainStudio.Integrations.Mirror | Editor | Always. It has no dependency on Mirror and removes stale Mirror defines after Mirror has been deleted. |
RTSTerrainStudio.Integrations.AStarRTSTerrainStudio.Integrations.AStar.Editor | Integrations/AStarPathfinding | RTSTerrainStudio.Integrations.AStar | All / Editor | RTS_ASTAR (A* 5.4.4 to below 6.0 installed) and not RTS_ASTAR_DISABLED. |
RTSTerrainStudio.Integrations.NavMeshRTSTerrainStudio.Integrations.NavMesh.Editor | Integrations/UnityNavMesh | RTSTerrainStudio.Integrations.NavMesh | All / Editor | RTS_AI_NAVIGATION (AI Navigation 2.0 or newer installed). |
The test and integration assemblies also need URP 17.3 or newer, in addition to the condition listed. Without URP, only the Mirror define clean-up, the define symbols assembly and the requirements notice are compiled, so the package causes no compile errors.
Code of your own that should compile only while RTS Terrain Studio is in the project uses the scripting define
symbol RTS_TERRAIN_STUDIO, which the package defines itself (see Define symbols).
RTSTerrainStudio.Runtime, RTSTerrainStudio.Samples and RTSTerrainStudio.Editor are
auto-referenced. Scripts in your project's default assembly (Assembly-CSharp) can use them without
any setup. If your code has its own assembly definition, add a reference to RTSTerrainStudio.Runtime
(and RTSTerrainStudio.Samples if you use the sample gameplay classes).
The in-game editor lives in Runtime/RuntimeEditor. If your game does not need it, you can delete that
folder: the Unity Editor tools and the demo content generator still compile, and the In-Game Editor Demo scene is
then created without an editor.
What's included
The package ships as source code, shaders and this manual. Everything visual (textures, models, tilesets, maps and scenes) is generated on your machine by a script. This keeps the download small, and the content is licensed exactly like the code.
Demo content generator
runs RTSDemoContent.CreateAll.
It generates all demo assets procedurally, with fixed seeds, so every run produces the same result:
- It writes only into its own folders:
Content,Samples/Scenesand two assets inResources/RTSTerrainStudio. Your own assets are never touched. - Running it again regenerates the assets in place, so references to them stay valid. Map files whose content has not changed are not rewritten, so version control shows no changes.
- It never closes your open scenes. Demo scenes are opened additively while they are built.
- At the end it offers to add the demo scenes to the build settings. Nothing is added unless you click Add Scenes.
| Generated | Location (under the package root) | Contents |
|---|---|---|
| Textures | Content/Textures/ (Ground, Cliffs, Water, Details, Props, Brushes) | Tileable ground, cliff, water and prop textures (512 px), grass and flower sprites and brush stamps (256 px), with matching normal maps. |
| Materials, meshes, prefabs | Content/Materials, Content/Meshes, Content/Prefabs | Low-poly trees, rocks, ruins and props with materials. |
| Tilesets | Content/Tilesets/Summer.asset, Winter.asset | Two tilesets with 10 ground layers and 2 cliff types each. Summer: Grass, Lush Grass, Dirt, Rocky Dirt, Sand, Cobblestone, Dark Forest Floor, Rock, Snow and Blight, with Rock Cliff and Grassy Cliff. Winter: the frozen versions, with Ice Cliff and Snowy Cliff. |
| Auto paint profile | Content/Tilesets/Summer Auto Paint.asset | Rules for the Summer tileset, for example dirt patches on gentle slopes and sand along shores. |
| Vegetation library | Content/Libraries/Demo Vegetation.asset | Details: Grass, Tall Grass, Flowers Yellow, Flowers Purple, Fern. Trees: Pine, Broadleaf, Dead Tree, Bush. |
| Decor library | Content/Libraries/Demo Decor.asset | Rock A, Rock B, Rock C, Boulder, Ruined Pillar, Crate, Barrel, Fence, Tree Stump, Mushrooms. They mix instanced and GameObject prototypes and have pathing footprints. |
| Brush shapes | Content/Brushes | Custom stamps: Noise Blob, Splatter, Star, Soft Square. |
| Maps | Content/Maps | Three .rtsmap files (see below). |
| Render settings | Content/Settings | A post-processing volume profile used by the demo scenes. |
| Scenes | Samples/Scenes | Three demo scenes (see below). |
| Resources | Resources/RTSTerrainStudio | The shader references asset and UI/RTSRuntimePanelSettings.asset, so the shaders and UI are included in builds. |
Demo maps
All three maps use 2 m cells, a 2 m cliff level height and the Summer tileset.
| Map | Size | Symmetry | Description |
|---|---|---|---|
Two Rivers (1v1).rtsmap | 128 × 128 cells | Rotate 2 | Two players, two rivers. Shallow fords cross the rivers everywhere, and the central lake is deep. Ramps lead up to forested plateaus with ruins and abandoned camps. |
Four Kingdoms (4p).rtsmap | 192 × 192 cells | Rotate 4 | Four kingdoms, each on its own highlands. Ramps lead down into the shared lowlands, and the centre is corrupted ground with the ruins of an old temple. |
Sandbox.rtsmap | 96 × 96 cells | None | A small, mostly flat map for trying out the tools. |

Demo scenes
| Scene | Map | What it shows |
|---|---|---|
| RTS Terrain Studio - Gameplay Demo | Two Rivers (1v1) | Press Play to play: units at the start locations (the enemies wander around), fog of war, RTS camera, selection, orders, minimap, HUD, building placement (B) and tree harvesting (T). |
| RTS Terrain Studio - In-Game Editor Demo | Sandbox | The in-game editor in Play mode. Edit the map, then press F5 to play-test it with units. |
| RTS Terrain Studio - Editor Playground | Four Kingdoms (4p) | A map without gameplay, for trying the Unity Editor tools in the Scene View. |
Every demo scene contains a sun, a post-processing volume, a camera that requests the depth and opaque textures,
and a terrain with RTSTerrain, RTSVegetationRenderer, RTSWaterRenderer,
RTSDecorManager and RTSEnvironment.
Each integration has its own demo scene builder. It needs the demo content and creates its scene in the
integration's Demo folder:
- creates
RTS Mirror Demo.unity. - creates
RTS AStar Demo.unity. - creates
RTS NavMesh Demo.unity.
Sample scripts
The Samples/Scripts folder (RTSTerrainStudio.Samples) is a small, readable RTS framework
that you can learn from or build on:
| Area | Classes |
|---|---|
| Bootstrapping | RTSDemoGame, RTSUnitSpawner |
| Units and movement | RTSUnit, RTSUnitFactory, RTSUnitRegistry, RTSFormation, RTSWanderAI |
| Path providers | IRTSUnitPathProvider, RTSBuiltinPathProvider, RTSUnitPathProviderComponent, RTSUnitPathProviderRegistry |
| Camera, input, selection, orders | RTSCameraController, RTSGameInput, RTSSelectionManager, RTSCommandController |
| UI | RTSMinimapUI, RTSDemoHUD, RTSRuntimeUI |
| Gameplay demos | RTSBuildingPlacementDemo, RTSDemoBuilding, RTSTreeHarvestDemo, RTSFallingTreeEffect |
| Helpers | RTSMoveMarker, RTSGroundRing, RTSSampleMaterials, RTSSampleMeshes, RTSSampleUtility |
Icons
All icons in the editor window, the inspectors and the in-game editor are drawn procedurally by RTSIcons,
so they stay sharp at any size and work in builds without texture assets.

Quick Start
This chapter takes you from an empty Unity project to a map you have built yourself and played with units, fog of war and a minimap. You do not need any programming knowledge. Follow the numbered steps in order. Each step names the exact menu, window or button to use.
| Part | What you do | Time |
|---|---|---|
| Installation and setup | Import the package, let the project validator fix the URP settings, generate the demo content. | about 5 min |
| Demo scenes | Play a finished map, try the in-game editor, explore the editor playground. | 5 min |
| Your first map | Create a terrain, paint heights, cliffs, textures, trees and water, place start locations and save. | 10 min |
| Your first play test | Play your map with the demo game, or edit and play test it inside the running game. | 5 min |
| 10 minute tutorial | Build a fair 1v1 map with symmetry painting, from start to finish. | 10 min |
You can open this chapter at any time from the Quick Start Guide link in the Welcome window (). The full manual opens with .
Installation and setup
Requirements
| Item | Version | Notes |
|---|---|---|
| Unity | 6.3 LTS (6000.3) | Use the editor version the package was made for. |
| Universal Render Pipeline | 17.3 | Required. All terrain, water, vegetation and fog of war shaders are URP shaders. Start from the Universal 3D project template if you create a new project. Without URP the package stays inactive and shows a notice (see Requirements). |
| Burst, Collections, Mathematics | from the Unity Registry | Required. The heavy work (mesh building, brushes, pathing, fog of war, pathfinding) runs in Burst jobs. |
| Input System | from the Unity Registry | Recommended. Used by the in-game editor, the RTS camera and the samples. The legacy Input Manager works as a fallback. |
| Mirror, A* Pathfinding Project, AI Navigation | optional | Only needed for the matching integration. The integrations compile automatically when the package is installed. See Integrations. |
Import the package
- Open your project in Unity 6.3. Make sure it uses URP (new projects from the Universal 3D template already do).
- Open , select My Assets, find RTS Terrain Studio, click Download and then Import.
- In the import dialog keep everything ticked and click Import. The package goes into
Assets/RTSTerrainStudio. - Wait until Unity has finished compiling. The Welcome window opens by itself (see below).
You can move the RTSTerrainStudio folder anywhere inside Assets. The package finds its own files wherever the folder is, so nothing breaks when you reorganise your project.
If the Console shows compile errors right after the import, the most likely cause is a missing Burst, Collections or Mathematics package. Install them with . The errors disappear once they are installed.
If the dialog RTS Terrain Studio requires URP appears instead of the Welcome window, the project has no URP 17.3. The package then stays inactive and changes nothing. Follow the steps in the dialog, or read Unity and render pipeline.
The Welcome window
The Welcome window opens automatically the first time the package is loaded in a project. You can open it again at any time with . Tick Show at startup at the bottom if you want it every time Unity starts. This setting is stored per user and per project, so it never ends up in version control.
The left column is a quick start list with one button per step:
| Step | Button | What it does |
|---|---|---|
| 1. Validate & fix the project | Validate | Opens the Project Validator. Below the step a status line shows "Project is ready" or the number of errors and warnings found. |
| 2. Create the demo content | Create | Runs . |
| 3. Open a demo scene | scene list + Open | Lists the demo scenes once they exist and opens the one you pick (it asks to save your open scenes first). |
| 4. Create your own map | New Map | Opens the New Map Wizard. |
| 5. Start editing | Editor Window | Opens the RTS Terrain Studio window. |
The right column has Learn links into this manual (Documentation, Quick Start Guide, Scripting API, Integrations, Troubleshooting) and an Integrations list that shows whether Mirror, the A* Pathfinding Project and Unity AI Navigation are installed in the project.
Validate the project
The Project Validator checks everything the package needs and fixes most problems with one click. Run it once after the import, and again whenever something looks wrong (pink materials, flat water, units visible through the fog).
- Open , or click Validate in the Welcome window.
- Read the summary at the top. Every check is a card with a status badge (OK, Info, Warning or Error). Open Details on a card to see exactly what was found.
- Click Fix All. A dialog lists every change before anything is modified. Click Apply Fixes.
- Click Run Again and check that no errors or warnings are left. Info cards are fine: they only tell you something.
Fix All works in several passes. If URP was not active yet, the first pass switches the project to URP and the camera texture and fog of war fixes, which need URP, are applied in the same click. Each card also has its own fix button if you prefer to fix things one by one.
| Check | Problem level | Fix button | What the fix does and why it matters |
|---|---|---|---|
| Rendering | |||
| Universal Render Pipeline is active | Error | Use URP | Assigns a URP asset of the project (or creates one) as default render pipeline and to every quality level that uses another pipeline. Without URP the terrain, water and vegetation render pink or not at all. |
| Depth and Opaque Texture enabled | Warning | Enable Both | Turns on Depth Texture and Opaque Texture on every URP asset used by a quality level. Water uses the depth texture so that its depth colour, foam and shoreline follow objects standing in the water, and the opaque texture for refraction. Without them water looks simpler. Cameras can still override these settings in their Rendering section. |
| Fog of War renderer feature | Warning | Add Feature | Adds the RTS Fog Of War renderer feature to the default renderer of every URP asset the project uses, and assigns its shader. Without it only the package's own shaders show the fog; units and props with other materials stay visible. |
| Fog kept in player builds | Warning | Keep Fog Modes | Shown when an RTSEnvironment in a build scene or an open scene applies fog. Sets to Custom and keeps the fog modes in use. Unity otherwise strips the fog shader variants, and maps with fog show no fog in builds. See Fog in player builds. |
| Project | |||
| Linear color space | Warning | Switch to Linear | Sets to Linear. In Gamma space colours, lighting and water look washed out. Switching re-imports all textures. |
| Burst, Collections and Mathematics | Error | Install | Adds the missing packages through the Package Manager. The package scripts do not compile without them. |
| Input handling | Info | none | Reports whether the Input System package is installed and which input handling is active. The legacy Input Manager also works. |
| WebGL (only while Web is the active build platform) | |||
| Web quality levels have Depth and Opaque Texture | Warning | Enable Both | Turns on Depth Texture and Opaque Texture on the URP assets of the quality levels that Web builds use. The editor often renders with a desktop quality level, so without this check the simpler water would only show in the browser. |
| MSAA is off for Web builds | Error | Turn MSAA Off | Turns MSAA off in the URP assets of Web quality levels that also use the Depth or Opaque Texture. URP cannot render this combination on WebGL 2, so the game would stay black in the browser. |
| Web template fills the browser window | Warning | Install Template | Installs the package's Web template and selects it. Unity's Default and Minimal templates show the game in a small fixed box, where the in-game editor, HUD and minimap are hard to read. See The full-window template. |
| Content | |||
| Package shaders compile | Error | Reimport | Re-imports package shaders that have compile errors (this helps when they were imported before URP finished loading). When shaders are missing entirely, re-import the package from the Asset Store. |
| Shaders included in builds | Error | Update | Creates or updates RTSShaderReferences.asset and the DecorPlaceholder material in the package's Resources folder. Shaders that are only created from code are stripped from player builds unless something references them, and the terrain would be pink in your build. This asset is also refreshed automatically after script reloads, when shaders change and before every player build. |
| Tileset texture arrays built | Info | Build Arrays | Builds the compressed texture arrays of tilesets that have none or outdated ones. Tilesets work without them, but then the editor builds uncompressed arrays when the map loads, which costs memory and loading time. Player builds rebuild outdated arrays automatically; tilesets that were never built use uncompressed arrays in players as well. |
| GPU instancing on instanced prototypes | Warning | Enable Instancing | Ticks Enable GPU Instancing on materials used by instanced trees, details or decor. |
| Scene (open scenes only) | |||
| Terrains have a tileset | Warning | Assign '<tileset>' | Assigns a tileset to every terrain without one (undoable). Without a tileset a terrain shows a neutral placeholder look. |
| Terrains save to a map file | Info | Create Map Files | Saves the map of each terrain that has no .rtsmap asset to a new file next to its scene and assigns it. Without a map file, edits are lost when the scene is closed. |
The scene fixes are not offered in Play Mode. Exit Play Mode first.
Create the demo content
The package ships without large binary art. Instead it generates a complete set of demo assets in your project, so everything works out of the box and you can start painting right away.
- Choose , or click Create in the Welcome window.
- A progress bar runs through the steps: Textures, Materials, Meshes and prefabs, Tilesets, libraries and brushes, Shader references and UI settings, Demo maps, Demo scenes. This can take a little while on the first run.
- At the end a dialog asks whether the demo scenes should be added to the build settings. Click Not Now unless you want to build a player with the demos (you can add them later in ). Only Add Scenes changes the build settings.
- The gameplay demo scene is selected in the Project window. Your open scenes stay open; nothing is replaced.
What is generated:
| Folder (inside the package folder) | Content |
|---|---|
Content/Textures | Ground, cliff, water, detail, prop and brush textures. |
Content/Materials, Content/Meshes, Content/Prefabs | Low-poly trees, bushes, rocks, props and their materials. |
Content/Tilesets | Summer and Winter tilesets, and the Summer Auto Paint profile. Summer has the ground layers Grass, Lush Grass, Dirt, Rocky Dirt, Sand, Cobblestone, Dark Forest Floor, Rock, Snow and Blight, and the cliff types Rock Cliff and Grassy Cliff. |
Content/Libraries | Demo Vegetation (grass, tall grass, flowers, fern; Pine, Broadleaf, Dead Tree and Bush trees) and Demo Decor (rocks, boulders, stumps and other props). |
Content/Brushes | Brush shape stamps. |
Content/Maps | Three maps: Two Rivers (1v1).rtsmap (128 × 128, point symmetric), Four Kingdoms (4p).rtsmap (192 × 192, four-fold rotational symmetry) and Sandbox.rtsmap (96 × 96, mostly flat with one plateau and a pond). |
Samples/Scenes | The three demo scenes described below. |
Resources/RTSTerrainStudio | Shader references and the runtime UI panel settings. |
Running the generator again asks Regenerate / Cancel. Only the generated demo assets and the demo scenes are overwritten; your own assets are never touched. Files whose content did not change are not rewritten.
The generator also adds the fog of war renderer feature to your URP renderer if it is missing. It does not change the depth and opaque texture settings of your URP asset: the demo cameras request those textures themselves. For water in your own scenes, run Validate Project as described above.
Open the demo scenes
The demo scenes are in RTSTerrainStudio/Samples/Scenes. Open one by double-clicking it in the Project window, or pick it in step 3 of the Welcome window and click Open.
| Scene | Map | What is in it | Try this |
|---|---|---|---|
| RTS Terrain Studio - Gameplay Demo | Two Rivers (1v1) | RTS camera, fog of war, and an RTS Demo Game object that starts the game automatically. | Press Play. Your units (player 1) spawn at your start location; the enemy units wander around and appear and vanish in the fog of war. |
| RTS Terrain Studio - In-Game Editor Demo | Sandbox | The in-game map editor (RTS In-Game Editor object), plus the same gameplay systems, which stay off until you play test. | Press Play, paint with the in-game editor, then press Play Test (F5). Press Esc to return to the editor. |
| RTS Terrain Studio - Editor Playground | Four Kingdoms (4p) | Only the terrain, light and camera, without gameplay. | Stay in Edit Mode, open and try the tools on a finished map. |
Controls in the gameplay demo
| Input | Action |
|---|---|
| W A S D / arrow keys, screen edge, middle mouse drag | Pan the camera. With units selected, S stops them instead of panning; the arrow keys always pan. |
| Mouse wheel | Zoom |
| Q / E, Alt + right drag | Rotate the view |
| Left click / left drag | Select a unit / draw a selection box |
| Shift + click | Add or remove units |
| Double click, Ctrl + click | Select all units of that type on screen |
| Right click | Move in formation (Shift queues the order) |
| S / H / P | Stop / hold position / patrol |
| Ctrl + 0…9, Shift + 0…9, 0…9 | Store a control group / add the selection to it / recall it (press twice to centre the camera) |
| Minimap | Left click moves the camera, right click moves the selected units |
| B, Delete | Place a building / remove the building under the cursor |
| T, right click on a tree | Cut down the tree under the cursor / let the selected workers chop it |
| Esc | Cancel the current mode, or clear the selection |
| F1 | Show or hide the help panel |
Your first map
A map lives on an RTS Terrain GameObject in your scene and is stored in a .rtsmap file in your project. The scene only references the file; your edits are saved into the file. Start with a new scene so you can experiment freely:
- Choose and pick a URP scene template (for example Basic (URP)).
- Save the scene right away with Ctrl+S, for example as
Assets/MyMaps/FirstMap.unity. New map files are created next to the saved scene, so this keeps your map and scene together.
Create a terrain
There are two ways. Both create the same RTS Terrain object, with the RTSTerrain, RTSVegetationRenderer, RTSWaterRenderer and RTSDecorManager components already set up.
| Way | Menu | Use it when |
|---|---|---|
| One click | You want to start painting immediately. You get a flat 128 × 128 cell map (2 m cells, cliff level 2) with the project's default tileset and libraries, placed at the Scene View pivot and selected. A new map file named <Scene name> Map.rtsmap is written next to the scene (or Assets/Maps/New Map.rtsmap when the scene is not saved). | |
| Guided | You want to choose the name, size, tileset and base texture, or generate a random playable map. |
If the project has no tileset yet, the one-click menu offers Create Demo Content first. With Continue Without the terrain uses a neutral checker look until you assign a tileset.
The New Map Wizard has five steps. Use Next and Back, or click a step in the bar at the top:
| Step | Settings |
|---|---|
| 1. Basics | Map Name (also the file name), Author (remembered for the next map), Description, Players (1–16; competitive maps are usually made for 2, 4 or 8 players). |
| 2. Size | Size cards: Tiny 64 (quick 1v1 duels and tests), Small 96 (1v1 and 2v2), Medium 128 (2 to 4 players), Large 192 (4 to 6 players), Huge 256 (6 to 8 players), Epic 384 (8+ players, campaigns), Epic XL 512 (very large worlds), or Custom (multiples of 16). Also Cell Size (m) (keep 2 m if unsure), Cliff Level Height (m), Base Cliff Level (default 2, so you can dig down for lakes, as in classic RTS maps) and an Advanced foldout with the texture, detail and pathing resolutions. Above these fields the step shows the estimated memory of the map. Very large maps get a warning, and a map that the active build target cannot run gets an error and cannot be created (see Memory limits and warnings). |
| 3. Look | Tileset (click a ground texture to make it the BASE layer that covers the map at the start), Vegetation Library, Decor Library. Without a tileset a Create Demo Content button is shown. |
| 4. Terrain | Flat (an empty, flat map on the base cliff level, perfect to learn the tools) or Generate (plateaus, ramps, water, start locations, vegetation and decor from a Preset and a Seed, with Symmetry, Start Locations, Scatter Vegetation, Scatter Decor and a Preview button). |
| 5. Create | New terrain object or Replace map of selected terrain, the Map File path (Browse...), Add Environment (sun, ambient light and fog from the map; creates a Sun light if the scene has none), Open Editor Window, and a summary that includes the estimated memory. Click Create Map. |
The wizard writes the map file, creates the terrain, frames it in the Scene View and opens the editor window. Every setting can be changed later in the editor window's Map tab.
Open the editor window
Open (the wizard and the Welcome window can open it for you, and the RTS Terrain inspector has an Open RTS Terrain Studio button). Dock it next to the Inspector so you can see the Scene View at the same time.
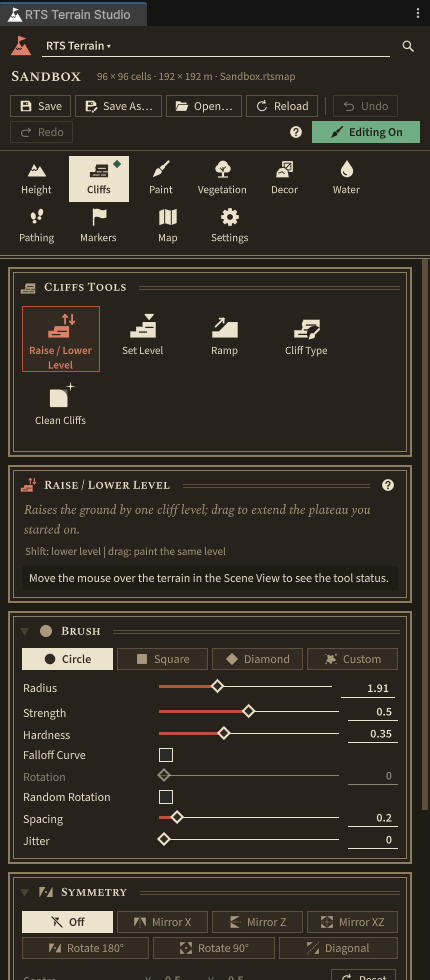
| Area | What it shows |
|---|---|
| Header | Terrain picker, map name (a dot means unsaved changes), Save, Save As…, Open…, Reload, Undo / Redo with the step name, a help button, and the Editing On / Editing Off toggle. |
| Tab bar | Eight tool categories (Height, Cliffs, Paint, Vegetation, Decor, Water, Pathing, Markers), then Map and Settings. A dot marks the category of the active tool. |
| Tools page | Large tool buttons, a card describing the active tool with its live status, the Brush and Symmetry cards, the tool's own settings and palettes (layers, cliff levels, players, trees, decor). |
| Status bar | Cursor cell, cliff level, height and pathing under the mouse, and undo memory. |
The eight categories and their tools:
| Key | Category | Tools |
|---|---|---|
| 1 | Height | Raise / Lower, Smooth, Flatten, Set Height, Noise, Terrace, Erode |
| 2 | Cliffs | Raise / Lower Level, Set Level, Ramp, Cliff Type, Clean Cliffs |
| 3 | Paint | Paint Layer, Tile Paint, Fill / Replace, Smooth Paint, Auto Paint |
| 4 | Vegetation | Paint Details, Erase Details, Place Trees, Erase Trees |
| 5 | Decor | Place Decor, Erase Decor, Select Decor |
| 6 | Water | Paint Water, Erase Water, Flood Fill |
| 7 | Pathing | Paint Pathing, Clear Pathing |
| 8 | Markers | Start Locations, Regions, Markers |
Every tool is described in detail in its own chapter (for example Height tools and Cliff tools); the window itself is described in Editor window.
Painting basics
- Click a tool button in the editor window. This turns editing on (the header shows Editing On). Clicking the active tool again turns editing off.
- Move the mouse over the terrain in the Scene View. The brush circle is drawn directly on the ground, exactly where you will paint.
- Hold the left mouse button and drag to paint.
| Input (Scene View) | Action |
|---|---|
| Left mouse | Paint a stroke (or click, for click tools such as Start Locations) |
| Shift + left mouse | Inverse action: lower, erase, remove |
| Ctrl + click | Pick a value under the cursor (height, ground layer, water height …) for tools that support it |
| [ / ] | Brush smaller / larger |
| - / = | Strength down / up |
| 1 … 8 | Switch to a tool category (press again to cycle through its tools) |
| G / P | Toggle the grid / cycle the pathing overlay (Off, Walkability, Buildability, Combined) |
| R | Toggle random brush rotation |
| Ctrl+Z / Ctrl+Y | Undo / redo terrain edits (the Edit menu shows the step names) |
| Esc | Cancel the running stroke, or stop editing |
The Scene View also shows an RTS Terrain Studio overlay with the editing toggle, category and tool buttons, Size and Strength sliders and the Symmetry setting, and a status line at the bottom with the hovered cell, cliff level and height. You can stay in the Scene View for most of your work.
Camera navigation in the Scene View works as usual (right mouse drag to fly, Alt + left drag to orbit, middle drag to pan). If Unity's Hand tool (Q) is active, left drag pans instead of painting; press W to paint again. All RTS Terrain Studio shortcuts can be rebound in (on macOS ) under the category RTS Terrain Studio (useful if 2 clashes with Unity's 2D mode toggle in your layout).
Paint heights
- Open the Height tab (1) and click Raise / Lower.
- Drag over the terrain to build hills. Hold the button to keep building up. Hold Shift to lower.
- Switch to Smooth and drag over sharp spots to soften them.
- Try Noise for rough ground and Flatten (Ctrl+click to pick the height) for building areas.
Heights are fine detail on top of the cliff levels: a hill on a plateau stays on that plateau.
Paint cliffs and ramps
Cliffs are the heart of a classic RTS map. The map is made of cliff levels 0 to 15 and starts on the base level (2 by default). Each level is one crisp vertical cliff step.
- Open the Cliffs tab (2) and click Raise / Lower Level.
- Click on the terrain: the ground rises by one cliff level. Keep the button down and drag to extend the plateau you started on, at the same level.
- Click inside the plateau and drag again to stack a second level on top.
- Hold Shift to lower by one level. Lowering below the base level digs basins for lakes and rivers.
- Click Ramp and paint across a one-level cliff edge to turn it into a walkable slope. All four corners of a cell must be ramp, so paint generously across the edge. Shift removes a ramp.
- Use Clean Cliffs over messy edges to remove single-vertex pillars and pits. Cliff Type paints another cliff material (for example Grassy Cliff instead of Rock Cliff).
Paint textures
- Open the Paint tab (3) and click Paint Layer.
- Click a ground layer in the layer palette, for example Dirt.
- Drag over the terrain to paint paths and clearings. Shift erases the layer; Ctrl+click picks the layer under the cursor.
- For classic RTS-style hard tiles, use Tile Paint. For large areas, use Fill / Replace.
- For a quick natural look, use the Auto Paint Whole Map card on the Paint tab with Profile set to Summer Auto Paint: it paints dirt near cliffs, sand at shores, rock on steep slopes and so on.
Place trees and grass
- Open the Vegetation tab (4) and click Place Trees.
- In Trees, pick one or more tree types, for example Pine and Broadleaf. Several types are mixed at random.
- Leave Mode on Scatter and drag along the map edges to plant forests. Density controls how many trees one dab adds. Trees are not placed on slopes steeper than Max Slope or under water (Avoid Water).
- Set Mode to Single to place one tree per click. Shift removes trees.
- Click Paint Details, pick Grass or Flowers Yellow in Details, and paint meadows. Target Density sets how dense the brush paints.
The vegetation tools need a vegetation library on the terrain. Terrains created after Create Demo Content get Demo Vegetation automatically. Decor works the same way with Place Decor on the Decor tab (5) and the Demo Decor library.
Add water
Water fills ground that lies below a target surface height. The easiest way is to dig a basin with the cliff tools and fill it.
- On the Cliffs tab, use Raise / Lower Level with Shift to dig a lake or river one level below the base level (level 1 on a default map).
- Open the Water tab (6) and click Flood Fill.
- Keep the default Water Height mode (cliff level plus offset) with Level 1. The default offset puts the water surface just below the base level, so the basin fills and the land around it stays dry.
- Click inside the basin. It fills in one click. Shift+click drains connected water.
- Use Paint Water to paint water by hand, and Erase Water to remove it.
Shallow and deep water are derived from the depth automatically and affect pathing: ground units can walk through shallow water (nothing can be built there, because building needs dry ground), while deep water blocks them.
If the water has no refraction and its shore ignores objects standing in the water, the URP Depth and Opaque Textures are off. Run and apply Enable Both.
Place start locations
Start locations are the spawn points of the players. The demo game spawns each player's units there.
- Open the Markers tab (8) and click Start Locations.
- In the player palette, pick P1 (player 1, red).
- Click on the terrain where player 1 should start. Each player has one start location, so clicking again moves it. Use Yaw to set the facing direction.
- Pick the next player and click again. Shift+click removes the nearest start location.
With symmetry turned on, one click places all players at once: the symmetric copies are assigned to the following players (P1, P2, …) as long as Symmetry Assigns Next Players is ticked. See the 10 minute tutorial.
Place start locations on flat, dry ground away from cliff edges. Validate Map on the Map tab (card Validation) reports missing start locations, start locations on cliff edges or in deep water, and more.
Save the map
Your edits live in memory until you save them into the .rtsmap file:
- Click Save in the editor window header. It is highlighted while there are unsaved changes, and a dot appears next to the map name.
- Save As… writes a new
.rtsmapfile anywhere inAssetsand assigns it to the terrain. - Saving the scene (Ctrl+S) also saves the maps of its terrains. You can turn this off in the Scene View overlay's options menu (Save Maps When Saving the Scene).
- The RTS Terrain inspector and the Scene View overlay menu also have Save and Save As entries.
When you enter Play Mode, close a scene or quit Unity with unsaved map changes, a dialog asks whether to save them. Select a .rtsmap file in the Project window to see its minimap preview and an Open In Scene button.
A terrain without a map file only keeps its map in memory. If you see the dialog "The map of '…' is not saved as a map asset yet", choose Save As… to create the file.
Your first play test
There are two ways to play your map: with the Demo Game in Play Mode, or inside the running game with the in-game editor and its Play Test button.
Play with the Demo Game
- Open the scene with your terrain. Make sure it has at least one start location (otherwise the units spawn in two opposite corners).
- Choose . An RTS Demo Game object is created and selected.
- Press Play. Save the map when asked.
- The demo game sets up everything it needs: fog of war, RTS camera, selection, move orders, minimap, HUD, building placement and tree harvesting. Your units (player 1) spawn at your start location; other players' units wander around.
- Press F1 for the help panel. The controls are listed in Controls in the gameplay demo.
- Exit Play Mode. Trees cut down during the game are restored, so the map stays as you made it.
The RTS Demo Game component has options such as Local Team, Units Per Player, Unit Prefabs (empty uses placeholder units), Fog Of War, Minimap and Hud. The camera used is the scene's main camera.
If units stay visible inside the fog of war, the RTS Fog Of War renderer feature is missing. Run Validate Project and apply Add Feature.
Edit and play test in game
The in-game editor is the same set of tools inside your running game, with its own UI. Players and modders can build and play maps in a shipped game with it.
- Open the scene with your terrain and a camera. If it has no RTS Demo Game yet, add one as described above.
- Choose .
- Press Play. The editor opens with a top bar (File, Map, undo and redo, Symmetry, Grid, Pathing, Markers, Play Test), a category and tool bar on the left, the tool panel on the right and a status bar. The demo game waits until you play test.
- Paint as in the Unity editor: left mouse, Shift to invert, Ctrl+click to pick, [ ] and - = for the brush, 1…8 for the categories. Move the camera with W A S D, right or middle drag, Q/E and the mouse wheel.
- Click Play Test or press F5. Units spawn, the fog of war and the RTS camera switch on.
- Press Esc to return to the editor. The map is restored to its state before the play test.
Useful keys in the in-game editor: F1 help, F2 show or hide the whole editor, H hide the panels, G grid, P pathing overlay, M markers, F focus the point under the cursor, Ctrl+Z / Ctrl+Y undo and redo.
In the in-game editor, (Ctrl+S) and (Ctrl+Shift+S) write map files into the game's maps folder (by default a Maps folder in Application.persistentDataPath), the same way a shipped game does. When you exit Play Mode in the Unity editor after editing, a dialog asks "Save map changes made in Play Mode?": Save writes them into the terrain's .rtsmap asset, Discard throws them away.
The in-game editor is covered in full in In-game editor.
For programmers: react to a play test
Your own gameplay code can listen to the same event the demo game uses. This example logs where every player starts when a play test begins:
using RTSTerrainStudio;
using UnityEngine;

// Add this component to any GameObject in a scene with an RTS Terrain and an in-game editor.
public class PlaytestStartLogger : MonoBehaviour
{
    void OnEnable()
    {
        // Raised by the in-game editor when a play test starts (true) or stops (false).
        RTSRuntimeEditorEvents.PlaytestChanged += OnPlaytestChanged;
    }

    void OnDisable()
    {
        RTSRuntimeEditorEvents.PlaytestChanged -= OnPlaytestChanged;
    }

    void OnPlaytestChanged(bool playing)
    {
        if (!playing) return;

        // The first enabled terrain of the scene.
        RTSTerrain terrain = RTSTerrain.Main;
        if (terrain == null || terrain.Map == null) return;

        foreach (StartLocation start in terrain.Map.StartLocations)
        {
            // Start locations are stored in map-local coordinates: convert to world space
            // and move the point onto the ground.
            var local = new Vector3(start.position.x, start.position.y, start.position.z);
            Vector3 world = terrain.SnapToGround(terrain.LocalToWorld(local));
            Debug.Log($"Player {start.player + 1} starts at {world}, facing {start.yaw:0} degrees");
        }
    }
}
See Scripting for terrain queries, loading maps and the tool API.
10 minute tutorial: your first 1v1 map
In this tutorial you build a small, fair map for two players: each player gets a base on a plateau with a ramp, a river separates the two halves, and forests frame the map. Symmetry painting makes sure both sides are identical, so you only build one half.
Before you start: the project is validated and the demo content exists (see Installation and setup).
1. Create the map (1 minute)
- Choose , pick a URP template and save the scene as
Assets/MyMaps/Duel.unity. - Open .
- Basics: Map Name
Duel, your name as Author, Players 2. Click Next. - Size: click Small (96 × 96, 1v1 and 2v2). Keep Cell Size 2 m and Base Cliff Level 2. Click Next.
- Look: Tileset Summer, click Grass as the base layer, Vegetation Library Demo Vegetation, Decor Library Demo Decor. Click Next.
- Terrain: choose Flat. Click Next.
- Create: keep New terrain object, tick Add Environment and Open Editor Window, then click Create Map.
2. Turn on symmetry (10 seconds)
- In the editor window, open the Cliffs tab. Find the Symmetry card below the Brush card.
- Choose Rotate 180°. Keep the centre at the map centre (0.5, 0.5).
- Move the mouse over the terrain: you now see a second brush on the opposite side of the map, and the symmetry guides are drawn in the Scene View.
Symmetry is shared by every tool, so it stays on while you switch tools. The modes:
| Mode (window) | Copies | Typical use |
|---|---|---|
| Off | 1 | Campaign or story maps |
| Mirror X | 2 | Mirror left and right |
| Mirror Z | 2 | Mirror top and bottom |
| Mirror XZ | 4 | Mirror on both axes (4 players) |
| Rotate 180° | 2 | Point symmetry, the classic 1v1 layout (corner against corner) |
| Rotate 90° | 4 | Four-fold rotation for 4 players; needs a square map |
| Diagonal | 2 | Mirror across the diagonal; needs a square map |
The Scene View overlay and the in-game editor offer the same modes (the overlay shows the enum names, for example Rotate 2 for Rotate 180°).
3. Build the bases (2 minutes)
- Click Raise / Lower Level. With [ and ], set a large brush.
- In the bottom-left quarter of the map, click and drag to paint a plateau about a quarter of the map wide. The same plateau appears in the top-right quarter.
- Click Ramp and paint across the plateau edge that faces the map centre. Make the ramp at least two or three cells wide so groups of units can pass.
- Click Clean Cliffs and paint once over the plateau outline to remove stray single-vertex bumps.
4. Dig the river (2 minutes)
- Still on Raise / Lower Level, hold Shift and drag a river from the top-left corner towards the map centre. The copy continues it from the bottom-right corner, so the river crosses the whole map.
- Leave one or two land bridges near the centre so the players can reach each other.
- Open the Water tab, click Flood Fill, keep Level 1 and click into the river bed. Click again in any part that is not filled yet.
5. Paint the ground (2 minutes)
- Open the Paint tab. In the Auto Paint Whole Map card set Profile to Summer Auto Paint (left empty, built-in rules matched to the tileset layer names are used) and click Auto Paint Whole Map. Confirm the dialog; the whole repaint is one undo step. Dirt appears near cliffs, sand at the river shores and rock on steep slopes.
- Click Paint Layer, choose Cobblestone and paint a square on each plateau where the main building will stand (one dab is enough, the copy paints the other base).
- Choose Dirt and paint a path from the base ramp to the land bridge.
- Optional: on the Height tab, use Raise / Lower with low strength (-) to add a few gentle hills between the bases, and Smooth to soften them.
6. Forests, grass and rocks (2 minutes)
- Open the Vegetation tab and click Place Trees. Pick Pine and Broadleaf, keep Scatter.
- Paint forests along the map border and behind each base. Keep the ramps, paths and land bridges free; Shift removes trees.
- Click Paint Details, pick Grass and Flowers Yellow, and paint some meadows.
- Open the Decor tab, click Place Decor, pick a few rocks and click near the river shores.
7. Place the start locations (30 seconds)
- Open the Markers tab and click Start Locations.
- Pick player P1 and make sure Symmetry Assigns Next Players is ticked.
- Click once in the middle of the bottom-left base. P1 is placed there and P2 appears on the opposite base, both facing the centre if you set a Yaw that points towards it.
8. Validate, save and play (1 minute)
- Open the Map tab and click Validate Map in the Validation card. Fix any errors it reports (for example a start location on a cliff edge).
- Click Save in the window header. The map is written to
Assets/MyMaps/Duel.rtsmap. - Choose and press Play.
- Select your units, right click to send them across the land bridge and watch the enemy appear out of the fog of war.
Want four players? Create a square map (for example Medium 128 × 128), choose Rotate 90° and set Players to 4. One click with the Start Locations tool then places P1 to P4. Or let the generator do it: in the wizard's Terrain step choose Generate, set Symmetry and Start Locations, click Preview and then refine the result by hand.
Where to go next
- Editor window: every tab, card and setting in detail, including the Map tab (resize, generator, heightmap import and export, minimap, environment).
- The tool chapters, one per category: Height, Cliffs, Paint, Vegetation, Decor, Water, Pathing, Markers.
- In-game editor: ship the editor with your game and let players build maps.
- Scripting: query heights, cliff levels and pathing from code, load maps at runtime, react to edits.
- Building a game on RTS Terrain Studio: store your game's data in maps, add your own editor tabs and run your own match in the play test.
- Integrations: multiplayer with Mirror, pathfinding with the A* Pathfinding Project or Unity NavMesh.
- Troubleshooting: pink materials, flat water, painting offsets and other common problems.
Project Setup
RTS Terrain Studio needs a few project settings: the Universal Render Pipeline with two camera textures, the fog of war renderer feature, Linear color space and three Unity packages. The window checks all of them and fixes most with one click, so most people never need the manual steps in this chapter. Read on if a check stays red, if you want to know what a fix changes, or if you set up a project by hand.
The help button on every card of the Project Validator opens the matching section of this chapter.
The Project Validator
Open , or click Validate in the Welcome window. The checks run as soon as the window opens. They are grouped into five categories:
| Category | What is checked |
|---|---|
| Rendering | URP is active, Depth and Opaque Texture are enabled, the fog of war renderer feature is installed, player builds keep the fog modes that RTS Environment uses. |
| Project | Linear color space; Burst, Collections and Mathematics are installed; which input handling is active. |
| WebGL | Only while Web is the active build platform: the quality levels of Web builds have Depth and Opaque Texture, and the Web template fills the browser window (see Web checks). |
| Content | The package shaders compile and are included in builds, tileset texture arrays are built, instanced prototypes have GPU instancing enabled. |
| Scene | Every RTS Terrain in the open scenes has a tileset and a map file. |
Every result has one of four statuses:
| Status | Meaning |
|---|---|
| OK | Everything is set up correctly. |
| Info | A hint or recommendation. Nothing is broken. |
| Warning | A feature works in a reduced way, for example water without refraction. Fixing it is recommended. |
| Error | A required setting is missing. Parts of the package will not work. |
Fix All applies every available fix. A dialog first lists all changes, and nothing is modified until you click Apply Fixes. Fixes that need URP (the camera textures and the fog of war feature) run automatically after the pipeline has been assigned, so one click sets up a fresh project. Run Again repeats the checks. The full list of checks, with their fix buttons, is in Validate the project.
The Project Validator checks your project. To check a single map (start locations, reachability, missing prototypes, performance limits), use the map validator on the Map tab; see Map Validation.
Running the checks from code
RTSProjectValidator.RunChecks() returns the results without changing anything, and
RTSProjectValidator.FixAll() applies the fixes. You can use them in a build script or a continuous
integration job. The example must be placed in an Editor folder.
using UnityEditor;
using UnityEngine;
using RTSTerrainStudio.Editor;

// Command line: Unity -batchmode -projectPath <path> -executeMethod ProjectSetupCheck.Run -quit
public static class ProjectSetupCheck
{
    public static void Run()
    {
        // Runs every check. Nothing is modified.
        var results = RTSProjectValidator.RunChecks();

        // Applies every available fix without dialogs, then checks again.
        int applied = RTSProjectValidator.FixAll(results, interactive: false);
        if (applied > 0) results = RTSProjectValidator.RunChecks();

        // Logs warnings and errors ("[Status] Title: Message").
        foreach (var result in results)
            if (result.IsProblem) Debug.LogWarning(result.ToString());

        // Fails the job when a required setting is still missing.
        if (RTSProjectValidator.WorstStatus(results) == RTSValidationStatus.Error)
            EditorApplication.Exit(1);
    }
}
The Install fix for missing packages only starts a Package Manager request, and the package scripts cannot compile until it has finished. Install Burst, Collections and Mathematics before you run the package in batch mode.
Universal Render Pipeline
All shaders of the package are written for URP. Without it, the terrain, water and vegetation render pink or not
at all. The Use URP fix takes a URP asset of the project (or creates
Assets/Settings/RTS URP.asset with a renderer), assigns it as the default render pipeline and to every
quality level that uses another pipeline. To do the same by hand:
- If the project has no URP asset yet, create one in the Project window with .
- Assign it in as Default Render Pipeline.
- Open . For every quality level that has a Render Pipeline Asset override, check that it is a URP asset as well.
Depth Texture and Opaque Texture
Water uses the camera depth texture so that its depth colour, foam and soft shore follow objects standing in the water, and the opaque texture for refraction. Without them water looks simpler. Select every URP asset your quality levels use and tick Depth Texture and Opaque Texture in its Rendering section, or click Enable Both in the validator.
A camera can override both settings in the Rendering section of its own inspector, and the water follows the setting of each camera that renders it. If the water in the Game view is still simpler than expected, check that your game camera does not turn them off. The Scene view always uses the URP asset. See also URP requirements of the water.
The fog of war renderer feature
The RTS Fog Of War renderer feature (RTSFogOfWarRendererFeature) draws the fog over
everything on screen, including units and props with your own materials. Without it only the package's own shaders
show the fog. Add Feature adds it to the default renderer of every URP asset in use. To add it by
hand, select the Universal Renderer Data asset, click Add Renderer Feature and choose
RTS Fog Of War. The details are in Rendering: renderer feature and shader
fallback.
Color space
The package is designed for Linear color space, the URP default. In Gamma space colours, lighting and water look washed out compared to the screenshots. Set to Linear, or click Switch to Linear in the validator.
Switching the color space re-imports all textures. In a large project this can take a while.
Required packages
The runtime assembly uses Burst (com.unity.burst), Collections
(com.unity.collections) and Mathematics (com.unity.mathematics) for its
jobs and data model. The package scripts do not compile while one of them is missing. Install them from
, or click Install in the
validator, which adds all missing packages with one Package Manager request. The tested versions are listed in
Required packages.
If the import shows compile errors and the menu is missing, the validator cannot run either, because it is part of the package. Install the three packages by hand, then open the validator.
Input handling
All runtime input (the in-game editor, the sample camera and units) goes through the static class
RTSInput. When the Input System package (com.unity.inputsystem) is
installed, the runtime assembly is compiled with the define RTS_INPUT_SYSTEM and uses it. Otherwise,
or when the project only uses the old Input Manager, RTSInput falls back to the old
UnityEngine.Input API.
| Active Input Handling | Input System installed | Result |
|---|---|---|
| Input System Package (new) | yes | OK. The Input System is used. |
| Both | yes | OK. The Input System is used. |
| Input Manager (old) | yes | Info. The fallback is used. |
| any | no | Info. The fallback is used. It works, but is not recommended for new projects. |
The setting is in . Unity asks to restart the editor when you change it. The Input handling check never changes the setting for you, because it depends on your game. See also Input handling in the requirements.
Shaders and content
- Package shaders compile. If a package shader has compile errors (affected objects render pink), Reimport re-imports it. This helps when the shaders were imported before URP finished loading. If required shaders are missing completely, re-import the package from the Asset Store. See Troubleshooting.
- Shaders included in builds. See Building your game.
- Tileset texture arrays built. Tilesets without up-to-date built arrays still work, but until the arrays are rebuilt, the editor builds uncompressed arrays when the map loads, which costs memory and loading time. Build Arrays builds them for every outdated tileset. Player builds rebuild outdated arrays automatically; tilesets that were never built use uncompressed arrays in players as well. See Texture arrays and Texture arrays in player builds.
- GPU instancing on instanced prototypes. Materials of instanced trees, Mesh-mode details and instanced decor should have Enable GPU Instancing ticked. Otherwise they are drawn through temporary copies, and their instancing variants may be stripped from player builds. Enable Instancing ticks it on every listed material that can be edited. Materials inside a model or a package are read only: extract them first. See GPU instancing.
- Terrains have a tileset. A terrain without a tileset shows a neutral placeholder look. The fix assigns a tileset of the project to every terrain without one (undoable). See Tilesets.
The scene fixes are not offered in Play Mode, because scene changes made in Play Mode are lost when it ends.
Map files for scene terrains
An RTS Terrain keeps its map in a .rtsmap asset (its Map Asset field). A terrain
without one has its map only in memory, and your edits are lost when the scene is closed. The check
Terrains save to a map file lists these terrains. Create Map Files saves the
current map of each listed terrain to a new .rtsmap file in the folder of its scene (or in
Assets/Maps when the scene is not saved yet) and assigns it to the terrain.
Terrains made with the New Map Wizard or the demo content already have a map file. To learn how map assets, Save and Save As work, read Map assets and map files.
Building your game
Unity only puts shaders into a player build when a material in the build uses them. RTS Terrain Studio creates the
terrain, water and fog of war materials from code at runtime, so the shaders are referenced from the asset
Resources/RTSTerrainStudio/RTSShaderReferences.asset inside the package folder. The asset also references the
DecorPlaceholder material, which keeps the instancing variants of URP Lit in the build. It is checked
and updated automatically after every script reload, whenever shaders are imported and before every player build.
If the check Shaders included in builds is red, click Update.
Before you build, go through this list:
- Run and fix all errors and warnings.
- Check that every quality level of your target platform uses a URP asset with Depth Texture and Opaque Texture, and that its renderer has the RTS Fog Of War feature if you use fog of war.
- Build the texture arrays of your tilesets once (Build Arrays in the validator, or Build Texture Arrays in the tileset inspector), so the terrain does not build them uncompressed at load time. Outdated arrays are rebuilt automatically before every player build (see below).
- If your maps use fog, make sure the check Fog kept in player builds is OK (see Fog in player builds).
- Validate your maps on the Map tab (see Map Validation).
- Add your scenes to the scene list of your build profile. Maps assigned to an RTS Terrain in a scene are included like any other referenced asset.
- If you ship the in-game editor, read Shipping the in-game editor. Maps
that players save at runtime go to the
Mapsfolder inRTSMapSerializer.StorageRoot(Application.persistentDataPath, and the storage of the browser in Web builds); see Map files at runtime. - If you raise Managed Stripping Level above Minimal and wrote your own editing tools, read Code stripping and custom tools.
- For a Web build, also read Web (WebGL) builds.
Do not move or rename RTSShaderReferences.asset or the package's Resources folder: the
package loads these assets with Resources.Load at runtime.
Texture arrays in player builds
A player uses the built texture arrays of a tileset as they are, because only the editor can compare them with the source textures. So that a build never ships old ground textures, every tileset whose arrays were built before is checked right before a player build starts:
- Arrays that no longer match the textures, the resolution or the compression, or that were built for another platform or texture compression, are rebuilt with normal compression quality. A progress bar shows the work.
- Tilesets that were never built are left alone. Players build uncompressed arrays for them when a map loads.
- When a rebuild is cancelled or fails and the textures or settings changed, a dialog offers Try Again, Cancel Build and Build Anyway. Arrays that only use another format still show the right textures, so they only log a warning.
- A batch mode build stops in that case. Add
-rtsAllowOutdatedTextureArraysto the command line to build anyway, with a warning per tileset. - An editor without a graphics device (
-nographics, common on build servers) cannot build arrays. The build then continues with a warning per outdated tileset, and players use the arrays as they were last built. Build the arrays in the editor before such a build. - Arrays are only rebuilt for the active build platform. When you build for another platform, the build logs a warning instead: switch to that platform first.
- Asset bundles and Addressables content that you build on their own do not run this check. Build the arrays first.
The outdated check uses the import state of the source textures, which can change with a Unity upgrade. The first player build after an upgrade may therefore rebuild the arrays of every built tileset, including the demo tilesets.
Built arrays are stored readable in the tileset asset. Players free this CPU copy the first time the arrays are used, which saves about 14 MB per tileset at 512 px and about 56 MB at 1024 px.
Fog in player builds
RTSEnvironment turns on the fog stored in a map while the game runs. Unity strips the shader variants
of fog modes it thinks are unused: with set to Automatic, it only keeps the fog of build scenes that are saved with fog turned on.
RTS Environment restores the scene's own fog before every save, so its fog does not count, and maps with fog would
show no fog in a build.
The check Fog kept in player builds reads the build scenes of the active build profile and the open scenes, and lists the fog modes that RTS Environment uses there. Keep Fog Modes (also part of Fix All) sets Fog Modes to Custom and keeps exactly these modes, plus any that were already kept. Each kept mode adds shader variants to the build, so modes that are not used are not added. If the active build profile overrides the Graphics settings, check its Fog Modes as well.
Web (WebGL) builds
RTS Terrain Studio runs in a web browser: the terrain, vegetation, water, decor, fog of war, the in-game editor and the samples. A browser works differently from a desktop, though: there is no folder the player can open, some keys belong to the browser, all code runs on one thread and the whole game shares one memory heap of limited size. This section explains what the package does about it and how you build, test and publish a Web build.
The short version:
- Open , select Web and click Switch Platform (or make your Web build profile the active one).
- Run and click Fix All. With Web active, the validator also installs the full-window template and checks the quality levels of Web builds.
- If your maps use fog, check that Fog kept in player builds is OK.
- Click Build And Run. Unity builds the game and opens it in your browser.
What works in the browser
| Topic | Support |
|---|---|
| Graphics API | WebGL 2.0, the default of Web builds (Auto Graphics API). All package shaders run there. This section describes WebGL 2.0; WebGPU, which Unity offers as an option, is not covered. |
| Browsers | Current desktop browsers that Unity's Web player supports, used with a mouse and keyboard. |
| Phones and tablets | The page loads, but the in-game editor, the RTS camera and the sample units are made for a mouse and keyboard. Touch input is not supported. The package's template shows a note on mobile devices. |
| Rendering | Terrain, vegetation, water, decor and the fog of war look the same as on desktop. Grass is stored in a float texture instead of a structured buffer (see Rendering and performance). |
| In-game editor | Every tool, the map browser and the play test. Maps are kept in the storage of the browser and can be downloaded and imported (see Maps in the browser). The map size and the undo memory have lower limits (see The in-game editor in the browser). |
| Threads | Web builds have no worker threads, so all jobs run one after the other on the main thread. |
The full-window template
The page around a Web build comes from a Web template. Unity's own Default and Minimal templates show the game in a fixed box on desktop browsers (960 × 600 pixels unless you change it). The in-game editor, the HUD and the minimap scale with that box, so their text becomes hard to read. The package therefore comes with its own template:
- The game fills the browser window above a slim footer with the game's name and the fullscreen button, and resizes with the window. On phones and tablets it fills the whole page.
- The loading bar (with a percentage), the fullscreen button and Unity's message banners are kept.
- On high-resolution screens the render resolution is capped at 1.5 times the CSS pixel size, which keeps the
frame rate up. Change
maxDevicePixelRatioin theindex.htmlof the installed template to adjust it (lower values down to 1 are faster, higher values are sharper). - Files the game saves, such as maps of the in-game editor, are written to the browser storage right away.
- The page makes no requests to other servers; its icons are part of the page.
To install it:
- Choose , or click Install Template on the card Web template fills the browser window of the project validator.
- The template is copied to
Assets/WebGLTemplates/RTSTerrainStudio(Unity only finds templates inAssets/WebGLTemplates) and selected in . - If the template is already installed, the menu asks whether to Keep and Select your copy or Replace it with the version of the package. The copy belongs to your project: edit it freely, the package never overwrites it without asking.
Build profiles: a build profile can override the Player Settings, and then it keeps its own template choice. Make your Web build profile the active one before you install the template, so the setting goes into that profile. If you installed it while another platform was active, select the template RTSTerrainStudio in the Player Settings overrides of your Web build profile by hand.
The template is based on Unity's Default template and uses only Unity's own template variables, so nothing
new appears in Player Settings. On phones and tablets it shows the note This game is best played on a computer
with a mouse and keyboard. for a few seconds; remove that line from index.html if your game
supports touch.
From an editor script (for example a build script), RTSWebGLTemplateInstaller.InstallAndSelect(false)
installs the template without dialogs, keeps an existing copy and selects it. IsInstalled and
IsSelected report the current state.
Web checks in the Project Validator
While Web is the active build platform, the validator shows a WebGL group with these three checks.
| Check | Fix | What it checks |
|---|---|---|
| Web quality levels have Depth and Opaque Texture | Enable Both | The quality levels ticked in the Web column of (the Web default level is listed first) and the URP asset each of them renders with. The editor usually renders with a desktop quality level, so a Web build can have simpler water that you never see in the editor. Each texture costs one full-screen copy per frame. The general check Depth and Opaque Texture enabled may report the same asset; Fix All handles both. |
| MSAA is off for Web builds | Turn MSAA Off | An error when a Web quality level renders with a URP asset that combines MSAA with the Depth or Opaque Texture. URP cannot render this combination on WebGL 2: the canvas stays black and the browser console shows Render Graph Execution error. The fix turns MSAA off in these assets. Desktop quality levels that share such an asset lose MSAA as well, so give the Web platform a quality level with its own URP asset. |
| Web template fills the browser window | Install Template / Reinstall | A warning for Unity's Default and Minimal templates, an error when the package's template is selected but its folder is missing (the build would fail), and OK for the package's template. The PWA template also fills the window and is OK, but its service worker caches the build: raise for every upload. Any other custom template gets an info without a fix. |
The Rendering check Fog kept in player builds runs for every platform and matters for Web builds too (see Fog in player builds).
Recommended build settings
| Setting | Where | Recommendation |
|---|---|---|
| Texture Compression | Your Web build profile | Use Player Settings or DXT for desktop browsers. For a build aimed at mobile browsers choose ASTC or ETC2. The tileset texture arrays follow this setting (DXT5, ASTC 6×6 or ETC2 RGBA8) and are rebuilt before the build. A browser that cannot use the chosen format gets the textures decompressed by Unity, which needs about four times the memory. |
| Maximum Memory Size | Keep the default of 2048 MB. The limits of the in-game editor in the browser are made for this heap. | |
| Compression Format | Brotli gives the smallest download but works only over HTTPS. Gzip also works over HTTP. Both need the right server headers (see Publishing on a website). | |
| Decompression Fallback | Turn it on when you cannot set the headers of the server, for example on game portals. The game then loads anywhere, with a slightly longer start. | |
| Data Caching | On. The browser keeps the downloaded game data, so the next visit starts faster. | |
| Enable Exceptions | Explicitly Thrown Exceptions Only (the default) for release builds. In this mode a null reference is not reported as an exception, so use a development build with Full With Stacktrace while you look for a bug. | |
| Managed Stripping Level | Any level works for the package. Higher levels make the download smaller; custom editing tools then need [Preserve] (see Code stripping and custom tools). | |
| Quality levels and URP asset | Untick the Web column of desktop quality levels you do not use in the browser, so their URP assets do not add shader variants to the build. In the URP asset used for Web, keep light cookies and reflection probe blending off unless your scenes need them: WebGL 2.0 allows only 16 textures per draw (see Mobile notes). Keep Anti Aliasing (MSAA) off in that asset: together with the Depth or Opaque Texture it stops URP from rendering on WebGL 2. | |
| Web Template | RTSTerrainStudio (see The full-window template). |
Testing a Web build on your computer
- Build And Run is the easiest way. Unity starts a small local web server and opens the game in your default browser.
- Double-clicking the built
index.htmldoes not work. Browsers do not run Web builds fromfile://addresses, and the page only shows an error message. - To open a finished build folder again later, serve it with any local web server. A simple server that sets no compression headers can only serve builds with Decompression Fallback on, or with compression disabled.
- Test the keys once in the browser you target: F1, F5, Ctrl+S, Alt+N and Esc in fullscreen (see The in-game editor in the browser).
Publishing on a website
- Upload the whole build folder:
index.html,BuildandTemplateData. - Compressed builds need two headers on the files in
Build:Content-Encoding: brfor Brotli orContent-Encoding: gzipfor Gzip, and the rightContent-Type, for exampleapplication/wasmfor the.wasmfile. WithoutContent-Encodingthe page shows an error message, and a wrongContent-Typemakes the start slower. If you cannot configure the server, turn on Decompression Fallback. - Game portals such as itch.io show the game inside an
iframe. Upload a ZIP file withindex.htmlat the top level. A sandboxediframeneedsallow-downloadsfor Download Map andallow-modalsfor the Leave site? question. Check both on the real page. - Saved maps belong to the website. The browser keeps them per website address (protocol, host and port). A new upload to the same website keeps them; the same game on another website starts without maps.
- Safari may delete the stored data of a website that was not used for seven days, and Safari on iPhone and iPad ignores the Leave site? question. Tell your players to download maps they want to keep.
- Inside an
iframethe game only gets keys after the player clicked into it, and Esc always leaves browser fullscreen (see below).
Maps in the browser
In a browser, Application.persistentDataPath is a file system in memory. It is only copied to the
browser's database (IndexedDB) on request. The package's template makes this request after every change. With
other templates the package makes it itself after every save, delete and import, so saved maps are still there
after a reload. Your own code does the same with RTSWebFileSystem.Flush() (see
Scripting).
persistentDataPath depends on the address of the page, so a new upload under another address (game
portals often use a new one per upload) would start without maps. In Web builds the maps are therefore kept in
RTSMapSerializer.StorageRoot, a folder named after the company and product name of the Player
Settings in the same browser storage. On all other platforms StorageRoot is
persistentDataPath. The in-game editor's maps folder is Maps inside it.
Players cannot open this storage as a folder, so the in-game editor moves maps between the browser and the computer itself:
| Command | Where | What it does |
|---|---|---|
| Download Map | File menu | Lets the browser download the current map, including unsaved changes, as a .rtsmap file (usually into the Downloads folder). |
| Import Map... | File menu | Opens the file picker of the browser. The chosen .rtsmap file is added to the maps saved in this browser and opened, after the usual question about unsaved changes. |
| Import... | Map browser (Open) | The same as Import Map, next to the location line. |
| Download | Map browser (Open) | Downloads the selected map file. |
| Drag and drop | Game canvas | A .rtsmap file dropped onto the game is imported and opened. Other files are refused with a message, so the browser does not leave the page to show them. |
- Files up to 128 MB are accepted. The map size is read from the first bytes and checked against the limits of
the browser (see Limits) before the map is decompressed. Then the whole file is read
with the strict rules of
RTSMapReadOptions.Strict, so a damaged file, or one that breaks the format rules, is never stored. The message names the problem. - An import never replaces another map. Importing the same file again reuses it; a different file with the same name is saved as Name (2), Name (3) and so on. A preview image is written when the map opens.
- The map browser shows Saved in this browser. Use Download to keep a copy on your computer. instead of a folder path. Show Maps Folder and Quit do not exist in the browser.
- Deleting the browsing data of the website also deletes the saved maps.
The in-game editor in the browser
Closing the tab with unsaved changes
While the map has unsaved changes and Confirm Quit With Unsaved Changes is on, the browser asks Leave site? before the tab is closed or reloaded. The browser chooses the text of this question. With Unity's own templates, which do not store files right away, it also asks while a save is still being written to the browser storage, independent of this option.
Bringing the editor back after closing it
In browsers the function keys are often media keys (on Macs and many laptops), and phones have none. So when the player closes the editor with its close button (×), a button Open Map Editor (F2) appears at the bottom left and brings it back. Without a keyboard, or when Toggle Key is None, the button reads Open Map Editor. The button only appears after the close button was used; when your game code hides the editor, your game decides how it comes back. The close button is available there even when Toggle Key is None.
Keyboard
- New Map is Alt+N. Browsers keep Ctrl+N for a new window and never pass it to the page. Alt+N works on desktop platforms too. Ctrl+T and Ctrl+W never reach a page either.
- Browser shortcuts are held back. While the editor is enabled, the browser does not act on F1 to F10 and on Ctrl (or Cmd) + S, O, D and A, so they work as editor shortcuts. F11, F12, Ctrl+F5, Ctrl+R, copy, paste and keys typed into text fields of the page stay with the browser.
- F5 starts and ends the play test, so you do not depend on Esc.
- Esc in fullscreen: browsers use Esc to leave fullscreen. In Chrome and
Edge, on a secure page (HTTPS or
localhost) that is not inside aniframe, a short press of Esc reaches the game, and holding Esc leaves fullscreen. Elsewhere the first Esc leaves fullscreen. The alternatives: F5 or Back to Editor ends a play test, the × button closes a dialog, and Ctrl+Z undoes a stroke. The help window (F1) says this too. - Keyboard layouts: the letter shortcuts (Ctrl+Z, G, P …) follow the letter printed on the key, also on German (QWERTZ) and French (AZERTY) keyboards. The brush keys follow the typed character, so [ also works where it is AltGr+8. This is the same on desktop platforms.
- Gameplay demo: Ctrl+1 to Ctrl+9 (control groups) switch browser tabs in most browsers. Choose other keys for a web game.
Limits
The map, its textures and the undo history share one memory heap of at most 2 GB (the default Maximum Memory Size), and that heap never shrinks. The editor therefore uses lower limits in the browser:
| Limit | Browser | Other platforms |
|---|---|---|
| Largest map in New Map and Resize | 2048 ÷ splat resolution cells per side: 512 at the default splat resolution 4, 256 at 8. Larger presets are left out, and the dialogs say In the browser, maps can be up to N x N cells. Resize keeps the size of a larger map that was opened from a file, but does not grow it. | 1024 |
| Undo memory | At most 192 MB. A lower Undo Memory MB value is kept. | Undo Memory MB (default 512) |
| Imported map file | 128 MB | No import command |
| Maps that Open and Import accept | Splat textures up to 2048 × 2048 texels, map data up to 512 MB, and the map must fit into half of the memory heap. The size is checked from the first bytes of the file. The map is then read with RTSMapReadOptions.Strict, so a file that breaks the format rules is refused with the reason. | Splat textures up to the largest texture size of the graphics card. Maps are read with the lenient default rules. |
| Map data a Web player loads with the default read options | 512 MB | 4 GB |
Maps made on desktop can be larger than a browser accepts. Before you publish a map for a Web build, switch the build target to Web () and run the map validator: it reports every map that a browser would refuse (see Memory limits and warnings).
Other differences
- The UI never gets smaller than 85 %, measured in CSS pixels, so it stays readable on high-resolution screens and in small windows.
- Edge panning of the editor camera and the sample RTS camera stops when the mouse leaves the page or the
iframeof the game.
Rendering and performance
- Grass: WebGL 2.0 has no structured buffers. The detail renderer stores the instances of each patch in a float texture instead (two texels per instance). It picks this path at runtime, and the grass looks the same.
- Terrain: the forward pass uses 10 of the 16 textures WebGL 2.0 allows per draw. Keep the URP asset of Web builds light (see Mobile notes).
- One thread: without worker threads, operations on the whole map take noticeably longer than on desktop, and the page does not react meanwhile: Generate, New Map, Resize, opening a large map and Apply to Whole Map of Auto Paint. Maps of 128 to 256 cells per side stay comfortable.
- Texture arrays: use built arrays in the format of your Web build (see Recommended build settings). Players free the CPU copy of built arrays, which matters in the limited memory of a page.
- Render resolution: the template caps the pixel ratio at 1.5; lower it for a higher frame rate.
Code stripping and custom tools
Editing tools are found and created through reflection (RTSToolRegistry), so no code refers to them
directly. With a Managed Stripping Level above Minimal, which is common for smaller Web
and IL2CPP builds, Unity cannot see that they are used and would remove them. The package's
Runtime/link.xml keeps every class of the RTSTerrainStudio namespace whose name ends in
Tool, so the built-in tools always stay.
Mark your own tool classes with [UnityEngine.Scripting.Preserve], which keeps the class and its
parameterless constructor, or list them in a link.xml file of your project. A player that finds no
tools at all logs No editing tools were found in this build. Map extensions
(MapDataExtension) are created through reflection as well, so mark them
with [Preserve] too.
using RTSTerrainStudio;
using UnityEngine.Scripting;

// [Preserve] keeps the tool in builds with a high Managed Stripping Level.
[Preserve]
public sealed class CraterTool : RTSTool
{
    // ...
}
Scripting API for Web builds
| Member | Description |
|---|---|
RTSWebFileSystem.IsSupported | True in a WebGL player. On other platforms and in the Unity editor the class does nothing. |
RTSWebFileSystem.Flush() | Copies the file system of the page to the browser storage, so files written or deleted with System.IO survive a reload. All calls of one frame are combined into one write. RTSMapSerializer.SaveToFile calls it for you. |
RTSWebFileSystem.DownloadFile(fileName, data, mimeType) | Lets the browser download bytes as a file. Returns false on other platforms or when the browser refused the download. |
RTSMapSerializer.StorageRoot | Folder for files kept between sessions: Application.persistentDataPath, and in Web builds a folder in the browser storage that does not depend on the page address. |
RTSMapSerializer.DefaultMapsFolder | Maps inside StorageRoot. |
RTSRuntimeEditor.RunsInBrowser | True in Web builds, where the editor uses the browser limits and Alt+N for New Map. |
RTSRuntimeEditor.StoresMapsInBrowser | True when maps are kept in the browser storage (WebGL players). |
RTSRuntimeEditor.HasReliableFunctionKeys | False in web browsers and on mobile platforms, where the close button shows the reopen button. |
editor.DownloadMap(), editor.ImportMap() | The File menu commands. Browsers only show the file picker in response to a click or key press, so call ImportMap from a click handler. |
RTSInput.SetBrowserShortcutGuard(bool) | Holds back the browser's own action for F1 to F10 and Ctrl+S/O/D/A, and lets a short Esc reach the game in fullscreen (Chrome, Edge). Every call with true needs a matching call with false. The in-game editor and RTSDemoHUD turn it on while they are enabled. Does nothing on other platforms. |
RTSInput.GetKeyDownByLabel(RTSKey) | Like GetKeyDown, but for the key that shows this letter on the player's keyboard layout. Use it for letter shortcuts such as Ctrl+Z. |
RTSInput.GetCharacterDown(char) | True when the character was typed this frame, on any keyboard layout. Use it for symbol keys such as [ ] - +. Characters typed into a focused text field arrive here too, so check the UI focus first. |
RTSInput.PointerInsideScreen | True while the pointer is inside the game window. In Web builds the mouse must also still be over the page. |
using System.IO;
using RTSTerrainStudio;

public static class MyGameFiles
{
    // Kept between sessions on every platform; in Web builds in the storage of the browser.
    static string SettingsPath => Path.Combine(RTSMapSerializer.StorageRoot, "settings.json");

    public static void SaveSettings(string json)
    {
        Directory.CreateDirectory(RTSMapSerializer.StorageRoot);
        File.WriteAllText(SettingsPath, json);

        // Web builds: write the change to the browser storage, so it survives a reload.
        // Does nothing on other platforms.
        RTSWebFileSystem.Flush();
    }

    /// <summary>Lets the player keep a copy of the current map on the computer (Web builds only).</summary>
    public static bool DownloadMap(RTSTerrain terrain)
    {
        if (!RTSWebFileSystem.IsSupported || terrain.Map == null) return false;
        byte[] bytes = RTSMapSerializer.Serialize(terrain.Map);
        return RTSWebFileSystem.DownloadFile("My Map" + RTSMapSerializer.FileExtension, bytes);
    }
}
Core Concepts
This chapter explains how RTS Terrain Studio thinks about a map: what is stored, in which units, how the visible surface is built from that data, and which assets (tilesets, libraries, map files) belong to it. You do not need to read it before your first map, but come back to it when you want to know why something behaves the way it does, or when you start writing code against the map data.
In short:
- A map is a grid of square cells. Heights, cliff levels and water live on the corners (vertices) of the cells.
- Cliff levels are whole numbers from 0 to 15. Where neighbouring corners have different levels, a vertical cliff wall appears, unless all four corners of the cell are flagged as a ramp.
- Ground textures, grass density and pathing overrides are raster layers with several texels per cell.
- Trees, decor, regions, start locations and markers are lists of objects in map-local coordinates.
- The look comes from a tileset (ground, cliff and water textures); the objects come from a vegetation library and a decor library. Maps only store indices and ids, so you can swap the look without touching the map.
- Everything is saved in one compact binary
.rtsmapfile, used by both the Unity Editor and the in-game editor.
The map model
All map data lives in one object of the class MapData (namespace RTSTerrainStudio). An
RTSTerrain component owns one MapData (terrain.Map), renders it as chunk meshes,
keeps the derived pathing map up to date and answers queries such as "how high is the ground here?".
Cells and vertices
The map is a grid of Width × Height cells. Every cell has four corner
vertices, and neighbouring cells share their corners. A map of 4 × 2 cells therefore has 5 × 3 vertices:
 z
 2   v10 ---- v11 ---- v12 ---- v13 ---- v14
      |  cell  |  cell  |  cell  |  cell  |
      | (0,1)  | (1,1)  | (2,1)  | (3,1)  |
 1   v5 ----- v6 ----- v7 ----- v8 ----- v9
      |  cell  |  cell  |  cell  |  cell  |
      | (0,0)  | (1,0)  | (2,0)  | (3,0)  |
 0   v0 ----- v1 ----- v2 ----- v3 ----- v4
     x=0      1        2        3        4

 vertex index = z * VertexCountX + x      (VertexCountX = Width + 1)
- Vertex layers (fine height, cliff level, flags, cliff type, water height) have
(Width + 1) × (Height + 1)entries, stored row by row. Usemap.VertexIndex(x, z). - Cell size (
map.CellSize, default 2 m) is the world size of one cell. A 128 × 128 map with 2 m cells covers 256 × 256 m (map.WorldSize). - A position belongs to the cell
floor(localXZ / CellSize);map.LocalToCell(localXZ)does this and clamps to the map. - For rendering, the cells are grouped into chunks (16, 32 or 64 cells per side, setting Chunk Size on the
RTSTerraincomponent, default 32). Only chunks touched by an edit are rebuilt. The chunk size does not change the map data.
Map dimensions
The dimensions are chosen when a map is created (New Map Wizard, the in-game New Map dialog, or
MapCreationSettings in code). Values outside the valid range are corrected by MapCreationSettings.Validate().
| Setting | Default | Valid values | Description |
|---|---|---|---|
width, height | 128 | 16–1024, rounded to a multiple of 16 | Number of cells along X and Z. The New Map Wizard offers presets from Tiny (64) to Epic XL (512). |
cellSize | 2 | ≥ 0.1 | World size of one cell in metres. |
cliffLevelHeight | 2 | ≥ 0.05 | World height of one cliff level in metres. |
baseCliffLevel | 2 | 0–15 | Initial cliff level of every vertex. Level 2 leaves room to dig down for lakes and rivers. |
baseGroundLayer | 0 | 0–15 | Ground layer that initially covers the whole map. |
splatResolution | 4 | 1, 2, 4, 8 | Ground texture (splat) texels per cell side. |
detailResolution | 2 | 1, 2, 4 | Detail (grass) density texels per cell side. |
pathingResolution | 2 | 1, 2, 4 | Pathing cells per map cell side. |
name | "New Map" | any text | Map name (stored in the map info). |
Resolutions that are not a power of two are rounded up (3 becomes 4). Cell size, level height and the three raster
resolutions are fixed once the map exists. The Resize function (RTSTerrain.ResizeMap) changes only the
number of cells; it keeps the content, shifts it by an offset and fills new areas with a chosen cliff level and ground layer.
MapData.Resize(newWidth, newHeight, offsetCells, fillCliffLevel, fillGroundLayer) returns a new map (the original is not modified).
Trees, decor and start locations outside the new bounds are removed. Markers and regions are shifted but kept, even if they end up outside.
Sizes are clamped to 16–1024 (MapData.MinSize–MaxSize) but not rounded to a multiple of 16 when you call it from code.
RTSTerrain.ResizeMap replaces the map (MapLoaded is raised), marks it unsaved and clears the undo history of edit sessions.
What a map contains
Every piece of data has a matching flag in the MapLayers enum. The flags are used for change notifications,
undo recording and serialization.
| Data | Stored per | MapData member | Type | MapLayers flag |
|---|---|---|---|---|
| Fine height | vertex | Heights | NativeArray<float>, metres | Heights |
| Cliff level | vertex | CliffLevels | NativeArray<byte>, 0–15 | CliffLevels |
| Vertex flags (ramp, water) | vertex | VertexFlags | NativeArray<byte> of VertexFlags | VertexFlags |
| Cliff type | vertex | CliffTypes | NativeArray<byte>, 0–3 | CliffTypes |
| Water surface height | vertex | WaterHeights | NativeArray<float>, map-local Y | Water |
| Ground layer weights | splat texel | SplatMaps[0..3] | NativeArray<Color32> × 4 | Splat |
| Grass / plant density | detail texel | DetailLayers | one DetailLayer (byte per texel) per prototype | Details |
| Trees | instance | Trees, TreePrototypeIds | List<TreeInstanceData> | Trees |
| Decor (doodads) | instance | Decor, DecorPrototypeIds | List<DecorInstanceData> | Decor |
| Manual pathing overrides | pathing cell | PathingOverrides | NativeArray<byte> of PathingOverride | PathingOverrides |
| Regions | list | Regions | List<MapRegion> | Regions |
| Start locations | list | StartLocations | List<StartLocation> | StartLocations |
| Markers | list | Markers | List<MapMarker> | Markers |
| Map info | map | Info | MapInfo | Info |
| Environment (lighting) | map | Environment | EnvironmentSettings | Environment |
| Custom header fields | map | HeaderFields | List<MapProperty> (key/value texts) | Info |
| Your own data (map extensions) | map | Extensions, GetExtension<T>() | classes derived from MapDataExtension | Extensions |
| Sections of other games and tools | map | UnknownSections | IReadOnlyList<RTSMapSection>, kept unchanged | Extensions |
Map extensions and kept sections are described in Your own data in the map, header fields in Header fields for map browsers and lobbies.
Two combined flags are handy: MapLayers.Geometry (heights, levels, vertex flags, cliff types) and
MapLayers.PathingInputs (everything that influences the pathing map). MapLayers.All covers everything.
The pathing map (terrain.Pathing, class PathingMap) is derived data: it is computed from the
layers above and never saved. See Pathing map.
VertexFlags.User0 and VertexFlags.User1 are reserved for your own code. The package never uses them, and
they are saved with the map, so you can mark special vertices (for example "creep spawn area") without a custom file section.
MapData holds native memory. A map you create or load yourself (MapData.Create,
RTSMapSerializer.LoadFromFile, RTSMapAsset.LoadMap, map.Clone()) must be disposed with
Dispose(), unless you hand it to a terrain with terrain.SetMap(map): the terrain then owns it and disposes it
when the map is replaced or the component is disabled.
Cliff levels, fine heights and cliff types
Classic RTS terrain has two kinds of height: big discrete steps (cliffs) and small smooth variations (hills). RTS Terrain Studio stores both separately on every vertex.
Cliff levels
- Every vertex has a cliff level from 0 to 15 (
MapData.MaxCliffLevel= 15). - One level is
CliffLevelHeightmetres high (default 2 m). - New maps start at level 2, so there are two levels below the ground for lakes, rivers and canyons, and thirteen above it for plateaus.
- Edit levels with the cliff tools: Raise / Lower Level, Set Level, Ramp, Cliff Type and Clean Cliffs.
- The fog of war uses cliff levels for line of sight: units see their own level and below, higher ground blocks their sight.
Fine heights
On top of the level, every vertex has a fine height in metres (Heights), positive or negative. The height
tools (Raise / Lower, Smooth, Flatten, Set Height, Noise, Terrace, Erode) change only the fine height, so you can build hills on a plateau
without turning them into cliffs. The ground height of a vertex is:
vertex height = CliffLevels[i] × CliffLevelHeight + Heights[i] (map-local Y, metres)
Example: level 3 with a level height of 2 m and a fine height of 0.4 m gives a vertex 6.4 m above the map origin.
map.GetVertexHeight(x, z) and map.GetVertexPosition(x, z) compute this for you.
Cliff types
A tileset can have up to 4 cliff layers (for example "Rock" and "Grassy Cliff"). Every vertex stores which one to use
(CliffTypes, 0–3, painted with the Cliff Type tool). A cliff wall uses the cliff type of the highest
corner of its cell. If a cliff type index has no layer in the tileset, the wall falls back to cliff layer 0.
How the surface is built (the reference surface)
The struct MapGeometryView defines the one true surface of the terrain. The chunk meshes, the gameplay queries
(GetHeight, Raycast, …), the pathing map and the fog of war all follow the same rules, so what you see is what units walk on.
Each cell is classified by its four corners:
| Cell kind | Condition | Surface |
|---|---|---|
| Smooth cell | All four corners have the same cliff level. | Bilinear patch of the four corner heights. |
| Ramp cell | All four corners are flagged VertexFlags.Ramp (levels may differ). | Bilinear patch: the levels blend smoothly into a slope. See Ramps. |
| Cliff cell | Corners have different levels and the cell is not a ramp cell. | Flat terraces separated by a vertical wall along a rounded contour. |
Rounded contours. Inside a cliff cell, for every level threshold t the indicator "corner level ≥ t" (1 or 0) is
interpolated bilinearly across the cell. A point belongs to the highest level whose interpolated indicator is at least 0.5
(MapGeometryView.LevelAt). This is a marching-squares rule: a single raised corner produces a quarter circle instead of a
diagonal, and long cliff lines stay straight. The wall itself is vertical at the contour. The fine heights are always interpolated bilinearly
and added on top, also inside cliff cells.
The look of the rendered walls is tuned on the RTSTerrain component (Settings):
| Setting | Default | Description |
|---|---|---|
| Surface Subdivisions | 2 | Quads per cell side on smooth ground (1 = classic RTS look, 2–4 = smoother hills). |
| Cliff Subdivisions | 4 | Sub-grid resolution used to trace the rounded contour inside a cliff cell. |
| Cliff Noise | 0.18 | Random horizontal displacement of wall vertices (fraction of a cell) for a natural rock look. |
| Cliff Noise Scale | 1.6 | Scale of the cliff noise in world units. |
| Cliff Slant | 0.12 | How far the top edge of a wall is pulled back, so walls are slightly slanted (fraction of a cell). |
| Cliff Wall Segments | 3 | Vertical segments per cliff level of wall geometry. |
Get a view with map.GetGeometryView(). It is a struct of native arrays, so you can also pass it into Burst jobs. All members take map-local positions:
| Member | Description |
|---|---|
SampleHeight(localXZ) | Ground height (map-local Y). |
SampleHeightInCell(cell, uv), SampleLevelHeightInCell(cell, uv) | The same inside a known cell (uv 0–1), with or without the fine height. |
SampleNormal(localXZ), SampleSlope(localXZ) | Surface normal; slope in degrees. |
SampleCliffLevel(localXZ) | Cliff level at a position. |
SampleWater(localXZ, out waterHeight), SampleWaterDepth(localXZ) | Whether there is water and its surface height; water depth, or 0 when dry. |
IsCliffCell(cell), IsRampCell(cell) | Classify a cell (see the table above). |
LocateCell(localXZ, out cell, out uv) | The cell of a position and the 0–1 position inside it. |
Raycast(origin, direction, maxDistance, out hitPoint, out hitDistance) | Analytic ray cast against the reference surface, no colliders needed. |
static LevelAt(l00, l10, l01, l11, uv), static Bilerp(v00, v10, v01, v11, uv) | The level rule inside a cliff cell and bilinear interpolation. |
width, height, cellSize, cliffLevelHeight, WorldSize | Size of the map in cells, cell size, level height and world size. |
Cliff Noise and Cliff Slant only move the rendered wall vertices by a fraction of a cell. Queries use the exact contour, so right at a cliff edge the visible rock and the reference surface can differ slightly. The pathing map accounts for this with its Cliff Margin setting, which keeps a small unwalkable band along every wall.
Ramps
A ramp lets units walk from one cliff level to the next. The rule is simple:
A cell is a ramp when all four of its corners are flagged as ramp. If even one corner is missing the flag, the cell stays a cliff cell with a vertical wall.
- The flag is
VertexFlags.Rampon each vertex. The Ramp tool (idcliff.ramp) paints it; hold Shift to remove it. - A ramp cell is a smooth bilinear slope between its corner heights (level plus fine height).
- Ramps work best across exactly one level. Steeper ramps are allowed, but the status bar warns about ramp cells that span more than one level.
- Pathing: a valid one-level ramp is tested for walkability on its fine-height slope only (the level incline it bridges does not make it "too steep"). Ramps are never buildable.
GetCliffLevelon a ramp returns the interpolated level, rounded: the lower level on the lower half, the upper level on the upper half.
- Raise a plateau by one level with Raise / Lower Level.
- Select the Ramp tool and paint across the cliff edge where the ramp should be. Make the brush cover at least the vertices on both sides of the wall, so that every corner of the cells in between is flagged.
- The wall disappears and a slope appears. Widen the ramp by painting more vertices along the edge.
Ground layers and splat maps
Ground textures are painted into splat maps: four RGBA textures (MapData.SplatMapCount = 4) of
SplatWidth × SplatHeight texels. Each of the 16 channels holds the weight of one ground layer of the tileset:
| Splat map | R | G | B | A |
|---|---|---|---|---|
SplatMaps[0] | layer 0 | layer 1 | layer 2 | layer 3 |
SplatMaps[1] | layer 4 | layer 5 | layer 6 | layer 7 |
SplatMaps[2] | layer 8 | layer 9 | layer 10 | layer 11 |
SplatMaps[3] | layer 12 | layer 13 | layer 14 | layer 15 |
- Layer i is stored in map
i / 4, channeli % 4. That is why a tileset has exactly 16 ground layers: 4 maps × 4 channels. - The weights of one texel always sum to 255 across all 16 channels. All paint tools keep this invariant; code that writes splat data must keep it too.
- The splat resolution is the number of texels per cell side (default 4). With 2 m cells that is one texel every 0.5 m.
- The centre of texel (x, z) is at
((x + 0.5), (z + 0.5)) × CellSize / SplatResolutionin map-local XZ. The same formula applies to detail and pathing texels with their own resolution. - Helpers:
map.SplatIndex(x, z),map.GetSplatWeight(texelIndex, layer),map.GetDominantLayer(texelIndex),MapData.GetChannel/SetChannelandmap.FillSplat(layer).
Maps store ground layers by index (0–15), not by name. Reordering or removing ground layers in the tileset changes what already painted maps show. Add new layers at the end when maps already use the tileset.
using RTSTerrainStudio;
using Unity.Mathematics;
using UnityEngine;

public static class SplatExample
{
    /// <summary>Paints one map cell 100 % with a ground layer (like the Tile Paint tool, without undo).</summary>
    public static void PaintCell(RTSTerrain terrain, int2 cell, int layer)
    {
        MapData map = terrain.Map;
        if (map == null || !map.IsValidCell(cell.x, cell.y)) return;
        layer = math.clamp(layer, 0, MapData.MaxGroundLayers - 1);

        int res = map.SplatResolution;
        for (int tz = cell.y * res; tz < (cell.y + 1) * res; tz++)
        {
            for (int tx = cell.x * res; tx < (cell.x + 1) * res; tx++)
            {
                int texel = map.SplatIndex(tx, tz);
                for (int m = 0; m < MapData.SplatMapCount; m++)
                {
                    // All channels 0, except the one of our layer: the sum stays exactly 255.
                    var c = new Color32(0, 0, 0, 0);
                    if (layer / 4 == m) MapData.SetChannel(ref c, layer % 4, 255);
                    map.SplatMaps[m][texel] = c;
                }
            }
        }

        // Tell the terrain which data changed and where (in cells). Textures and pathing update in LateUpdate.
        terrain.NotifyChanged(MapLayers.Splat, new RectInt(cell.x, cell.y, 1, 1));
    }
}
Water
- A vertex is under water when it has the flag
VertexFlags.Water. Its water surface height (map-local Y, metres) is stored inWaterHeights; the value is only meaningful where the flag is set. - A point is wet when the bilinear coverage of the four flagged corners of its cell is at least 0.5. Corners without water inside a wet cell use the highest water height of the cell, so shorelines stay level.
- Water depth = water surface − ground height. Depth decides pathing: water deeper than the tileset's Shallow Depth Limit (default 0.9 m) is deep water (not walkable), shallower water is shallow water (walkable, not buildable by default).
- The water tools are Paint Water, Erase Water and Flood Fill. Water edits only notify
MapLayers.Water, so terrain chunks are not rebuilt while you paint water. - Queries:
terrain.IsWater(world, out depth)andterrain.TryGetWaterHeight(world, out waterWorldY).
The look of water (colours, waves, foam) comes from the tileset's water profile; see Water profile.
Detail density (grass and small plants)
- Details are not individual objects. Each detail prototype that is used on the map has one
DetailLayerinmap.DetailLayers: a byte per detail texel (DetailWidth×DetailHeight, default 2 texels per cell side). - A density of 0 means empty, 255 means Max Density instances per texel (a field of the detail prototype, default 6). Every
texel spawns
density / 255 × maxDensityinstances; the renderer scatters them deterministically, so the same map always looks the same. - Layers are matched to the vegetation library by
prototypeId.map.GetOrAddDetailLayer(id)creates a layer on demand;map.FindDetailLayer(id)returns null when the prototype is not used. - Paint with Paint Details, remove with Erase Details.
Trees and decor instances
Trees (TreeInstanceData) and decor objects (DecorInstanceData) are stored as plain lists. Instead of a prototype
name, every instance stores a small palette index into a list of library ids on the map:
map.TreePrototypeIds = [ "a3f0…", "77c1…" ]        <- ids of TreePrototype entries in the vegetation library
map.Trees[n].prototype = 1                          <- this tree uses "77c1…"
- Use
map.GetOrAddTreePrototype(id)/map.GetOrAddDecorPrototype(id)to get the palette index of a library id (it is added when missing). - Because maps reference prototypes by id, you can rename, reorder or extend a library safely. A prototype that is
missing from the library is skipped by the vegetation renderer and shown as a magenta placeholder cube by the decor manager; adding a prototype with the same id brings it back. Pathing: trees with a missing prototype are not drawn but still block a circle of
PathingMapBuilder.DefaultTreeFootprintRadius(0.8 m) × scale. Decor placeholders do not write a pathing footprint until the prototype is back. - Every instance has a unique, stable
idwithin the map. Get new ids withmap.AllocateInstanceId(). - Positions are map-local. Rotations follow one convention everywhere: degrees, clockwise seen from above, 0 = +Z, 90 = +X (the same as Unity's Y rotation).
The position.y convention
position.y is an extra offset above the ground, normally 0. It is not the absolute height.
The renderers sample the ground every time they refresh, so trees and decor stay on the ground when you edit the terrain below them.
| Object | Rendered at (map-local Y) |
|---|---|
| Tree | ground height + position.y |
| Decor | ground height + position.y + the prototype's Y Offset |
Decor with DecorFlags.KeepHeight | position.y as an absolute map-local height (does not follow terrain edits) |
Never copy the prototype's yOffset into position.y; it is added at render time. DecorMath.ComputeLocalPosition
and DecorMath.ToStoredHeight convert between stored and rendered positions.
| Field | TreeInstanceData | DecorInstanceData |
|---|---|---|
id | uint, unique in the map | uint, unique in the map |
prototype | ushort index into TreePrototypeIds | ushort index into DecorPrototypeIds |
variant | – | byte, 0 = main prefab, 1… = variants entries |
flags | – | DecorFlags: IgnorePathing, Locked (tools cannot select or erase it), KeepHeight |
position | float3, map-local, y = offset | float3, map-local, y = offset (or absolute with KeepHeight) |
| rotation | yaw in degrees | rotation, a map-local quaternion |
| scale | scale, uniform float | scale, float3 |
tint | Color32 multiplied with the material colour | Color32 multiplied with the material colour |
using RTSTerrainStudio;
using Unity.Mathematics;
using UnityEngine;

public static class InstanceExample
{
    /// <summary>Adds a tree of the first tree prototype of the terrain's vegetation library at a world position.</summary>
    public static uint AddTree(RTSTerrain terrain, Vector3 worldPosition, float yawDegrees)
    {
        MapData map = terrain.Map;
        RTSVegetationLibrary library = terrain.VegetationLibrary;
        if (map == null || library == null || library.trees.Count == 0) return 0;

        Vector3 local = terrain.WorldToLocal(worldPosition);
        var tree = new TreeInstanceData
        {
            id = map.AllocateInstanceId(),
            prototype = map.GetOrAddTreePrototype(library.trees[0].id), // palette index of the library id
            position = new float3(local.x, 0f, local.z),                 // y = offset above the ground, normally 0
            yaw = yawDegrees,                                             // clockwise from above, 0 = +Z
            scale = 1f,
            tint = new Color32(255, 255, 255, 255)
        };
        map.Trees.Add(tree);

        // Notify the cell that changed: vegetation, pathing (tree footprint) and fog blockers update.
        int2 cell = map.LocalToCell(new float2(local.x, local.z));
        terrain.NotifyChanged(MapLayers.Trees, new RectInt(cell.x, cell.y, 1, 1));
        return tree.id;
    }

    /// <summary>Adds a decor object (by library id) standing upright on the ground.</summary>
    public static uint AddDecor(RTSTerrain terrain, string decorPrototypeId, Vector3 worldPosition, float yawDegrees)
    {
        MapData map = terrain.Map;
        if (map == null) return 0;

        Vector3 local = terrain.WorldToLocal(worldPosition);
        var decor = new DecorInstanceData
        {
            id = map.AllocateInstanceId(),
            prototype = map.GetOrAddDecorPrototype(decorPrototypeId),
            variant = 0,                                  // main prefab
            flags = DecorFlags.None,
            position = new float3(local.x, 0f, local.z),  // the prototype's yOffset is added at render time
            rotation = DecorMath.Yaw(yawDegrees),
            scale = new float3(1f, 1f, 1f),
            tint = new Color32(255, 255, 255, 255)
        };
        map.Decor.Add(decor);

        int2 cell = map.LocalToCell(new float2(local.x, local.z));
        terrain.NotifyChanged(MapLayers.Decor, new RectInt(cell.x, cell.y, 1, 1));
        return decor.id;
    }
}
Code that changes MapData directly is not recorded for undo. For undoable edits from editor scripts, run them through the
edit session with RTSEditSession.RunOperation(name, layers, operation), which records the given layers as one undo step.
Pathing map
The pathing map answers "can a unit walk here, can a building stand here?". It is a grid of pathing cells
(PathingResolution per map cell side, default 2, so 1 m pathing cells on a map with 2 m cells) with one
PathingFlags byte each. It is derived automatically and rebuilt incrementally whenever an input changes
(geometry, water, ground layers, trees, decor, overrides). It is never saved: only the manual overrides are.
PathingFlags | Value | Meaning |
|---|---|---|
Walkable | 1 | Ground units can walk here. |
Buildable | 2 | Buildings can be placed here. |
Flyable | 4 | Air units can fly here. Set everywhere, unless an Unflyable effect removes it: a painted pathing override, the runtime pathing layer, the ground layer rule of the tileset or a decor prototype's Footprint Effect. |
ShallowWater | 8 | Shallow water (walkable, not buildable by default). |
DeepWater | 16 | Deep water (naval units only). |
Cliff | 32 | The cell touches a cliff wall. |
Blocked | 64 | Blocked by a tree or decor footprint. |
Steep | 128 | Too steep for ground units. |
The bit values of PathingFlags and PathingOverride are fixed and part of the public API, so games can copy the
bytes into their own grids or send them over the network (see Deterministic pathing and checksums).
How the flags are derived
- Terrain: cliff walls (plus the Cliff Margin) set
Cliff; slopes above Max Walkable Slope (default 42°) setSteep; water setsShallowWaterorDeepWaterby depth;Flyableis set everywhere;Buildable= walkable, slope ≤ Max Buildable Slope (default 18°) and dry (or shallow water when Shallow Water Buildable is on). Then the Pathing Effect of the dominant ground layer is applied (for example "Unbuildable" on rough rock). - Footprints: trees block a circle (Footprint Radius × tree scale × Tree Footprint Scale); decor applies its
Footprint Effect inside a circle or a rotated box, unless the instance has
DecorFlags.IgnorePathing. Trees that gameplay hid (RTSTerrain.SetTreeHidden) are left out. - Manual overrides painted with Paint Pathing / Clear Pathing.
- The runtime pathing layer of the terrain (
RTSTerrain.SetDynamicPathing), with the same rules as the manual overrides. It is applied last and is never saved (see Runtime pathing layer).
The rule settings live on the RTSTerrain component (RTSPathingSettings, property terrain.PathingSettings).
PathingOverride | Value | Effect |
|---|---|---|
Unwalkable | 1 | Removes Walkable (and Buildable). As a decor Footprint Effect it also sets Blocked. |
Unbuildable | 2 | Removes Buildable. |
Unflyable | 4 | Removes Flyable. |
ForceWalkable | 8 | Sets Walkable even if the derived rules say otherwise. |
ForceBuildable | 16 | Sets Buildable even if the derived rules say otherwise. |
The same PathingOverride flags are used for ground layer pathing effects, decor footprint effects, painted overrides and the runtime pathing layer.
Query the result with terrain.GetPathing(world), terrain.IsWalkable(world) and terrain.IsBuildable(world), or read
terrain.Pathing.Flags directly.
Regions, start locations and markers
These are lightweight objects for your game logic. They are not rendered in the game; the editors draw them as gizmos.
| Type | Fields | Typical use |
|---|---|---|
MapRegion (Regions tool) | name, rect (map-local XZ rectangle in metres: rect.x = X, rect.y = Z), color, properties (key/value list) | Triggers, spawn zones, creep camps. Contains(localXZ), GetProperty(key, fallback). |
StartLocation (Start Locations tool) | player (zero-based), position, yaw | Player spawns. The sample unit spawner uses them. |
MapMarker (Markers tool) | name, tag (free text such as "camera" or "goldmine"), position, rotation, properties | Cinematic cameras, points of interest, scripted spawn points. |
The tools store position.y = 0 for start locations and markers and treat it as an offset above the ground, like trees.
using RTSTerrainStudio;
using Unity.Mathematics;
using UnityEngine;

public static class RegionExample
{
    /// <summary>Returns the "gold" property of the first region that contains the world position, or 0.</summary>
    public static int GetGoldAt(RTSTerrain terrain, Vector3 worldPosition)
    {
        if (terrain.Map == null) return 0;
        Vector3 local = terrain.WorldToLocal(worldPosition);
        foreach (MapRegion region in terrain.Map.Regions)
        {
            // Regions are rectangles in map-local XZ.
            if (region.Contains(new float2(local.x, local.z)) &&
                int.TryParse(region.GetProperty("gold", "0"), out int gold))
                return gold;
        }
        return 0;
    }
}
Map info and environment
MapInfo field | Default | Description |
|---|---|---|
name | "New Map" | Display name (also stored in the uncompressed file header). |
author | "" | Author name. |
description | "" | Free text shown in map browsers. |
maxPlayers | 2 | Recommended number of players. |
tilesetId | "" | Id of the tileset the map was made for (RTSTileset.tilesetId). Filled in automatically when the terrain has a tileset. The RTSTerrain inspector warns when the assigned tileset does not match. |
createdUtcTicks, modifiedUtcTicks | set automatically | Creation and last save time (UTC ticks). The modification time is set by RTSMapSerializer.Write every time the map is serialized: SaveToFile, Save in the editor, Serialize(map) and RTSMapAsset.CreateFromMap. |
EnvironmentSettings stores the lighting of a map. It is applied to the scene by an RTSEnvironment component
(); without one, the values are saved but not used.
EnvironmentSettings field | Default | Description |
|---|---|---|
sunColor | warm white (1, 0.956, 0.84) | Colour of the sun light. |
sunIntensity | 1.2 | Intensity of the sun light. |
sunRotation | (50, −30) | Sun rotation in degrees (x = pitch, y = yaw). |
ambientColor | (0.45, 0.5, 0.58) | Ambient light colour. |
fog | off | Enables distance fog. |
fogColor | (0.6, 0.68, 0.75) | Fog colour. |
fogDensity | 0.004 | Fog density. |
Change notifications
When you change MapData from code, tell the terrain what changed and where, in cells:
terrain.NotifyChanged(MapLayers layers, RectInt cellRect)raisesMapChangedimmediately and queues the rebuild.terrain.NotifyChangedAll(layers)marks the whole map (after generators or imports).- Pending changes are processed in
LateUpdate(and every editor tick outside Play Mode), or immediately withterrain.ProcessPendingChanges(). AfterwardsChangesProcessedfires: meshes, textures and pathing are up to date. - A vertex touches up to four cells. Convert a rectangle of vertices with
BrushUtility.VertexRectToCellRect(map, vertexRect), and texel rectangles withBrushUtility.TexelRectToCellRect(map, texelRect, resolutionPerCell).
using RTSTerrainStudio;
using UnityEngine;

public static class CliffExample
{
    /// <summary>Raises a square plateau by one cliff level around a world position.</summary>
    public static void RaisePlateau(RTSTerrain terrain, Vector3 worldCenter, int radiusInVertices)
    {
        MapData map = terrain.Map;
        if (map == null) return;

        // Nearest vertex to the centre (vertices sit on multiples of the cell size).
        Vector3 local = terrain.WorldToLocal(worldCenter);
        int cx = Mathf.RoundToInt(local.x / map.CellSize);
        int cz = Mathf.RoundToInt(local.z / map.CellSize);

        int x0 = Mathf.Max(0, cx - radiusInVertices), x1 = Mathf.Min(map.Width, cx + radiusInVertices);
        int z0 = Mathf.Max(0, cz - radiusInVertices), z1 = Mathf.Min(map.Height, cz + radiusInVertices);
        for (int z = z0; z <= z1; z++)
        {
            for (int x = x0; x <= x1; x++)
            {
                int i = map.VertexIndex(x, z);
                // Levels are bytes from 0 to 15: always clamp.
                map.CliffLevels[i] = (byte)Mathf.Min(map.CliffLevels[i] + 1, MapData.MaxCliffLevel);
            }
        }

        // Convert the changed vertices to the cells around them and notify the terrain.
        var vertexRect = new RectInt(x0, z0, x1 - x0 + 1, z1 - z0 + 1);
        RectInt cells = BrushUtility.VertexRectToCellRect(map, vertexRect);
        terrain.NotifyChanged(MapLayers.CliffLevels, cells);
    }
}
Coordinates and multiple terrains
All map data is stored in map-local space. The RTSTerrain GameObject's transform places that space in the world.
Map-local space
- The origin is vertex (0, 0), the corner of cell (0, 0). X and Z run from 0 to
map.WorldSizein metres, Y is up. - Vertex (x, z) is at local
(x × CellSize, height, z × CellSize); cell (x, z) has its centre at((x + 0.5) × CellSize, …, (z + 0.5) × CellSize). - Local Y = 0 is level 0 with a fine height of 0. A new map at base level 2 with 2 m levels has its ground at local Y = 4 m.
- The chunk GameObjects live under a hidden RTS Chunks child of the terrain (
RTSTerrain.ChunkRoot). That root has no local offset or rotation and compensates the terrain's scale, and each chunk has an identity local transform, so the object space of chunk meshes is map-local space. This matters when you write shaders for the terrain.
Converting between world and map space
Method (RTSTerrain) | Description |
|---|---|
WorldToLocal(Vector3) / LocalToWorld(Vector3) | Positions between world and map-local space. |
WorldToLocalDirection / LocalToWorldDirection | Directions (rays, normals). |
WorldToCell(Vector3) | Cell containing a world position (clamped to the map). |
CellCenterToWorld(int2) | World position of a cell centre on the ground. |
VertexToWorld(int2) | World position of a vertex. |
Contains(Vector3) | True when the world position lies inside the map's XZ area. |
WorldBounds | Approximate world bounds of the whole map, including the highest possible cliff level. |
GetHeight, SnapToGround, GetNormal, GetCliffLevel, IsWater, TryGetWaterHeight, GetPathing, Raycast | Queries that take and return world values and convert internally. |
GetGeometry() | A MapGeometryView for fast queries in map-local space (also inside Burst jobs). |
using RTSTerrainStudio;
using Unity.Mathematics;
using UnityEngine;

/// <summary>Add to any GameObject and use the context menu to see the map data under it.</summary>
public class TerrainProbe : MonoBehaviour
{
    [ContextMenu("Probe Terrain")]
    void Probe()
    {
        // Several terrains can exist: find the one below this object.
        RTSTerrain terrain = RTSTerrain.FindAt(transform.position);
        if (terrain == null || terrain.Map == null) { Debug.Log("Not above an RTS Terrain."); return; }
        MapData map = terrain.Map;

        // World -> map-local (origin at vertex 0,0; position and Y rotation only).
        Vector3 local = terrain.WorldToLocal(transform.position);
        int2 cell = terrain.WorldToCell(transform.position);

        // Nearest vertex.
        int vx = Mathf.Clamp(Mathf.RoundToInt(local.x / map.CellSize), 0, map.Width);
        int vz = Mathf.Clamp(Mathf.RoundToInt(local.z / map.CellSize), 0, map.Height);
        int v = map.VertexIndex(vx, vz);

        // Splat texel below the object (SplatResolution texels per cell side).
        int tx = Mathf.Clamp((int)(local.x / map.CellSize * map.SplatResolution), 0, map.SplatWidth - 1);
        int tz = Mathf.Clamp((int)(local.z / map.CellSize * map.SplatResolution), 0, map.SplatHeight - 1);
        int dominantLayer = map.GetDominantLayer(map.SplatIndex(tx, tz));

        Debug.Log($"Cell {cell}, vertex ({vx},{vz}): level {map.CliffLevels[v]}, fine height {map.Heights[v]:0.00} m, " +
                  $"vertex height {map.GetVertexHeight(vx, vz):0.00} m. Ground at world Y {terrain.GetHeight(transform.position):0.00}, " +
                  $"cliff level {terrain.GetCliffLevel(transform.position)}, dominant ground layer {dominantLayer}, " +
                  $"pathing {terrain.GetPathing(transform.position)}.");
    }
}
Position, rotation and scale rules
| Transform part | Supported | Notes |
|---|---|---|
| Position | Yes | Moves the whole map. Use it to place several terrains side by side or at different heights. |
| Y rotation | Yes | Rotates the map around its origin (vertex 0, 0). Queries, tools, brush cursor and rotations of instances follow it. |
| X / Z rotation | No | Only the Y rotation is meant to be used. The RTSTerrain inspector warns and offers Fix, which keeps Y and resets X and Z. |
| Scale | Ignored | The chunks compensate any scale of the terrain or its parents. The inspector warns and offers Reset Scale. To make a map bigger, use more cells or a larger cell size. |
Multiple terrains
A scene can contain any number of RTSTerrain components. Each one has its own map, tileset, libraries, chunks and pathing map.
RTSTerrain.Alllists all enabled terrains;RTSTerrain.Mainreturns the first one (handy for single-map games; temporary preview terrains are skipped).RTSTerrain.FindAt(worldPosition)returns the terrain whose XZ area contains a position.RTSTerrain.RaycastAll(ray, out hit)ray casts against all terrains and returns the closest hit (hit.terraintells you which).RTSTerrain.TerrainEnabled/TerrainDisabledare static events for systems that track terrains.- Terrains are independent: maps are not stitched at their borders, and pathfinding (
RTSPathfinder.FindPath(terrain, …)) works on one terrain at a time. To make two maps meet seamlessly, give their border vertices the same heights.
using RTSTerrainStudio;
using UnityEngine;

public static class TerrainLayout
{
    /// <summary>Places "east" directly next to "west" (along west's local +X), with the same rotation.</summary>
    public static void PlaceNextTo(RTSTerrain west, RTSTerrain east)
    {
        if (west.Map == null) return;
        float widthMetres = west.Map.WorldSize.x;   // map-local X extent in metres
        east.transform.SetPositionAndRotation(
            west.transform.position + west.transform.rotation * new Vector3(widthMetres, 0f, 0f),
            west.transform.rotation);
    }
}
Map assets and map files
A map is saved as a .rtsmap file. The same binary format is used in the Unity Editor (as an asset in your project)
and by the in-game editor (as a file on disk), so maps made by players can be opened in Unity and the other way round.
.rtsmap files in the project
When Unity finds a .rtsmap file in the Assets folder, the importer RTSMapImporter turns it into an
RTSMapAsset. The asset stores the compressed file bytes, a small header (name, author, size, players, tileset id) and a
minimap preview that is also used as the thumbnail in the Project window.
Creating a map asset
- : guided setup (basics, size, look, terrain); writes the file and creates a terrain for it, or assigns it to the selected terrain.
- : creates a flat 128 × 128 map with default settings in the selected folder.
- Save As… in the RTS Terrain Studio window: writes the current map of a terrain to a new file.
- Copy a
.rtsmapfile made with the in-game editor into theAssetsfolder; it is imported like any other file.
The map asset inspector
Select a map asset to see its preview, name, author, description, size, players, tileset and format version, plus statistics (cells, world size, cell size, level height, start locations, trees, decor, regions, markers, detail layers, file size, memory, last modification).
| Control | Description |
|---|---|
| Open In Scene | Assigns the map to the selected terrain (or the only terrain; asks when there are several). Creates a terrain when the scene has none. Disabled in Play Mode. |
| ▾ menu | Open In New Terrain, or Open On a specific terrain of the scene. |
| Show In Explorer (Reveal In Finder on macOS) | Shows the file in the operating system's file browser. |
| Tileset Id (Copy, Select) | The tileset id stored in the map. Select selects the matching tileset asset. |
| Preview Size | Longest side of the baked preview: 128, 256 (default) or 512 pixels. |
| Preview Tileset | Tileset used for the preview colours. Empty = the tileset whose id the map stores (found automatically). |
| Re-bake Preview, Apply / Revert | Rebuilds the preview / applies changed import settings. |
The preview is re-baked automatically when the tileset with the map's id is added, removed or changes its minimap colours. Rebuilding texture arrays does not re-import maps. A damaged file is imported as an empty asset with an error icon and an import error in the console.
Editing, Save and Save As
Assign a map asset to the Map Asset field of an RTSTerrain. When the terrain is enabled it loads the map into
memory, and all edits happen on that in-memory copy. The scene file only stores the reference to the asset, never the map data itself.
- Save (RTS Terrain Studio window header, or Save Map in the options menu of the RTS Terrain Studio Scene View overlay)
writes the map back into its
.rtsmapfile and re-imports it. Save is highlighted while there are unsaved changes. - Save As… writes a new file and assigns it to the terrain without reloading, so your undo history is kept.
- Open… loads another map asset; Reload reloads the map from its asset and discards unsaved changes.
- A terrain without a map asset creates a map from its Default Map Settings. That map exists only in memory until you use Save As.
- Saving the scene (Ctrl+S) also saves the edited maps of the terrains in that scene, and offers Save As for new maps without a file. Both behaviours can be switched off in the options menu of the Scene View overlay (Save Maps When Saving the Scene, Offer Save As for New Maps).
- Before entering Play Mode, closing a scene or quitting Unity with unsaved map edits, you are asked whether to save them. Edits made in Play Mode (Scene View tools or the in-game editor) are also offered for saving when you exit Play Mode.
Map edits are not part of the scene. Unity's own "Save scene?" dialog does not cover them; the RTS Terrain Studio prompts do. If a
.rtsmap file is read-only or locked by version control, Save shows a dialog instead of writing.
Map files at runtime
In a built game, maps are plain files on disk:
RTSMapSerializer.DefaultMapsFolderis theMapsfolder inRTSMapSerializer.StorageRoot, which isApplication.persistentDataPath, so on Windows the folder is typically%USERPROFILE%\AppData\LocalLow\<Company>\<Product>\Maps. In Web buildsStorageRootis a folder in the storage of the browser (see Maps in the browser).- The in-game editor (
RTSRuntimeEditor) saves and opens maps in its Maps Folder (empty = the default folder above; relative paths are relative toRTSMapSerializer.StorageRoot). With Write Preview Images on, it writes a small minimap imageName.preview.pngnext to every saved map for its map browser. - To share a map, copy the
.rtsmapfile into another player's maps folder, or into a Unity project. In a web browser, use Download Map and Import Map of the in-game editor instead. - Maps you ship with the game can simply be map assets referenced by a terrain or a script; they are included in the build like any other asset.
| API | Description |
|---|---|
terrain.LoadFromFile(path) / terrain.SaveToFile(path) | Load a file into a terrain / save the terrain's map. Both set terrain.CurrentFilePath. |
terrain.MapAsset = asset | Assigns a map asset and loads it immediately when the terrain is enabled. |
terrain.SetMap(mapData) | Shows a MapData you created or loaded; the terrain takes ownership. |
terrain.HasUnsavedChanges | True after edits since the last load or save. |
RTSMapAsset.LoadMap() | Deserializes the asset into a new MapData (you own it). |
RTSMapAsset.CreateFromMap(map, preview) | Creates an in-memory map asset, for example to pass a map between scenes. |
RTSMapSerializer.Serialize(map) / Deserialize(bytes) | Bytes, for example to send a map over the network. |
RTSMapSerializer.TryReadHeaderFromFile(path, out header) | Reads only the uncompressed header (fast, for map lists). |
RTSMapSerializer.TryReadHeader(bytes, out header) | The same for map bytes in memory (for example received over the network). |
terrain.CreateNewMap(MapCreationSettings) | Creates and shows a new flat map, the code equivalent of the New Map dialog. Fills in Info.tilesetId from the terrain's tileset, clears CurrentFilePath and marks the map unsaved. |
terrain.LoadFromAsset() | Reloads the map from MapAsset and discards unsaved edits. If the asset cannot be read, it logs an error and falls back to a map created from DefaultMapSettings. |
terrain.SaveToMapAsset() | Editor only: writes the map back into its .rtsmap asset. Returns false when the terrain has no map asset. |
terrain.PendingLayers | Layers with changes that were notified but not yet processed. |
RTSMapAsset.Header / Preview / Data | The map header (read without decompressing the map), the minimap preview (may be null) and the raw file bytes. |
RTSMapAsset.SetData(bytes, preview) | Replaces the content of a map asset (the header is read from the bytes). |
using System.IO;
using RTSTerrainStudio;
using UnityEngine;

public class SimpleMapList : MonoBehaviour
{
    [SerializeField] RTSTerrain terrain;

    /// <summary>Logs all maps in the default folder without loading them, then opens the first one.</summary>
    [ContextMenu("List And Open Maps")]
    void ListAndOpen()
    {
        string folder = RTSMapSerializer.DefaultMapsFolder;
        if (!Directory.Exists(folder)) { Debug.Log("No maps folder yet: " + folder); return; }

        string[] files = Directory.GetFiles(folder, "*" + RTSMapSerializer.FileExtension);
        foreach (string path in files)
        {
            // The header is stored uncompressed, so this is fast even for big maps.
            if (RTSMapSerializer.TryReadHeaderFromFile(path, out RTSMapHeader h))
                Debug.Log($"{h.name} by {h.author}: {h.width} x {h.height} cells, {h.maxPlayers} players, saved {h.Modified}");
        }

        if (files.Length > 0 && terrain != null)
        {
            try
            {
                terrain.LoadFromFile(files[0]);   // the terrain owns and disposes the loaded map
            }
            catch (InvalidDataException e)
            {
                Debug.LogError("The map file is damaged: " + e.Message);
            }
        }
    }
}
Tilesets
A tileset (RTSTileset) defines the look of a map: up to 16 ground layers, up to 4 cliff layers and
the water style, comparable to the summer, winter or desert tilesets of classic RTS map editors. You can have any number of tilesets and switch the tileset
of a terrain at any time: painted maps only store layer indices, so the same map can be shown in summer and winter.
- Create a tileset with .
- Drag your ground textures onto the Ground Layers section of the inspector. One layer is created per albedo texture. Matching normal and
height maps are picked up by their file name suffix (for example
_n,_normal,_nrm,_normalgl,_h,_height,_disp); roughness, AO and metallic maps are ignored, so you can drop a whole downloaded texture folder. - Add cliff layers in Cliff Layers the same way.
- Assign the tileset to the Tileset field of your
RTSTerrain. - Click Build Texture Arrays in the Texture Arrays section once (see Texture arrays).
Tileset fields
| Setting | Default | Description |
|---|---|---|
Tileset Id (tilesetId) | generated | Stable identifier stored in map files, so maps remember the tileset they were made for. Shown read-only with a Copy button. |
Display Name (displayName) | "New Tileset" | Name shown in the editors. |
Ground Layers (groundLayers) | empty | Up to 16 GroundLayer entries. Extra entries are removed. |
Cliff Layers (cliffLayers) | empty | Up to 4 CliffLayer entries. |
Water (water) | blue-green | The WaterProfile, see below. |
Resolution (arrayResolution) | 1024 | Slice size of the texture arrays: 256, 512, 1024 or 2048. Source textures are resized automatically. |
Compress (compressArrays) | on | Compress the built arrays (BC7 / ASTC). Turn off for the fastest iteration. |
Material Override (materialOverride) | none | Optional material instead of the default terrain material. It must use the RTS Terrain Studio/Terrain shader or a compatible one. |
Macro Variation (macroVariation) | 0.25 | Large scale variation that breaks up texture repetition over big areas. |
Triplanar Sharpness (triplanarSharpness) | 6 | Sharpness of triplanar blending on cliff walls (1–16). |
Ground layer fields
| Setting | Default | Description |
|---|---|---|
| Name | "Layer" | Shown in the palettes. |
| Albedo | none | Base colour (RGB). Any size and format. |
| Normal | none | Tangent space normal map (import it as Normal Map). |
| Height Map | none | Optional height (R channel) for height based blending. Overrides the albedo alpha. |
| Height From Albedo Alpha | off | Use the albedo alpha as height when no height map is assigned. |
| Tint | white | Colour multiplied with the albedo. |
| Tile Size | 6 | World size of one texture repeat in metres (≥ 0.1). |
| Normal Strength | 1 | 0–2. |
| Smoothness | 0.1 | 0–1. |
| Metallic | 0 | 0–1. |
| Height Blend | 0.5 | Strength of height based blending against neighbouring layers (0 = linear blend). Needs a height source. |
| Anti Tiling | 0.3 | Breaks visible tiling with a second, varied sample (0–1). |
| Pathing Effect | None | Pathing rules applied where this layer dominates, for example Unbuildable for rough rock or Unwalkable for lava. |
| Minimap Color | black | Colour on the minimap and in map previews. Black = calculated from the albedo. |
Cliff layer fields
| Setting | Default | Description |
|---|---|---|
| Name | "Cliff" | Shown in the Cliff Type palette. |
| Albedo | none | Wall colour. Without it, cliffs of this type show a dark grey placeholder. |
| Normal | none | Tangent space normal map. |
| Tint | white | Colour multiplied with the albedo. |
| Tile Size | 4 | World size of one texture repeat in metres. |
| Normal Strength | 1 | 0–2. |
| Smoothness | 0.15 | 0–1. |
| Top Ground Layer | −1 (none) | Ground layer painted automatically on top of cliffs of this type. Used by Auto Paint. |
| Edge Ground Layer | −1 (none) | Ground layer the cliff tools paint along the edges of new cliffs of this type, for example a stony rim (see Automatic cliff edges). Shown as Edge Layer on the cliff card. −1 = no automatic edge. |
| Minimap Color | black | Minimap colour. Black = calculated from the albedo. |
Cliff walls are textured triplanar in map-local space, so cliff textures need no special UV layout.
Water profile
The water profile is part of the tileset and is used by the water renderer, the pathing map and the minimap.
| Setting | Default | Description |
|---|---|---|
| Shallow Color | (0.22, 0.55, 0.6, 0.55) | Colour of shallow water; alpha = opacity. |
| Deep Color | (0.03, 0.16, 0.27, 0.95) | Colour of deep water; alpha = opacity. |
| Color Depth | 3 | Depth in metres at which the deep colour is fully reached. |
| Shallow Depth Limit | 0.9 | Water deeper than this is deep water (not walkable). Shallower water is walkable, as in classic RTS games. |
| Normal Map | none | Wave normal map. |
| Normal Strength | 0.6 | 0–2. |
| Normal Tile Size | 8 | World size of one normal map repeat in metres. |
| Flow Speed | (0.03, 0.02) | Scrolling speed of the normal map. |
| Wave Height | 0.05 | 0–1. |
| Smoothness | 0.92 | 0–1. |
| Refraction | 0.03 | 0–0.2. |
| Foam Color | white, alpha 0.8 | Shoreline foam colour. |
| Foam Distance | 0.6 | Shoreline foam distance in metres. |
| Foam Texture | none | Optional foam pattern. |
| Minimap Color | (0.1, 0.3, 0.55) | Water colour on the minimap. |
Editing tilesets from code
Tilesets are ScriptableObjects. After changing fields from code, call tileset.NotifyChanged() so terrains refresh their materials.
tileset.GetGroundLayer(index) and GetCliffLayer(index) return null for unused slots.
Texture arrays
The terrain shader draws all 20 layers in a single pass, so all layer textures are packed into two GPU texture arrays. You never author these arrays yourself: plain Unity textures of any size and format go in, the arrays come out.
Layout
| Array | Slices | Channels | Colour space |
|---|---|---|---|
_RTS_AlbedoArray | 0–15 ground layers, 16–19 cliff layers | RGB = albedo, A = height for height blending | sRGB |
_RTS_NormalArray | 0–15 ground layers, 16–19 cliff layers | RGB = tangent space normal remapped to 0–1 (n × 0.5 + 0.5) | linear |
- The first cliff slice is
RTSTileset.CliffSliceOffset(16); the total isRTSTileset.TotalSlices(20). - Height (alpha) comes from the layer's Height Map (R channel), else from the albedo alpha when Height From Albedo Alpha is on, else a constant 0.5.
- Normals are unpacked during the build, so your normal maps can use Unity's normal map import (DXT5nm / BC5) as usual. Layers without a normal map get a flat normal.
- Layers without an albedo get a neutral grey slice with a subtle pattern; the tint is still applied by the shader.
- Every slice has a full mip chain and uses trilinear filtering. Sources of any size are resized to the chosen Resolution.
Built arrays and the runtime fallback
There are two ways the arrays come into existence:
| Built arrays (recommended) | Runtime fallback | |
|---|---|---|
| Created by | Build Texture Arrays button in the tileset inspector | The renderer, automatically, when no up-to-date built arrays exist |
| Stored | As sub-assets inside the tileset asset (included in player builds) | In GPU memory only, rebuilt on load |
| Format | BC7 (desktop, consoles), ASTC 6×6 (Android, iOS, tvOS, visionOS), for Web the texture compression of the build (DXT5, ASTC 6×6 or ETC2 RGBA8), DXT5 (other platforms); RGBA32 when Compress is off | Uncompressed (4 bytes per pixel) |
| Memory at 1024 px | about 56 MB with BC7 for both arrays | about 224 MB for both arrays |
The Texture Arrays section shows a status badge:
- Not built: the terrain uses runtime arrays. Click Build Texture Arrays once.
- Up to date: format, size, mip count and memory are shown.
- Outdated: textures, resolution or compression changed, or the arrays were built for another platform or texture compression. Rebuild, or let the next player build do it.
- Building: a build is running or scheduled.
The section also shows the target format for the active build platform, the estimated size and build time, and asks for confirmation before builds larger than 256 MB. Clear removes the built arrays.
Player builds
Players use the built arrays as they are, because only the editor can compare them with the source textures. Outdated arrays are therefore rebuilt
automatically right before every player build, and tilesets that were never built keep using runtime arrays. The details, including batch mode and
-rtsAllowOutdatedTextureArrays, are in Texture arrays in player builds. Players also free the CPU copy of the
built arrays the first time they use them, which saves about as much memory as the arrays use on the GPU.
From code: tileset.HasValidBuiltArrays tells you whether the compressed arrays will be used. In the editor they must exist and match
ComputeContentHash(). A player trusts the built arrays until your code changes the layer textures, the resolution or the compression at runtime,
and then falls back to runtime arrays. ComputeContentHash() values are only comparable within the editor, or within one player session, because
the editor hashes the import state of the textures. When HasValidBuiltArrays is false,
RTSTerrain builds uncompressed runtime arrays (RTSTextureArrayBuilder.Acquire). tileset.BuiltAlbedoArray / BuiltNormalArray expose the
built arrays. Use RTSShaderReferences.FindShader(name) (and FindMaterial(name)) instead of Shader.Find in your own runtime code, so the lookup also works in player builds.
Auto Build
With Auto Build on (the default, an editor preference for all tilesets), arrays that were built before are rebuilt one second after textures, resolution or compression change, using fast compression. The first build is always started by hand. A cancelled or failed auto build is not retried until the content or the target format changes. The explicit Build Texture Arrays button uses normal compression quality, which looks slightly better, so press it before you ship.
The size estimate is easy to reason about: resolution² × 20 slices × 2 arrays × 4/3 for mips × bytes per pixel (1 for BC7, about 0.44 for ASTC 6×6, 4 uncompressed). Drop the resolution to 512 for mobile: a quarter of the memory.
For player builds the shaders RTS Terrain Studio/Terrain and Hidden/RTS Terrain Studio/TextureArrayBlit (used by the runtime fallback)
must be included. creates the RTSShaderReferences asset in
Resources/RTSTerrainStudio, which keeps all package shaders in builds.
Vegetation library
A vegetation library (RTSVegetationLibrary) lists the grass, plants and trees available for painting. Create one with
and assign it to the Vegetation Library field of the
RTSTerrain. The terrain also needs an RTSVegetationRenderer component to show vegetation (the RTSTerrain inspector offers to add it).
The inspector has two tabs, Details and Trees, with a grid of thumbnails. Drop prefabs (trees), textures (grass cards) or meshes
(detail meshes) onto it to add entries. Every entry gets a stable id that maps use; duplicated entries automatically get new ids.
Detail prototypes
Details are small, numerous plants painted by density (see Detail density). They are generated in patches of 16 × 16 cells and drawn
with the internal procedural shader Hidden/RTS Terrain Studio/Detail, which handles wind, fog of war and colour variation.
| Setting | Default | Description |
|---|---|---|
| Id | generated | Stable identifier stored in map files. |
| Name | "Grass" | Shown in the palette. |
| Render Mode | Crossed Quads | CrossedQuads: crossed quads textured with Texture (classic grass). Mesh: uses Mesh, textured with the main texture and colour of Material. |
| Mesh | none | Mesh for Mesh mode. |
| Material | none | Material for Mesh mode. Its main texture, colour and alpha cutoff are used with the detail shader. |
| Texture | none | Texture with alpha for Crossed Quads mode. |
| Healthy Color / Dry Color | light green / straw | Instances blend between the two by noise. |
| Min / Max Width | 0.6 / 1.0 | Random width range in metres. |
| Min / Max Height | 0.4 / 0.8 | Random height range in metres. |
| Max Density | 6 | Instances per detail texel at full density (255). Range 1–32. |
| Color Noise Scale | 12 | Scale of the noise that blends the healthy and dry colours. |
| Wind Strength | 0.5 | 0–1. The wind direction and speed are set on the RTSVegetationRenderer. |
| Render Distance | 70 | Instances beyond this camera distance are culled (they shrink out smoothly before). |
| Cast Shadows | off | Shadows from details are expensive; leave off for grass. |
| Align To Ground | on | Tilt instances to follow the ground normal. |
| Max Slope | 40 | Do not spawn on slopes steeper than this (degrees). |
| Avoid Water | on | Do not spawn under water. |
| Icon | none | Palette icon; generated in the editor when empty. |
Tree prototypes
Trees are individual instances (see Trees and decor instances) placed with Place Trees.
| Setting | Default | Description |
|---|---|---|
| Id | generated | Stable identifier stored in map files. |
| Name | "Tree" | Shown in the palette. |
| Prefab | none | Prefab with MeshRenderers and an optional LODGroup (LOD0 and LOD1 are used). |
| Spawn Mode | Instanced | Instanced: GPU instanced, no GameObjects, fastest. GameObject: one prefab instance per tree, for gameplay such as harvesting. |
| Min / Max Scale | 0.85 / 1.2 | Random uniform scale range. |
| Random Rotation | on | Random yaw when placing. |
| Tint A / Tint B | white / pale green | Random tint range per instance. |
| Footprint Radius | 0.8 | Radius in metres blocked in the pathing map (scaled with the tree). |
| Blocks Vision | on | Trees block line of sight for the fog of war, as in classic RTS games. |
| Min Spacing | 1.6 | Minimum distance to other trees when scattering. |
| Colliders | on | Instanced mode: pooled capsule collider proxies are created. GameObject mode: the prefab's own colliders are used. |
| Collider Radius / Height | 0.4 / 4 | Size of the capsule proxies (Instanced mode). |
| Render Distance | 250 | Trees beyond this camera distance are culled. |
| Cast Shadows | on | Shadow casting. |
| Icon | none | Palette icon; generated in the editor when empty. |
GPU instancing
Instanced trees are drawn with GPU instancing, so their materials should have Enable GPU Instancing switched on. If a material has it off, the renderer uses a hidden instancing copy of it automatically (kept in sync with the original while you edit), and the library inspector shows an info message with an Enable button that fixes the material itself. Details do not need instancing on their materials, because they are always drawn with the procedural detail shader.
Use the RTS Terrain Studio/Vegetation shader for tree and plant prefab materials to get wind, translucency, fog of war and the per-instance tint.
Other instancing-capable URP materials work too, but without the tint.
From code, tree instances are removed with RTSVegetationRenderer.RemoveTree(id) (for example when a worker harvests a tree), found with
TryFindNearestTree, and their GameObject or collider proxy is returned by GetTreeObject(id).
Editing libraries from code
Maps store a palette of prototype ids, so resolve a palette index through the library:
- Trees:
vegetationLibrary.FindTree(map.TreePrototypeIds[tree.prototype]). - Detail layers:
vegetationLibrary.FindDetail(layer.prototypeId). - Decor:
decorLibrary.Find(map.DecorPrototypeIds[d.prototype]). Get the variant prefab withprototype.GetPrefab(d.variant): 0 is the main prefab, and invalid or empty variants fall back to it.VariantCountincludes the main prefab. decorLibrary.GetCategories()lists the categories in display order (prototypes without a category are listed as Misc).vegetationLibrary.EnsureUniqueIds()gives duplicated entries new ids.
After changing a library from code, call library.NotifyChanged() (it raises the library's Changed event), so RTSTerrain raises LibrariesChanged and the renderers refresh. This is the same rule as for tilesets.
Decor library
A decor library (RTSDecorLibrary) lists the props (doodads) you can place: rocks, ruins, fences, crates, buildings or any other prefab.
Create one with and assign it to the Decor Library field of the RTSTerrain.
An RTSDecorManager component on the terrain keeps the scene in sync with the placed instances.
The inspector shows the prototypes as a grid with auto-generated thumbnails and one tab per category (plus All). Drop prefabs onto it to add them to the current category; right-click a category tab to rename it. Prototypes without a category appear under Misc.
Decor prototype fields
| Setting | Default | Description |
|---|---|---|
| Id | generated | Stable identifier stored in map files. |
| Name | "Decor" | Shown in the palette. |
| Category | "Props" | Palette tab the prototype appears in. |
| Prefab | none | The object to place. |
| Variants | empty | Optional alternative prefabs; a random variant is chosen when placing. The instance stores the variant index (0 = main prefab). |
| Spawn Mode | GameObject | GameObject: one GameObject per instance (scripts, colliders, animations). Instanced: GPU instanced, no GameObjects, static props only, fastest. |
| Min / Max Scale | 0.9 / 1.1 | Random uniform scale range. |
| Random Yaw | on | Random rotation around the up axis. |
| Yaw Step | 0 | Snap the yaw to multiples of this angle (0 = free), for example 90 for walls and fences. |
| Max Random Tilt | 0 | Random tilt in degrees (0–45). |
| Align To Normal | 0 | Align the up axis to the ground normal (0 = upright, 1 = fully aligned). |
| Snap To Grid | off | Snap the position to cell centres. |
| Y Offset | 0 | Vertical offset in metres added at render time (negative sinks the object into the ground). |
| Tint A / Tint B | white / white | Random tint range per instance. |
| Footprint Shape | Circle | None, Circle or Box. |
| Footprint Size | (0.75, 0.75) | Circle: X is the radius. Box: half extents along the object's X and Z axes. In metres, scaled with the instance. |
| Footprint Effect | Unwalkable, Unbuildable | PathingOverride flags written inside the footprint. |
| Blocks Vision | off | Blocks line of sight for the fog of war. |
| Min Spacing | 1 | Minimum distance to other decor when scattering. |
| Cast Shadows | on | Shadow casting. |
| Icon | none | Palette icon; generated in the editor when empty. |
Footprints
- A circle footprint uses Footprint Size X as radius, multiplied by the largest horizontal scale of the instance.
- A box footprint follows the instance's rotation (its X and Z axes projected onto the ground) and its X/Z scale, so a rotated wall blocks exactly its own area.
- No footprint is written when the shape is
None, the effect isNone, or the instance has the flagDecorFlags.IgnorePathing. - Use
Unbuildablealone for flat decorations units may walk over (flowers, rubble), andUnwalkablefor solid objects.
Spawn modes
| GameObject | Instanced | |
|---|---|---|
| Scene objects | One per instance, under a child named "RTS Decor" (not saved with the scene) | None |
| Scripts, colliders, animation | Yes (each root gets an RTSDecorInstance component) | No |
| Rendering | Normal renderers of the prefab | Graphics.RenderMeshInstanced with LOD0, culled per patch |
| Best for | Interactive props, gold mines, destructible objects | Thousands of static rocks and plants |
Instanced decor has the same GPU instancing behaviour as instanced trees: materials without Enable GPU Instancing are drawn through a hidden instancing copy.
Spawned objects are pooled; RTSDecorManager.GetInstanceObject(id) returns the spawned object of an instance, and
RTSDecorInstance.FromCollider(collider) maps a physics hit back to its instance.
The .rtsmap file format
This section is for programmers who want to read maps with other tools, write converters or add their own data. You do not need it to use the package:
RTSMapSerializer handles everything.
Binary layout
All numbers are little-endian. Strings use the .NET BinaryWriter format: a 7-bit encoded length followed by UTF-8 bytes.
| Part | Type | Content |
|---|---|---|
| Magic | 4 bytes | ASCII RTSM |
| Format version | int32 | RTSMapSerializer.CurrentVersion (currently 1) |
| Header length | int32 | Number of header bytes that follow |
| Header | bytes | string name, string author, string description, int32 width, int32 height, float cellSize, int32 maxPlayers, string tilesetId, int64 modifiedUtcTicks; then, only for maps with custom header fields, int32 count and per field a string key and a string value |
| Body | raw deflate stream (RFC 1951, no zlib or gzip wrapper) to the end of the file | A sequence of sections, terminated by an int32 tag of 0 |
The header is uncompressed so map browsers can show name, author, size and players without decompressing the map
(RTSMapSerializer.TryReadHeader, TryReadHeaderFromFile, struct RTSMapHeader). Readers jump to the end of the header using the
header length, so a reader that knows only the fixed fields skips the appended ones.
Sections
Every section is [int32 tag][int32 length][payload]. Tags are FourCC codes stored little-endian, so the first character is in the lowest byte
(DIMS = 0x534D4944). Arrays of raster data are written as an int32 element count followed by the raw elements.
| Tag | Value | Payload |
|---|---|---|
DIMS | 0x534D4944 | int32 width, int32 height, float cellSize, float cliffLevelHeight, int32 splatResolution, int32 detailResolution, int32 pathingResolution, uint32 nextInstanceId. Must be the first section. |
INFO | 0x4F464E49 | string name, author, description; int32 maxPlayers; string tilesetId; int64 createdUtcTicks, modifiedUtcTicks |
HGHT | 0x54484748 | Fine heights: float per vertex |
LEVL | 0x4C56454C | Cliff levels: byte per vertex |
VFLG | 0x474C4656 | Vertex flags: byte per vertex |
CTYP | 0x50595443 | Cliff types: byte per vertex |
WATR | 0x52544157 | Water surface heights: float per vertex |
SPLT | 0x544C5053 | int32 map count (4), then per splat map an array of RGBA bytes per texel |
DETL | 0x4C544544 | int32 layer count, then per layer: string prototypeId and a byte array of densities per detail texel |
TREE | 0x45455254 | Prototype id list (int32 count + strings), int32 tree count, then per tree: uint32 id, uint16 prototype, float3 position, float yaw, float scale, 4 bytes tint (30 bytes) |
DECO | 0x4F434544 | Prototype id list, int32 count, then per instance: uint32 id, uint16 prototype, byte variant, byte flags, float3 position, float4 rotation (x, y, z, w), float3 scale, 4 bytes tint (52 bytes) |
PATH | 0x48544150 | Manual pathing overrides: byte per pathing cell |
REGN | 0x4E474552 | int32 count, then per region: string name, float x, z, width, depth, float4 colour, properties |
STRT | 0x54525453 | int32 count, then per start location: int32 player, float3 position, float yaw |
MARK | 0x4B52414D | int32 count, then per marker: string name, string tag, float3 position, float4 rotation, properties |
ENVR | 0x52564E45 | float4 sunColor, float sunIntensity, float2 sunRotation, float4 ambientColor, bool fog, float4 fogColor, float fogDensity |
"Properties" are written as an int32 count followed by key/value string pairs. The derived pathing map is not stored; only the manual overrides are.
Unknown sections, damaged files and versioning
- Unknown sections are skipped by the reader using their length, so your own sections never break other readers, and tools and games without your code still read the map. The package also keeps them unchanged (
MapData.UnknownSections) and writes them back when the map is saved (see Map extensions). - By default, a file whose format version is above
RTSMapSerializer.CurrentVersionlogs a warning and is read anyway; unknown data is skipped. A raster layer whose element count does not match the map size logs a warning; what fits is read, the rest is skipped. Strict reading rejects both (see the next section). - Every rejected file throws the same exception type,
System.IO.InvalidDataException, with a message that names the problem, for example "Not an RTS Terrain Studio map file (bad magic)", "The map file is damaged or incomplete: …" or "The map needs about 600 MB of memory, the limit is 512 MB". A failed load leaves nothing behind: the partly read map is disposed. RTSMapSerializer.SaveToFilewrites to<path>.tmpfirst and then replaces the file, so a crash during saving never leaves a half written map behind.- The format grows only through new sections and appended header fields; existing sections keep their layout. Follow the same rule for your own data: keep a version number at the start of your payload and add new fields at its end.
Safety limits and read options
Map files often come from other people: players share maps, game servers send them, and players import them into a Web build. A damaged or deliberately broken file must never crash the game or use up its memory. The reader therefore checks every file, whichever way it is loaded (Deserialize, LoadFromFile, Read, the map importer, Open in the editor window or in the in-game editor). These checks are always on:
- Size first.
DIMSmust be the first section. Its size and resolutions are validated, and the memory the map will need (its map data, see Memory numbers) is compared withMaxMapMemoryBytes, before any map memory is allocated. - Limited decompression. The reader decompresses at most as much data as a valid map of that size can contain: its raster layers,
MaxDetailLayersdetail layers andMaxObjectBytesfor everything else (trees, decor, regions, markers, map info, custom sections), and never more thanMaxDecompressedBytes. A small file that would expand to gigabytes stops at that limit. - Counts and lengths. Every count (trees, decor, regions, markers, start locations, properties) and every text and layer length is checked against the bytes left in its section before memory is reserved for it.
- Detail layers. At most
MaxDetailLayers, and each one must have exactly as many texels as the detail resolution of the map needs. - Repeated sections. A second
DIMSor a second copy of a built-in section is rejected. Your own custom sections may appear more than once. - Damaged header. A header length shorter than the header fields is rejected.
- Out of memory. When the system runs out of memory while a map is read, the reader throws
InvalidDataException("There is not enough memory to load the map.") instead of anOutOfMemoryException.
Valid maps within the limits are not affected by these checks. The demo maps and every map the package writes pass all of them.
Default and Strict
RTSMapReadOptions holds the limits and the validation rules. Its two presets return a new object every time, so you can change it freely:
RTSMapReadOptions.Defaultis lenient: it repairs or skips what it can, so a slightly damaged map of your own still opens. Every method without an options parameter uses it.RTSMapReadOptions.Strictrejects everything the format does not allow. Use it for maps from other people.
| The file has … | Default | Strict |
|---|---|---|
a format version above CurrentVersion | Warning; read anyway, unknown data is skipped | Rejected |
| a raster layer of the wrong size | Warning; what fits is read | Rejected |
no HGHT, LEVL, VFLG, CTYP, WATR, SPLT or PATH section | The layer stays empty | Rejected |
| more or fewer than 4 splat maps | Extra maps are skipped, missing ones stay empty | Rejected |
| cliff levels above 15 or cliff types of 4 or more | Clamped, with one warning per layer | Rejected |
a header whose width, height or cell size differs from DIMS | DIMS is used | Rejected |
| resolutions that are not powers of two | Accepted within the allowed ranges | Rejected |
| numbers that are not finite (NaN, infinity) | Accepted; the map validator reports invalid heights | Rejected |
| a built-in section whose content does not end exactly at its length | Reading continues after the declared length | Rejected |
| no end marker | Accepted | Rejected |
| trees or decor with a prototype index outside the prototype list of the map | Accepted; the map validator reports them | Rejected |
| unknown or custom sections | Accepted and kept in MapData.UnknownSections (and passed to CustomSectionReader) | Accepted and kept in MapData.UnknownSections (and passed to CustomSectionReader) |
| custom header fields | Read into MapData.HeaderFields | Read into MapData.HeaderFields |
The package uses Strict by itself where maps come from other people:
- Mirror: every map a client downloads or takes from its cache, with the memory limit Max Map Memory MB (see Joining a game and map streaming).
- In-game editor in a web browser: Import Map, drag and drop, and opening maps saved in the browser, with a memory budget that fits the page (see Maps in the browser).
Everything else uses Default: the map importer, Open in the editor window, Open of the in-game editor outside web browsers, RTSTerrain.LoadFromFile and RTSMapAsset.LoadMap.
Limits
| Property | Default | Web players | Description |
|---|---|---|---|
StrictValidation | off in Default, on in Strict | the same | Rejects everything the format does not allow (table above). |
MaxMapMemoryBytes | 4 GB | 512 MB | Largest map data (RTSMapMemory.EstimateDataBytes, including the detail layers). 4 GB accepts every valid map. Checked before the map is allocated and again for every detail layer. |
MaxDecompressedBytes | 2 GB | 640 MB | Largest amount of decompressed section data. |
MaxObjectBytes | 256 MB | 64 MB | Budget for all data that is not a raster layer. A tree takes 30 bytes and a decor object 52, so 64 MB still holds about 2 million trees. |
MaxDetailLayers | 64 | 64 | Largest number of detail layers (one per painted detail prototype). |
The Web values apply only in Web players. The Unity editor always uses the desktop values, also with Web as the build target.
In a Web player every load without options uses the 512 MB limit, also RTSTerrain.LoadFromFile and map assets. To load a larger map there anyway, pass your own options with a higher MaxMapMemoryBytes (and a higher MaxDecompressedBytes for map data above about 600 MB), for example terrain.SetMap(RTSMapSerializer.LoadFromFile(path, options)) or terrain.SetMap(RTSMapSerializer.Deserialize(asset.Data, options)), and set terrain.CurrentFilePath yourself if you want to save back to the file. The page must have enough memory for it (see Player settings).
Loading maps from other people
using System.IO;
using RTSTerrainStudio;
using UnityEngine;

// Loads a map that a player got from somewhere else (a mod site, a friend, your own server).
public static class SharedMapLoader
{
    public static bool TryLoad(RTSTerrain terrain, byte[] bytes, out string error)
    {
        // Fast: reads only the size from the first bytes. The map is not loaded yet.
        if (!RTSMapSerializer.TryReadDimensions(bytes, out RTSMapDimensions size))
        {
            error = "This is not an RTS Terrain Studio map.";
            return false;
        }
        long gameBytes = RTSMapMemory.EstimateRuntimeTotalBytes(size.width, size.height,
            size.splatResolution, size.detailResolution, size.pathingResolution);
        Debug.Log($"{size.width} x {size.height} cells, about {gameBytes / (1024 * 1024)} MB in the game.");

        // Strict: reject everything the format does not allow instead of repairing it.
        RTSMapReadOptions options = RTSMapReadOptions.Strict;   // a new object, safe to change
        options.MaxMapMemoryBytes = 256L * 1024 * 1024;          // this game accepts up to 256 MB of map data

        try
        {
            // The terrain takes ownership of the map and disposes the previous one.
            terrain.SetMap(RTSMapSerializer.Deserialize(bytes, options));
            error = null;
            return true;
        }
        catch (InvalidDataException e)
        {
            // Every rejected file ends up here; the message names the problem.
            error = e.Message;
            return false;
        }
    }
}
Custom sections
You can store your own data in map files, for example game rules, triggers or the units that stand on the map when the match starts. The simplest way is a map extension: derive a class from MapDataExtension, and the map saves it as a section with your tag, reads it when your code asks for it, and copies, resizes and undoes it together with the map. Your own data in the map: map extensions explains it with examples.
Sections that neither the package nor an extension has read are kept unchanged in MapData.UnknownSections and written back when the map is saved. So a map passes through projects that do not know its data without losing it.
For full control over the bytes, static hooks on RTSMapSerializer read and write raw sections:
| Hook | Type | Called |
|---|---|---|
CustomSectionWriter | Action<MapData, Action<int, byte[]>> | Once per save, after the built-in sections and the map extensions. Call the given action with your tag and payload for every section you want to write. A section written here replaces the kept sections with the same tag. |
CustomSectionReader | Action<MapData, int, byte[]> | For every section the reader does not know, with its tag and a copy of its payload. The MapData already exists at that point (DIMS comes first). The section is kept in UnknownSections as well. |
CustomHeaderWriter | Action<MapData, Action<string, string>> | Once per save: adds custom header fields (see Header fields). |
- Choose tags that do not collide with the built-in ones: start them with
Xand build them withRTSMapSerializer.MakeTag("XSTA"). Never use 0, which marks the end of the sections;RTSMapSerializer.IsReservedTag(tag)is true for 0 and every built-in tag. - The hooks are plain delegates: combine handlers with
+=and remove them with-=, so several systems can add sections. - Check the tag in your reader and ignore sections that are not yours.
- A section your reader receives is also kept and written back on save, unless your writer writes a section with the same tag in that save. If your writer leaves a section out on purpose, for example because the data was deleted, call
map.RemoveUnknownSections(tag)in your reader, or always write the section. - Register the hooks before any map is loaded or saved. In the Unity Editor, maps are also read by the importer and written by Save, so register for the editor as well (the example uses
InitializeOnLoadMethod). RTSMapSerializer.TryValidatenever callsCustomSectionReader.
This writer adds a small statistics section to every saved map, for example for a website that lists maps. It computes the section from the map at every save, so the section is always written and never outdated:
using System;
using System.IO;
using RTSTerrainStudio;
using UnityEngine;

/// <summary>Adds a statistics section "XSTA" to every saved map.</summary>
public static class MapStatisticsSection
{
    static readonly int Tag = RTSMapSerializer.MakeTag("XSTA");
    const int PayloadVersion = 1;

#if UNITY_EDITOR
    [UnityEditor.InitializeOnLoadMethod]          // editor: Save in the editor window and the Scene View
#endif
    [RuntimeInitializeOnLoadMethod(RuntimeInitializeLoadType.SubsystemRegistration)]   // player and Play Mode
    static void Register()
    {
        // Remove first so a second registration does not add the handler twice.
        RTSMapSerializer.CustomSectionWriter -= Write;
        RTSMapSerializer.CustomSectionWriter += Write;
    }

    static void Write(MapData map, Action<int, byte[]> writeSection)
    {
        using (var stream = new MemoryStream())
        {
            using (var writer = new BinaryWriter(stream))
            {
                writer.Write(PayloadVersion);   // our own version, so the payload can grow later
                writer.Write(map.Trees.Count);
                writer.Write(map.Decor.Count);
                writer.Write(map.StartLocations.Count);
            }
            writeSection(Tag, stream.ToArray());
        }
    }
}
Editing in the Unity Editor
This chapter covers everything you use to build a map inside the Unity Editor: the RTS Terrain Studio window, painting in the Scene View, keyboard shortcuts, brushes, symmetry, undo, every editing tool with all of its settings, Auto Paint, and the RTS Terrain component itself.
The same tools, brush and symmetry settings also power the in-game editor (see In-Game Editor), so what you learn here works there too.
Your first edit in five steps. If you have never used the package before, try this:
- Create a terrain with . If the project has no tileset yet, you are offered to create the demo content first, so accept that.
- Open .
- On the Height tab, click Raise / Lower. Editing turns on automatically.
- Move the mouse over the terrain in the Scene View and hold the left mouse button. A hill grows. Hold Shift to dig instead.
- Press 2 for the Cliff tools, click on the hill to raise a plateau, and press Esc when you are done. Ctrl+Z undoes any step.
The RTS Terrain Studio window
The window is the control centre of the editor. It holds no editing state of its own: it shows and changes the shared edit session that the Scene View, the Scene View overlay and the RTS Terrain inspector use as well. Anything you change in one place shows up immediately in the others.
You can open it in any of these ways:
- the Open RTS Terrain Studio button in the RTS Terrain inspector
- the window button in the RTS Terrain Studio overlay of the Scene View
The window has four areas: the header at the top, the tab bar, the scrollable page, and the status bar at the bottom.
Header
The header shows which terrain and map you are editing and holds the file and undo commands.
| Control | What it does |
|---|---|
| Terrain picker | Chooses the terrain the window and the Scene View tools edit. It lists every RTS Terrain in the open scenes and has a Create New Terrain entry. Selecting a terrain in the Hierarchy or clicking another terrain in the Scene View also switches the edited terrain. Pending text edits are committed before the switch. |
| Select button | Selects and pings the terrain GameObject in the Hierarchy. |
| Map name and dot | The name of the map (from the Map tab). A dot next to it means the map has unsaved changes. Below it you see the map size and the name of the .rtsmap asset. |
| Save | Writes the map into its .rtsmap asset. Without a map asset it behaves like Save As. The button is highlighted while there are unsaved changes. If the file is read-only or locked, a dialog explains the problem and offers Save As. |
| Save As… | Saves the map as a new .rtsmap asset in the project and assigns it to the terrain. |
| Open… | Opens another .rtsmap asset of the project on this terrain. Files outside the Assets folder must be copied into the project first. |
| Reload | Reloads the map from its asset and discards unsaved changes. Needs a map asset. |
| Undo / Redo | Undo or redo the last terrain edit. The buttons show the step name, for example Undo Raise / Lower. See Undo and redo. |
| ? | Opens this manual at the editor window chapter. |
| Editing On / Editing Off | Turns terrain editing in the Scene View on or off. If no tool is selected yet, turning editing on picks the first tool of the tab you are looking at. |
Open… and Reload ask before they replace a map that has unsaved changes or undo history, because loading a map clears the undo history. In Play Mode a warning reminds you that edits are lost when you leave Play Mode unless you save the map.
When the scene has no terrain yet, the header shows a Create Terrain button instead. It creates an RTS Terrain GameObject with the vegetation, water and decor components, using the menu item .
Tab bar
The tab bar has ten tabs: the eight tool categories Height, Cliffs, Paint, Vegetation, Decor, Water, Pathing and Markers, followed by Map and Settings. A small dot marks the category of the tool you are currently painting with. The window remembers the last tab you used.
Custom tool categories and content of your own add further tabs, placed by the order of their category (see Your own tabs, panels and menu commands).
While the window has keyboard focus, 1 to 8 (also on the numeric keypad) switch between the built-in category tabs. These keys are ignored while you type in a text field.
Tool pages
Each category tab shows a stack of cards. Every card can be collapsed by clicking its header.
| Card | Contents |
|---|---|
| Category Tools | The tool grid. Click a tool to paint with it in the Scene View. Click the active tool again to stop editing. Hover a tool to read its description and modifier keys. Custom tools you write appear here automatically. |
| Tool card | The name, description and hint of the selected tool, a ? button that opens the matching section of this manual, and a live status line. Move the mouse over the terrain to see it, for example Ground 4.25 m | Fine +0.25 m | Level 2 for height tools or Level 2 → 3 for the cliff tools. |
| Getting Started | Shown when no tool of this category is selected. If you are painting with a tool of another category, it says Active tool: X and offers Go to Tool. |
| Brush | Shape, radius, strength, hardness, falloff curve, rotation, random rotation, spacing and jitter. These settings are shared by all brush tools. Hidden for tools that do not use the brush. See Brushes. |
| Symmetry | Symmetry mode and centre (not shown for drag tools). See Symmetry. |
| Tool Settings | The settings of the selected tool, built automatically from the tool's code. They are remembered between editor sessions. The tables in the tool reference list every setting. |
| Category actions | Extra cards for some categories: Auto Paint Whole Map (Paint), Selection (Decor, while Select Decor is active), Water at Cursor (Water) and Pathing Overlay (Pathing). |
| Your own content | A card that game code added with RTSTerrainStudioWindow.RegisterTab (see Tabs in the RTS Terrain Studio window). |
While editing is paused, a banner says Editing is paused – the Scene View uses Unity's tools. Its Resume button turns editing on again.
Tool settings and palettes
The settings card picks a control for every setting from its type:
| Setting type | Control |
|---|---|
| Number with a range | Slider with a value field |
| On/off value | Toggle |
| Choice (enum) | Dropdown |
| Colour / text | Colour field / text field |
| Ground layer | Palette of the tileset's ground layers with texture thumbnails. Empty slots stay visible and explain in their tooltip how to fill them. |
| Cliff type | Palette of the tileset's cliff layers. |
| Cliff level | Buttons for levels 0 to 15. Each tooltip shows the ground height of that level, and the palette shows the level under the cursor. |
| Player | The 16 player colours (Red, Blue, Teal, Purple, Yellow, Orange, Green, Pink, …). |
| Detail, tree or decor prototypes | Grid of the library's prototypes with previews, a search field and, for decor, category filters. Click selects one prototype, Ctrl+click adds or removes one, Shift+click selects a range. None clears the selection; placement tools then use the first prototype of the library. |
| Asset reference | Object field (for example the Auto Paint profile). Scene objects are accepted where the type allows it. |
When a palette needs an asset the terrain does not have, the card explains what is missing and offers a button to create it: Create Tileset, Create Vegetation Library or Create Decor Library. You can also assign an existing asset in the field next to it. Each palette also has an Edit button that selects the tileset or library so you can add entries in the Inspector.
A Ctrl+click pick in the Scene View changes the setting in the window too, for example the selected ground layer or the flatten height.
Status bar
The status bar at the bottom of the window shows, from left to right:
- the point under the mouse: cell, world position, cliff level, ground height, water depth (when wet) and the name of the dominant ground layer;
- the pathing flags at that point (walkable, buildable and so on);
- the brush, for example Brush 6.0 m · 50%;
- the undo history, for example Undo 12 (+2) · 48 MB: steps you can undo, steps you can redo, and the memory they use.
Map tab
The Map tab holds map-wide settings and operations. Every change can be undone, unless its dialog says otherwise. The ? button at the top opens this section.
Map
| Setting | Description |
|---|---|
| Name | Name of the map shown in map browsers and lobbies. It is also shown in the window header. |
| Author | Who made the map. |
| Description | Short description shown to players. |
| Max Players | Recommended number of players (1–16). |
| Map Asset | The .rtsmap asset this terrain loads and saves. Assigning another asset opens that map, with the same confirmation as Open…. |
Below the fields the card shows the map size, the resolution of the splat, detail and pathing layers per cell, and the memory the map uses: its map data, and about how much it needs in a game together with the splat textures. Typing in these fields creates one undo step (Edit Map Info) when you leave the field.
New Map
Replaces the terrain's map with a new, flat map.
| Setting | Default | Description |
|---|---|---|
| Size presets | – | Buttons for square maps of 64, 96, 128, 192, 256, 384 and 512 cells. |
| Width / Height | from the terrain's Default Map (128) | Size in cells. Multiple of 16, from 16 to 1024. |
| Cell Size | 2 m | Size of one cell in metres. Classic RTS maps use about 2 m. |
| Cliff Level Height | 2 m | World height of one cliff level. |
| Base Cliff Level | 2 | Initial cliff level of the whole map. 2 leaves room to dig lakes and valleys. |
| Base Ground Layer | 0 | Ground layer that initially covers the whole map. |
| Splat | 4 | Ground paint texels per cell (1, 2, 4 or 8). 4 is a good default; 8 gives very fine paint. |
| Details | 2 | Grass density texels per cell (1, 2 or 4). |
| Pathing | 2 | Pathing cells per map cell (1, 2 or 4). Higher values let units be placed more precisely. |
| Name | New Map | Name of the new map. |
A summary line shows the resulting world size and the estimated memory while editing and in a game (hover over it to see the parts). A very large map adds a warning. A map that the active build target cannot run, for example one with splat textures above 2048 texels per side for Web, shows an error, and Create New Map refuses it: choose a smaller size or splat resolution, or switch the build target in . See Memory limits and warnings.
Creating a new map clears the undo history and cannot be undone. The old map asset is detached from the terrain but not changed. Use Save As… to store the new map in its own file.
Resize
Grows or shrinks the map while keeping its content.
- Enter New Width and New Height in cells (multiples of 16).
- Click one of the nine anchor buttons. The arrows show the direction in which the map grows; the existing content stays at the anchored side.
- Choose the Fill Level (cliff level) and the Fill Layer (ground layer) for new areas.
- Click Resize Map. The hint above the button shows how far the content moves, the new world size and its estimated memory, with the same warning and error as New Map. A map that is already too large for the build target can still be made smaller.
Shrinking removes terrain, trees, decor and markers outside the new area. Resizing clears the undo history.
Generator
Generates a complete map layout from a seed: plateaus, ramps, water, ground paint, vegetation, decor and start locations. The same seed and settings always produce the same map.
| Control | Description |
|---|---|
| Seed, Style, Symmetry | The seed, the style (Plains, Hills, Highlands, Islands, Canyon, Arena) and the symmetry of the layout (default Rotate 2, the 180° layout; see Symmetry). |
| Noise, Cliffs, Ramps, Water, Border, Paint, Vegetation, Decor, Start Locations | Foldouts with the detailed generator settings of each stage. |
| Randomize Seed | Picks a new random seed. |
| Apply Style Preset | Loads the noise, cliff, ramp and water values of the selected style. |
| Reset | Resets all generator settings to the defaults of the selected style. |
| Generate | Replaces heights, cliffs, water, ground paint, vegetation, decor and start locations. The map size is kept. This is one undo step. When that step would need more memory than the undo limit, the confirmation says so and its button reads Generate Without Undo (see Limits and memory). |
The generator works on the terrain bound in the window header. If another terrain is selected, a dialog asks you to pick this terrain in the header first. A progress bar is shown while it runs, and a summary of what was generated appears below the buttons.
Heightmap
Imports or exports the terrain height as a 16-bit PNG or RAW file, for example to use World Machine, Gaea or Photoshop.
| Setting | Description |
|---|---|
| Mode (import) | Fine Heights Only: adds hills on top of the existing cliff levels. Cliff Levels And Fine Heights: splits the image into cliff levels and fine heights, so the ground matches the image exactly (best for terraced heightmaps; smooth slopes that cross a level become small cliffs). Absolute Heights Keep Levels: the image is the absolute ground height but the cliffs are kept; use it to re-import a Ground Height export that you edited elsewhere. |
| Height Scale | Metres represented by the full 16-bit range. 0 = automatic. |
| Height Offset | Import: metres added to every height. Export: the height written as 0. |
| Flip Vertically | Flips the image along Z. Use it when the map appears mirrored. |
| RAW Width / RAW Height | Size of RAW files. 0 = guess from the file size (square files only). |
| RAW Little Endian | Byte order of RAW files. Windows and most tools use little endian. |
| Source (export) | Ground Height: cliff levels plus fine height. Fine Heights: only the fine height on top of the levels. |
The buttons are Import PNG… (8- or 16-bit grayscale PNG, JPG or EXR), Import RAW…, Export PNG…, Export RAW… and Export Splat PNG… (an image of the ground paint in the dominant layer colours). Images of a different size are resampled. A map has one more vertex than cells in each direction, so a 256 map uses 257 × 257 samples. Each import is one undo step. When that step would not fit into the undo memory limit, you are asked first (Continue Without Undo).
Minimap
Bakes a minimap image of the map. Choose the Size of the longer side (128, 256, 512 or 1024 px) and adjust the Bake Options: ground colours (dominant or blended layers), cliff level brightness, hill shading, cliffs, water, trees, decor and start locations. Bake Preview shows the result in the card; Save PNG… bakes and saves it as a file. When you edit the map after baking, the card tells you to bake again.
Validation
Validate Map checks the map for problems such as missing textures, unreachable start locations or performance limits. Each issue is listed as an error, warning or info with a hint on how to fix it. Click an issue that has a location to show it in the Scene View. When you edit the map after validating, the card says that the list describes the map before the latest edits.
Environment
Sun, ambient light and fog are stored in the map and applied to the scene by the RTS Environment component.
| Setting | Description |
|---|---|
| Sun Colour | Colour of the sun light. |
| Sun Intensity | Intensity of the sun light (0–8). |
| Sun Rotation | Degrees: x = pitch (height above the horizon), y = yaw. |
| Ambient Colour | Ambient (sky) light colour. |
| Fog | Enables distance fog. |
| Fog Colour / Fog Density | Colour and density (0–0.05) of the exponential fog. |
Capture From Scene copies the current scene lighting into the map (one undo step). Apply applies the map's environment to the scene now, and Select Component selects the RTS Environment component. When the terrain has no RTS Environment, the card offers Add Environment Component.
Settings tab
| Card | Contents |
|---|---|
| View | Show Grid (the cell grid on the edited terrain, also G), Show Markers (start locations, regions and markers even when no marker tool is active), Pathing Overlay (Off, Walkability, Buildability, Flyability, Water, Combined) and Overlay Opacity. |
| Terrain Component | The full inspector of the edited RTS Terrain component (see The RTS Terrain component) and a Select Terrain button. |
| Undo History | Max Steps (10–1000, default 100) and Memory Limit (MB) (32–4096, default 512), the current memory use and Clear History. See Limits and memory. |
| Shortcuts | The Scene View shortcuts with their current key bindings, read from Unity's Shortcut Manager. Edit Shortcuts… opens the Shortcut Manager; Refresh reads the bindings again after you changed them. |
| Help & Maintenance | Open Documentation, Validate Project (runs ) and Reset All Tool Settings, which resets the brush, symmetry and the settings of every tool to their defaults and clears the terrain undo history. |
| About | Product version and Unity version. |
Painting in the Scene View
All editing happens in the Scene View. When terrain editing is on and a tool is selected, the left mouse button paints with the tool instead of selecting objects. Turn editing on with the window's Editing button, the overlay's Start Editing button, the inspector's Edit Terrain button, or by clicking a tool. Turn it off with Esc.
Mouse and modifier keys
| Input | Action |
|---|---|
| Left mouse button | Paints with the active tool (press, drag, release). One stroke is one undo step. Many tools keep working while you hold the button still, for example Raise / Lower keeps building up the hill. |
| Shift (held) | Inverts the tool: lower instead of raise, erase instead of paint, remove instead of place. The brush cursor turns reddish and the status panel says (inverted). |
| Ctrl+click | Picks a value under the cursor instead of painting: a height, a ground layer, a cliff level, a cliff type or a water height. Tools without a pick action show This tool has nothing to pick and do not paint. |
| Alt+drag | Orbits the camera as usual. It never paints. |
| Right / middle mouse | Keep their Unity meaning (fly, pan). |
| Hand tool (Q) | With Unity's Hand tool, left-drag pans the camera and does not paint. The status panel says Hand tool (Q) active: press W to paint, or drag to pan. |
| Esc | Does the first that applies: cancels a running decor handle drag, cancels the running stroke (its changes are reverted), clears the decor selection (Select Decor), or stops editing. Esc is read by the Scene View that has keyboard focus (click into it first); hovering is not enough. With the RTS Terrain Studio window focused, Esc cancels the stroke and turns editing off. |
| Click another terrain | Makes that terrain the edited one (notification Editing X). While you hover it, the status panel says Click to edit 'X'. |
On macOS, Cmd works wherever this manual says Ctrl.
The pointer hits the terrain mathematically, so no colliders are needed. The brush cursor is drawn by the terrain shader exactly where you paint. With several Scene Views open, only the view under the mouse paints, and a stroke stays in the view where it started.
Editing only works on a terrain that is enabled, has a map loaded and belongs to the current stage. In Prefab Mode, edit the terrain inside the prefab.
RTS Terrain Studio overlay
As soon as the scene contains an RTS Terrain, a compact RTS Terrain Studio overlay appears in the Scene View. It gives you the most used controls without the full window:
- Start Editing / Editing (Esc to stop) button, a button that opens the window, and an options menu;
- the edited terrain (Terrain: X • unsaved when it has unsaved changes);
- the eight category buttons (keys 1–8), a button for every custom category that has tools, and the tools of the selected category;
- Size (a slider with fine control for small brushes, plus an exact value field) and Strength;
- the Symmetry dropdown, with a warning when the mode needs a square map;
- Grid and Markers toggles and the Pathing overlay dropdown.
The options menu contains Show Status Panel, Save Map, Save Map As…, Save Maps When Saving the Scene, Offer Save As for New Maps, Shortcuts… and Documentation. Like every Unity overlay, it can be moved, docked or collapsed, and Unity remembers its position.
Unity's Tools overlay
While an RTS Terrain is selected, Unity's own Tools overlay contains an RTS Terrain Studio tool. Activating it makes the selected terrain the edited one and turns editing on. Switching to another Unity tool turns editing off again.
The exception is Select Decor: while it is active, Unity's Move, Rotate, Scale and Transform tools choose the handle used for the decor selection, so editing stays on. See Decor selection handles.
Status panel and notifications
A status panel at the bottom of the Scene View shows two lines:
- the active tool, (inverted) while Shift is held, the brush size and strength (brush tools only) and the symmetry mode, with a warning when the mode needs a square map;
- the hovered cell, cliff level and height, the tool status or hint, and what Esc does right now (Esc: cancel stroke, Esc: cancel edit, Esc: clear selection or Esc: stop editing).
Hide or show it with Show Status Panel in the overlay's options menu. Shortcuts confirm what they did with a short notification in the Scene View, for example Brush 8.0 m, Strength 55%, Grid on or Stroke cancelled. If editing was still on from your last session when Unity starts, a one-time notice says Terrain editing is on (Esc to stop).
Previews and guides
- Brush cursor: projected onto the terrain in the tool's colour, plus one copy for every symmetry copy.
- Ghosts: in Single mode, Place Trees and Place Decor show a translucent preview of the next object at the cursor.
- Symmetry guides: magenta axes and the centre point while a symmetry mode is on.
- Markers: start locations (in player colours), regions and markers, drawn while Show Markers is on or a marker tool is active.
- Grid (G) and pathing overlay (P): drawn by the terrain shader.
Decor selection handles
With Select Decor active, click objects to select them, drag a rectangle for a box selection and hold Shift to add to or toggle the selection. The selection gets Unity-style handles at the centre of the selected objects:
| Unity tool | Handle |
|---|---|
| Move (W) | Position handle. |
| Rotate (E) | Yaw disc: decor only rotates around the up axis. Hold Ctrl to snap. |
| Scale (R) | Uniform scale handle. With Select Decor active, the R shortcut selects this tool instead of toggling random rotation. |
| Transform (Y) | Position handle and yaw disc. |
| Rect (T) | Position handle. |
| Hand (Q) | No handle; left-drag pans the camera. |
Delete removes the selection. Ctrl+D duplicates the selection, offset by one cell in X and Z so the copies are visible; move them with the handle. A notification such as Duplicated 3 objects confirms it. Ctrl+A selects every unlocked decor object and F frames the selection. These are Unity's own Delete, Duplicate, Select All and Frame Selected commands, so they follow your bindings in the Shortcut Manager. Each handle drag is one undo step. Esc during a drag reverts it without creating a step. More commands are on the Selection card of the Decor tab (see Decor tools).
Saving and save guards
The map is kept in memory while you edit, outside the scene file. Unity's own Save scene? prompts therefore do not cover it. RTS Terrain Studio adds its own guards:
| When | What happens |
|---|---|
| Saving a scene | The maps of its terrains are saved into their .rtsmap assets automatically (overlay option Save Maps When Saving the Scene, on by default). A terrain without a map asset is offered Save As… once per editor session, with the choices Not Now and Never Ask Again (overlay option Offer Save As for New Maps). |
| Entering Play Mode | Save map changes before entering Play Mode? with Save, Cancel (stays in Edit Mode) and Don't Save. Unity reloads the scene, and with it the map from its asset. The prompt is skipped when Enter Play Mode Options disable both the scene and the domain reload. |
| Exiting Play Mode | Save map changes made in Play Mode? with Save or Discard. Asked when the map was edited with the Scene View tools during Play Mode, or whenever the scene contains an In-Game Editor (RTSRuntimeEditor) and the map has unsaved changes. In other scenes, gameplay changes such as harvested trees do not trigger it. |
| Closing a scene, quitting Unity | Asks whether to save the changed maps. |
Before overwriting a map file, the package asks your version control system to check it out. If that fails, a dialog explains what to do. The guards never show dialogs in batch mode or while a player is being built.
Build scripts and editor tests can turn the guard off temporarily:
using RTSTerrainStudio.Editor;
using UnityEditor;

static class MyBuildSteps
{
    [MenuItem("Tools/My Project/Run Map Batch")]
    static void RunMapBatch()
    {
        // No save prompts while this scope is open. Scopes can be nested.
        using (RTSMapSaveGuard.Suppress())
        {
            // ... open scenes, edit or generate maps, enter and leave Play Mode ...
        }
    }
}
Keyboard shortcuts
The Scene View shortcuts are registered in Unity's Shortcut Manager under the category RTS Terrain Studio. They are active only while terrain editing is on, a Scene View or one of the RTS Terrain Studio editor windows has keyboard focus (or the mouse is over a Scene View), and you are not typing in a text or number field. Outside editing, keys such as R or the number keys keep their normal Unity meaning.
| Default key | Shortcut Manager entry | Action |
|---|---|---|
| [ | RTS Terrain Studio/Brush Smaller | Brush radius × 0.87. |
| ] | RTS Terrain Studio/Brush Larger | Brush radius × 1.15. |
| - | RTS Terrain Studio/Strength Down | Brush strength − 5 %. |
| = | RTS Terrain Studio/Strength Up | Brush strength + 5 %. |
| R | RTS Terrain Studio/Toggle Random Rotation | Toggles random brush rotation. With Select Decor active it selects Unity's Scale tool instead. |
| G | RTS Terrain Studio/Toggle Grid | Shows or hides the cell grid. |
| P | RTS Terrain Studio/Cycle Pathing Overlay | Cycles Off → Walkability → Buildability → Combined → Off. |
| 1 | RTS Terrain Studio/Height Tools | Selects the first tool of the category. Press the key again to cycle through the tools of that category. |
| 2 | RTS Terrain Studio/Cliff Tools | |
| 3 | RTS Terrain Studio/Paint Tools | |
| 4 | RTS Terrain Studio/Vegetation Tools | |
| 5 | RTS Terrain Studio/Decor Tools | |
| 6 | RTS Terrain Studio/Water Tools | |
| 7 | RTS Terrain Studio/Pathing Tools | |
| 8 | RTS Terrain Studio/Marker Tools |
These keys and mouse actions are handled by the package itself and cannot be rebound:
| Key | Where | Action |
|---|---|---|
| Shift (held) | Scene View | Invert the tool (lower, erase, remove). |
| Ctrl+click (Cmd+click on macOS) | Scene View | Pick a value (height, layer, level, cliff type, water height). |
| Esc | Scene View with keyboard focus | Cancel the handle drag or stroke, clear the decor selection, or stop editing. |
| 1–8 (also keypad) | RTS Terrain Studio window | Switch the category tab. |
| Esc | RTS Terrain Studio window | Cancel the stroke and stop editing. |
| Tab, Enter, Space | RTS Terrain Studio window | Move focus between tools and tabs; activate the focused one. |
| Ctrl+click, Shift+click | Prototype grids | Add or remove one prototype; select a range. |
The following keys are Unity's own shortcuts and commands. RTS Terrain Studio reacts to them, but they follow whatever you bind to them in under Unity's categories (Main Menu/Edit, Tools):
| Default key | Where | Action |
|---|---|---|
| Ctrl+Z / Ctrl+Y | Anywhere in Unity | Undo / redo terrain edits through Unity's Edit menu. |
| W E Y | Scene View, Select Decor | Unity's Move, Rotate and Transform tools: they choose the handle for the decor selection. |
| Delete, Ctrl+D, Ctrl+A, F | Scene View, Select Decor | Delete, Duplicate, Select All (unlocked decor) and Frame Selected. |
R with Select Decor is the package's own RTS Terrain Studio/Toggle Random Rotation entry: while Select Decor is active it switches to Unity's Scale tool instead of toggling random rotation.
Custom tool categories have no number key. Add a shortcut of your own that calls RTSSceneViewShortcuts.SelectCategory("your.category") (see Shortcuts for your categories).
Rebinding shortcuts
- Open (on macOS ), or click Edit Shortcuts… on the Settings tab.
- Select the category RTS Terrain Studio.
- Assign new keys to the entries listed above.
- Click Refresh on the Settings tab to see the new bindings in the window.
If a key collides with another shortcut in your setup, for example the Scene View's Toggle 2D Mode on 2, Unity asks once which one to use. You can rebind either one in the Shortcut Manager.
Brushes
All brush tools share one brush. You set it on the Brush card of any tool page, in the overlay (Size and Strength) or with the shortcuts. The brush is remembered between editor sessions.
| Setting | Range | Default | Description |
|---|---|---|---|
| Shape | Circle, Square, Diamond, Custom | Circle | Outline of the brush. Square and Diamond can be rotated. Custom uses a Brush Shape asset. |
| Custom Shape | – | none | The Brush Shape asset used by the Custom shape. Click the Custom shape button: the card then shows every Brush Shape asset of the project as a tile, plus a Custom Shape field. Click a tile (or assign an asset in the field) to use it. |
| Radius | 0.25–128 m | 6 m | Brush radius in metres. The slider is logarithmic for fine control of small brushes. Shortcuts [ and ]. |
| Strength | 0.01–1 | 0.5 | Effect of each dab. Shortcuts - and =. |
| Hardness | 0–1 | 0.35 | 0 = soft edge over the whole radius, 1 = hard edge. Disabled while Falloff Curve is on. |
| Falloff Curve | on/off | off | Use a custom curve instead of Hardness. |
| Curve | – | ease in-out from 1 to 0 | Weight from the brush centre (x = 0) to its edge (x = 1). |
| Rotation | 0–360° | 0 | Rotation of square, diamond and custom shapes, clockwise seen from above. Disabled for the Circle shape and while Random Rotation is on. |
| Random Rotation | on/off | off | Rotates every dab randomly. Great with custom stamps. Shortcut R. |
| Spacing | 0.05–2 | 0.2 | Distance between dabs relative to the radius. Smaller values give smoother strokes. |
| Jitter | 0–1 | 0 | Random offset of every dab relative to the radius. |
How a dab is weighted
Every dab gives each vertex, splat texel or object a weight between 0 and 1, which the tool multiplies with Strength. With Hardness, the weight is 1 inside hardness × radius and then fades smoothly to 0 at the edge. With Falloff Curve on, the curve defines the weight instead: x is the distance from the centre (0 = centre, 1 = edge), y is the weight. For square and diamond shapes, "distance" follows the outline, so a square brush is evenly strong along its sides.
Some tools use the brush as a hard selection: cliff, water and pathing tools change only what has a weight of at least 0.5, or the vertex under the brush centre. Soft edges then mean "slightly smaller" rather than "weaker".
Spacing, jitter and repeat
- Spacing: while you drag, a dab is placed every
radius × spacingmetres along the mouse path, but at least every tenth of a cell. Tools that snap to vertices place dabs at least half a cell apart. - Jitter: each dab is moved by a random distance of up to
jitter × radius. Jitter only applies to tools that use the brush. - Repeat: many tools keep applying dabs while you hold the button still, for example 30 dabs per second for Raise / Lower. The tool tables list which tools do this.
Rotation convention
All rotations in RTS Terrain Studio (brush rotation, tree and decor yaw, start location and marker direction) use the same convention: degrees, clockwise seen from above, where 0° points along +Z (north) and 90° points along +X (east). Because of this, symmetric copies of a rotated brush or object are rotated and mirrored exactly like their positions. With Random Rotation on, one random angle is drawn per dab and shared by all of its symmetry copies, so symmetric strokes stay symmetric.
Custom brush shapes
A Brush Shape asset turns any grayscale texture into a brush stamp: white areas apply the full effect, black areas none.
- Import a grayscale texture, for example a rock outline or a splash. It does not need to be readable.
- Create the asset with and assign the texture.
- Check the preview in the Inspector. It shows the baked mask exactly as the brushes use it, plus its coverage.
- On the Brush card, click the Custom shape button. The card now shows every Brush Shape asset as a tile; click the tile of the new shape.
| Setting | Default | Description |
|---|---|---|
| Texture | none | Grayscale or alpha texture. White = full effect. |
| Use Red Channel | on | Reads the red channel. Turn it off to read the alpha channel instead. |
| Invert | off | Inverts the mask. |
| Resolution | 64 | Baked mask resolution (16–256). |
The mask is baked automatically after every change. Bake Mask bakes it immediately. A custom stamp covers the square around the brush centre and is still multiplied by the hardness or the falloff curve. Lower the hardness for soft stamp edges, or set it to 1 to use the stamp as it is.
Symmetry
Symmetry repeats every dab, click and placed object at mirrored or rotated positions. It is how you build fair competitive maps: every player gets the same hills, cliffs, ramps, trees and gold mines. Choose the mode on the Symmetry card or in the overlay. Magenta guides in the Scene View show the axes and the centre.
Symmetry applies to brush and click tools. Drag tools (Regions and Select Decor) ignore it, and the window hides the Symmetry card while one of them is active. Create mirrored regions by hand.
| Window name | Overlay / code name | Copies | What it does | Use it for |
|---|---|---|---|---|
| Off | None | 1 | Only the brush itself paints. | Free-form maps, campaign maps, details that should not repeat. |
| Mirror X | Mirror X (MirrorX) | 2 | Mirrors left ↔ right across the vertical axis through the centre. | Two players or teams facing each other west vs. east. |
| Mirror Z | Mirror Z (MirrorZ) | 2 | Mirrors top ↔ bottom across the horizontal axis. | Two players or teams facing each other north vs. south. |
| Mirror XZ | Mirror XZ (MirrorXZ) | 4 | Mirrors on both axes. | Four corner bases, or 2v2 maps where each team holds one side. |
| Rotate 180° | Rotate 2 (Rotate2) | 2 | Point symmetry around the centre. | The classic 1v1 layout with bases in opposite corners. Unlike a mirror, a rotation keeps left and right the same for both players: a path on one player's left is also on the other player's left. |
| Rotate 90° | Rotate 4 (Rotate4) | 4 | Rotational symmetry in quarter turns. Needs a square map. | The classic four-player free-for-all. |
| Diagonal | Mirror Diagonal (MirrorDiagonal) | 2 | Mirrors across the diagonal (x ↔ z). Needs a square map. | 1v1 maps with bases in the top-left and bottom-right corners. |
Centre is the symmetry centre in normalized map coordinates: (0.5, 0.5) is the map centre and the default. Reset moves it back. If you move the centre, some copies may fall outside the map and are skipped; the card shows a warning.
Rotate 90° and Diagonal swap the X and Z axes. On a map that is not square, copies land outside the map or end up uneven. The Symmetry card, the overlay and the status panel warn you. Resize the map to a square or pick another mode.
How copies behave
- Copies closer than half a cell (or a tenth of the brush radius, whichever is larger) to another copy are merged. Painting on a symmetry axis therefore never applies the effect twice.
- Placed trees, decor, start locations and markers are rotated with their copy. Mirrored copies get mirrored directions.
- Rotated and mirrored brushes and custom stamps turn with their copy (see Rotation convention).
- Start Locations: with Symmetry Assigns Next Players on (default), one click places the start of the selected player and its copies place the following players. With Rotate 90° and Player 1 selected, one click places Players 1 to 4.
- Raise / Lower Level computes its target level from the original dab, so every copy paints the same level.
- Fill / Replace in Replace Dominant Layer or Fill All mode works on the whole map and runs only once. Fill Connected fills from every copy.
Build the shape of the map (cliffs, ramps, water, start locations) with symmetry on, then switch it off for small decorations so the map does not look copy-pasted. The pathing overlay (P) is a quick way to check that every base has the same paths.
Undo and redo
Every terrain edit is recorded in the map's own undo history, which is linked to Unity's undo system. Ctrl+Z, Ctrl+Y and the menu work for terrain edits exactly like for any other change, and the Edit menu shows the step name, for example Undo Raise / Lower. The Undo and Redo buttons in the window header do the same and keep Unity's history in step. Undoing a change to another object in between does not disturb the terrain history.
| Action | Undo step |
|---|---|
| One brush stroke (press to release) or one click | One step named after the tool, for example Paint Layer. All symmetry copies belong to the same step. |
| Decor handle drag | One step (Move Decor, Rotate Decor, Scale Decor). |
| Selection card buttons (Delete, Duplicate, Lock …) | One step per click. |
| Generate, heightmap import, Auto Paint Whole Map, Capture From Scene | One step each (Generate Map, Import Heightmap, Auto Paint Map …). A step larger than the memory limit is not kept; see below. |
| Map info and environment fields | One step when you leave the field (Edit Map Info, Edit Environment). |
Changes to your own map data (EditExtension, see Map extensions) | One step per call, named by your code. |
| Stroke cancelled with Esc | No step. The stroke's changes are reverted. |
| New Map, Resize, Open, Reload, switching to another terrain | Not undoable. These clear the history (their dialogs say so). |
Limits and memory
Each step stores only the layers it changed. Raster layers (heights, cliff levels, water, splat maps, details, pathing overrides) are stored in tiles of 16 × 16 cells around the edited area. Object layers (trees, decor, regions, start locations, markers, map info, environment) are stored as copies of the whole list, so one tree stroke on a map with very many trees costs memory in proportion to the map's total tree count. A small height or paint stroke therefore costs a few kilobytes, while generating a whole map stores every layer of the map. The status bar and the Undo History card show the memory currently used.
On the Settings tab you set two limits. The oldest steps are dropped first when either is exceeded.
| Setting | Range | Default | Description |
|---|---|---|---|
| Max Steps | 10–1000 | 100 | Number of undo steps that are kept. |
| Memory Limit (MB) | 32–4096 | 512 | Memory the undo history may use. |
The limits are stored per user in the editor preferences and apply even while the window is closed. Clear History deletes all terrain undo and redo steps, for example to free memory after a large generation.
Steps larger than the memory limit. A single step that needs more memory than Memory Limit (MB) is not kept. Its change stays on the map, but it cannot be undone. The whole undo history is cleared as well, because older steps cannot be undone across a change that was not recorded, and the Console shows a warning. A brush stroke stops recording as soon as its copies would not fit, so it never uses more than the limit; Esc cannot revert such a stroke.
Whole-map operations store a copy of every layer they change, before and after the operation: about twice the map data (see Memory numbers). With the default limit of 512 MB, Generate needs more on a 512 × 512 map at splat resolution 8 and on a 1024 × 1024 map at splat resolution 4. These operations therefore ask first:
- Generate on the Map tab puts the note into its confirmation, and the button reads Generate Without Undo.
- Import PNG… and Import RAW… ask whether to continue without undo.
- Other whole-map operations, such as Auto Paint Map and your own
RunOperationcalls, show a Run Without Undo dialog. - The in-game editor asks before Generate; Enter chooses Cancel there. In a player, its Apply to Whole Map button of the Auto Paint tool does not ask: when the step does not fit, it runs without undo, clears the history and logs a warning. In Play Mode the Unity editor shows the Run Without Undo dialog instead.
Cancel leaves the map unchanged. To keep such a step undoable, raise Memory Limit (MB) before the operation; the computer needs that much free memory.
Undoable edits from your own editor scripts
RTSEditSession.RunOperation records the given layers of the whole map, runs your code, and pushes the result as one step. Ctrl+Z then works for it like for any tool.
using RTSTerrainStudio;
using RTSTerrainStudio.Editor;
using UnityEditor;

static class MyTerrainCommands
{
    [MenuItem("Tools/My Project/Raise Whole Map 1 m")]
    static void RaiseWholeMap()
    {
        // The terrain edited by the RTS Terrain Studio window and the Scene View tools.
        RTSTerrain terrain = RTSEditorContext.Terrain;
        if (terrain == null || terrain.Map == null) return;

        RTSEditSession session = RTSEditorContext.Session;

        // Records the Heights layer, runs the code and pushes one undo step named "Raise Whole Map".
        session.RunOperation("Raise Whole Map", MapLayers.Heights, ctx =>
        {
            var heights = ctx.Map.Heights; // fine height per vertex, on top of the cliff level
            for (int i = 0; i < heights.Length; i++)
                heights[i] = TerrainToolUtility.ClampFineHeight(ctx.Map, heights[i] + 1f);

            // Tell the terrain which layers changed so meshes, water and pathing are rebuilt.
            ctx.Terrain.NotifyChangedAll(MapLayers.Heights);
        });
    }
}
The in-game editor uses the same undo history type (MapUndoStack) with its own Undo and Redo buttons. The link to Unity's Ctrl+Z exists only in the Unity Editor.
Tool reference
The following sections describe every tool of the eight categories. All tools work the same way in the Unity Editor and in the in-game editor. Some conventions apply to all of them:
- Id is the tool's unique id. Use it in code, for example
RTSEditorContext.ActivateTool("height.raise"). - Input: Brush tools paint while you drag. Click tools act once per click. Drag tools use press, drag and release (rectangles, box selection).
- Repeats: dabs per second while you hold the button without moving.
- Shift inverts and Ctrl+click picks, where the table says so.
- Every setting is listed with its range and default. Settings are remembered between editor sessions. Reset All Tool Settings on the Settings tab restores the defaults.
Cliff levels and fine height
The ground height of every vertex has two parts. The cliff level (0–15) is set by the Cliff tools and creates vertical cliff walls; one level is Cliff Level Height metres high (2 m by default). The fine height is set by the Height tools and adds smooth hills and dips on top of the level. Fine heights are limited to ±8 cliff levels (±16 m with 2 m levels). Keeping both apart is what lets you paint crisp, classic RTS-style cliffs on rolling ground.
Adding your own tool
Any class that derives from RTSTool (or one of the category base classes such as HeightTool) and has a public parameterless constructor appears automatically in the window, the overlay and the in-game editor. Public fields marked with [ToolSetting] get a UI. This example raises or lowers the ground by a fixed step per click:
using RTSTerrainStudio;

// Appears on the Height tab after the built-in tools (Order 100).
public sealed class StepTool : HeightTool
{
    public override string Id => "mygame.step";
    public override string DisplayName => "Step";
    public override string Description => "Raises the ground under the brush by a fixed step per click.";
    public override string Hint => "Shift: step down";
    public override int Order => 100;

    // One dab per click; keep the brush panel visible for the radius and falloff.
    public override ToolInputMode InputMode => ToolInputMode.Click;
    public override bool UsesBrush => true;

    [ToolSetting("Step", Min = 0.05f, Max = 4f, Order = 0, Tooltip = "Height change per click in metres at full strength.")]
    public float step = 0.5f;

    // Called once per click and once for every symmetry copy.
    public override void ApplyDab(RTSToolContext ctx, in BrushDab dab)
    {
        var map = ctx.Map;
        // Computes the vertex weights and records the Heights layer for undo.
        bool any = BeginVertexEdit(ctx, dab, out var w, out var cells);
        using (w) // the weights must always be disposed
        {
            if (!any) return;
            float sign = dab.invert ? -1f : 1f; // Shift inverts
            var heights = map.Heights;
            for (int z = w.rect.yMin; z < w.rect.yMax; z++)
            for (int x = w.rect.xMin; x < w.rect.xMax; x++)
            {
                float weight = w[x, z];
                if (weight <= 0f) continue;
                int i = map.VertexIndex(x, z);
                heights[i] = TerrainToolUtility.ClampFineHeight(map, heights[i] + sign * step * dab.strength * weight);
            }
        }
        // Rebuilds the chunks, water and pathing of the changed cells.
        EndVertexEdit(ctx, cells);
    }
}
See Scripting for the full tool API (drag tools, picking, gizmos and status text). For builds with a high Managed Stripping Level, mark your tool with [UnityEngine.Scripting.Preserve] (see Code stripping and custom tools). Tools of a category of your own get a tab of their own: see Tool categories.
Height tools
Height tools sculpt the fine height: hills, valleys, roads and natural detail on top of the cliff levels. They never change cliff levels, so cliff walls stay crisp. The status line shows the ground height, fine height and cliff level under the cursor.
| Tool | Id | What it does | Input and modifiers |
|---|---|---|---|
| Raise / Lower | height.raise | Raises the ground under the brush; hold the button to keep building up hills. | Brush, repeats 30/s. Shift: lower. |
| Smooth | height.smooth | Softens bumps and sharp edges of the ground without washing out cliff walls. | Brush, repeats 20/s. |
| Flatten | height.flatten | Levels the ground to one height, ideal for building sites and roads. | Brush, repeats 20/s. Ctrl+click: pick the height. |
| Set Height | height.set | Sets the ground to an exact height; at full strength the brush centre reaches it in one dab. | Brush, repeats 20/s. Ctrl+click: pick the height. |
| Noise | height.noise | Adds natural looking bumps, hills or ridges from seeded procedural noise. | Brush, repeats 10/s. Shift: subtract noise. |
| Terrace | height.terrace | Turns slopes into flat steps with rounded edges, like rice fields or layered rock. | Brush, repeats 15/s. |
| Erode | height.erode | Simulates material sliding down steep slopes, giving hills a natural, weathered look. | Brush, repeats 15/s. |
Raise / Lower settings
| Setting | Range | Default | Description |
|---|---|---|---|
| Speed | 0.01–2 | 0.15 | Height change per dab in metres at full brush strength. |
Smooth settings
| Setting | Range | Default | Description |
|---|---|---|---|
| Filter Radius | 1–4 | 1 | Neighbourhood in vertices that is averaged. Larger values remove larger features. |
| Iterations | 1–8 | 2 | Smoothing passes per dab. |
Flatten settings
| Setting | Range | Default | Description |
|---|---|---|---|
| Target | Stroke Start, Fixed Height | Stroke Start | Stroke Start uses the height under the cursor when the stroke begins. Fixed Height uses Target Height. |
| Target Height | −32–32 m | 0 | Fixed fine height relative to the cliff level. Ctrl+click picks it. Values beyond the map's fine height limit (±8 cliff levels, ±16 m with 2 m levels) are clamped when applied. |
| Mode | Flatten, Raise Only, Lower Only | Flatten | Flatten in both directions, only fill in ground below the target, or only cut away ground above it. |
Set Height settings
| Setting | Range | Default | Description |
|---|---|---|---|
| Height | −32–64 m | 0 | Height to set, interpreted according to Height Space. Ctrl+click picks it. Values beyond the map's fine height limit (±8 cliff levels, ±16 m with 2 m levels) are clamped when applied. |
| Height Space | Fine Height, Ground Height | Fine Height | Fine height relative to the cliff level, or absolute ground height. |
Noise settings
| Setting | Range | Default | Description |
|---|---|---|---|
| Noise Type | Fbm, Ridged, Billow | Fbm | Fbm: rolling hills. Ridged: sharp crests. Billow: rounded bumps. |
| Scale | 2–256 m | 24 | Size of the largest features. |
| Amplitude | 0.01–4 m | 0.25 | Height added per dab at full strength. |
| Octaves | 1–8 | 4 | Number of detail layers. More octaves add finer detail. |
| Roughness | 0.2–0.8 | 0.5 | Amplitude ratio between octaves. Higher values give rougher ground. |
| Seed | 0–9999 | 1 | Changes the pattern. The same seed always produces the same pattern. |
Terrace settings
| Setting | Range | Default | Description |
|---|---|---|---|
| Step Height | 0.1–8 m | 1 | Height of one terrace step. |
| Sharpness | 0–1 | 0.7 | 0 = soft, rounded steps. 1 = crisp, steep risers. |
| Offset | −4–4 m | 0 | Shifts all steps up or down. |
Erode settings
| Setting | Range | Default | Description |
|---|---|---|---|
| Talus Angle | 5–70° | 30 | Slopes steeper than this angle erode. |
| Erosion Strength | 0.05–1 | 0.5 | Share of the excess material that moves per iteration. |
| Iterations | 1–50 | 8 | Erosion passes per dab. |
For a building site, use Flatten with Target = Stroke Start: start the stroke on the spot whose height you want, then paint over the area. For a road at an exact height, Ctrl+click a point to pick its height, switch Target to Fixed Height and paint.
Cliff tools
Cliff tools change the cliff level of vertices (0–15) and the look of the cliff walls between levels. The brush snaps to vertices and acts as a hard selection, so you paint whole vertices, never half levels. The status line shows the hovered level and the level you are about to paint, for example Level 2 → 3.
| Tool | Id | What it does | Input and modifiers |
|---|---|---|---|
| Raise / Lower Level | cliff.raise | Raises the ground by one cliff level; drag to extend the plateau you started on. | Brush. Shift: lower by one level. |
| Set Level | cliff.set | Paints one exact cliff level, useful for large plateaus, basins and quick blockouts. | Brush. Ctrl+click: pick the level. |
| Ramp | cliff.ramp | Turns cliff edges into walkable slopes; paint across a one-level cliff so all four corners of a cell are ramp. | Brush. Shift: remove the ramp. |
| Cliff Type | cliff.type | Changes the material of cliff walls, for example rock cliffs next to grassy cliffs. | Brush. Ctrl+click: pick the cliff type. |
| Clean Cliffs | cliff.smoothEdges | Removes isolated single-vertex pillars and pits so cliff outlines look clean. | Brush. |
Raise / Lower Level settings
The target level is taken from the vertex under the cursor when the stroke starts: one level higher (or lower with Shift). Dragging paints that same level, so you can extend a plateau without stacking levels. The tool only raises (or only lowers) vertices.
| Setting | Range | Default | Description |
|---|---|---|---|
| Break Ramps | on/off | on | Removes the ramp flag from vertices whose level changes. |
| Paint Cliff Edges | on/off | on | Paints the cliff type's edge layer along new cliff edges when the stroke ends (see Automatic cliff edges). |
| Edge Width | 0.25–4 cells | 1 | Width of the painted edge, measured from the cliff wall. |
| Edge Strength | 0.1–1 | 0.9 | How strongly the edge layer covers the ground right next to the wall. |
| Edge Sides | Both / Top / Bottom | Both | Paint the plateau rim, the foot of the cliff, or both. |
| Clean Up Old Edges | on/off | on | Removes the edge layer where an edge no longer exists after the stroke (moved cliffs, new ramps). |
Set Level settings
| Setting | Range | Default | Description |
|---|---|---|---|
| Level | 0–15 (palette) | 2 | Cliff level to paint. |
| Break Ramps | on/off | on | Removes the ramp flag from vertices whose level changes. |
| Edge settings | as above | Paint Cliff Edges, Edge Width, Edge Strength, Edge Sides and Clean Up Old Edges work like in Raise / Lower Level. Ramp and Clean Cliffs have the same five settings. | |
Ramp
Ramp has no settings. A cell becomes a ramp when all four of its corner vertices are flagged as ramp and the cell spans a level difference of exactly one. The status line helps: it counts the valid ramp cells under the brush, mentions flagged cells without a level difference, and warns when a ramp spans more than one level (it would be stretched).
Cliff Type settings
| Setting | Range | Default | Description |
|---|---|---|---|
| Cliff Type | 0–3 (palette) | 0 | Cliff layer of the tileset to paint. |
Clean Cliffs settings
| Setting | Range | Default | Description |
|---|---|---|---|
| Strictness | 5–8 | 8 | How many of the 8 neighbours must share the other level before a vertex adopts it. 8 only removes fully isolated vertices; lower values also round off jagged corners. Vertices on the map border need the same share of their fewer neighbours. |
| Break Ramps | on/off | on | Removes the ramp flag from vertices whose level changes. |
Automatic cliff edges
In classic RTS map editors, raising a cliff also changes the ground next to it. The cliff tools do the same: when a stroke ends, the ground along every new cliff edge is painted with the edge ground layer of the cliff type, for example a stony "Rocky Dirt" rim. The rim follows the rounded cliff outline, fades out over the Edge Width and has a slightly irregular outline, so it looks natural rather than cell-shaped.
- Select the tileset and open Cliff Layers. On each cliff card choose an Edge Layer (the demo tilesets use Rocky Dirt).
- Pick Raise / Lower Level, Set Level, Ramp or Clean Cliffs and keep Paint Cliff Edges switched on.
- Paint cliffs as usual. The rim appears when you release the mouse button.
- One undo step: the level change and the edge paint are undone together.
- Symmetry: all symmetric copies get their edges in the same pass.
- Ramps: ramp cells never get a rim. Painting a ramp across an edge removes the rim there when Clean Up Old Edges is on.
- Moved cliffs: with Clean Up Old Edges on, the rim of an edge that disappeared (a lowered plateau, an extended plateau) is removed again. This also removes the edge layer if you painted it there by hand.
- Optional: switch Paint Cliff Edges off for a tool, or set the cliff type's Edge Layer to None for the whole tileset. When the option is on but no edge layer is set, the status line says so.
From code, call CliffEdgePainter.PaintEdges(map, tileset, cellRect, CliffEdgeOptions.Default) after you change cliff levels yourself (for example in a custom generator), then terrain.NotifyChanged(MapLayers.Splat, returnedRect).
A typical workflow: block out plateaus with Set Level, refine their edges with Raise / Lower Level, run Clean Cliffs over the outlines, then add Ramps where units should walk up. Check the result with the pathing overlay (P).
Paint tools
Paint tools paint the ground layers of the tileset (up to 16). Each splat texel stores the weights of all layers, which always add up to 100 %. When the selected layer is missing in the tileset or has no texture, the status line says so instead of painting silently with a fallback.
| Tool | Id | What it does | Input and modifiers |
|---|---|---|---|
| Paint Layer | paint.layer | Paints a ground texture layer with soft brush edges. | Brush, repeats 10/s. Shift: erase the layer. Ctrl+click: pick the layer under the cursor. |
| Tile Paint | paint.tile | Paints whole cells with a ground layer, as in classic RTS map editors. Every cell whose centre lies inside the brush outline is painted at 100 %. | Brush, snaps to cell centres. Shift: remove the layer from cells. Ctrl+click: pick. |
| Fill / Replace | paint.fill | Replaces a ground layer everywhere, flood fills an area or fills the whole map with one click. | Click. Ctrl+click: pick. |
| Smooth Paint | paint.smooth | Blurs ground layer transitions under the brush for softer blends. | Brush, repeats 15/s. |
| Auto Paint | paint.auto | Paints ground layers from height, slope, cliffs and water using an auto paint profile. | Brush, repeats 8/s. Shift: paint the profile's base layer. |
Paint Layer settings
| Setting | Range | Default | Description |
|---|---|---|---|
| Layer | palette | 0 | Ground layer of the tileset to paint. |
| Opacity | 0.05–1 | 1 | Highest coverage the layer can reach. Lower values blend the layer with the ground below. |
Tile Paint settings
| Setting | Range | Default | Description |
|---|---|---|---|
| Layer | palette | 0 | Ground layer of the tileset to paint. |
| Soft Border | on/off | off | Blends one texel around painted cells for slightly softer edges. |
Fill / Replace settings
| Setting | Range | Default | Description |
|---|---|---|---|
| Layer | palette | 0 | Ground layer the area is filled with. |
| Mode | Replace Dominant Layer, Fill Connected, Fill All | Fill Connected | Replace Dominant Layer: every texel of the map whose dominant layer is the clicked layer. Fill Connected: flood fill of the connected texels with the clicked dominant layer. Fill All: the whole map. |
| Preserve Blends | on/off | on | Only swaps the clicked layer for the new one and keeps blends with other layers (Replace and Flood Fill). |
Each click is one undo step that records only the area that actually changed.
Smooth Paint settings
| Setting | Range | Default | Description |
|---|---|---|---|
| Blur Radius | 1–3 | 1 | Size of the blur kernel in splat texels. Larger values smooth faster. |
Auto Paint settings
| Setting | Default | Description |
|---|---|---|
| Profile | none | The Auto Paint Profile asset the brush paints with. Empty = built-in rules matched to the tileset's layer names. See Auto Paint. |
The Paint tab also shows the Auto Paint Whole Map card, which repaints the entire map from the profile in one step.
Vegetation tools
Vegetation tools paint grass and small plants (details) and place trees from the terrain's Vegetation Library. If the terrain has none, the tool page offers Create Vegetation Library. Pick prototypes in the grid; with none selected, the first prototype of the library is used.
| Tool | Id | What it does | Input and modifiers |
|---|---|---|---|
| Paint Details | veg.details | Paints grass, flowers and other small plants by density. | Brush, repeats 10/s. Shift: erase the selected details. |
| Erase Details | veg.detailsErase | Removes grass and other detail vegetation under the brush. | Brush, repeats 10/s. |
| Place Trees | veg.trees | Scatters trees with the brush or places single trees with a click. | Scatter: brush, Shift removes trees. Single: click, Shift+click removes the nearest tree. |
| Erase Trees | veg.treesErase | Removes trees under the brush. Lower strength erases only near the brush centre. | Brush. |
Paint Details settings
| Setting | Range | Default | Description |
|---|---|---|---|
| Details | prototype grid | none | Detail prototypes to paint. |
| Target Density | 0–1 | 0.6 | Density the brush paints towards (1 = maximum density of the prototype). |
| Mode | Raise, Set | Raise | Raise only increases density. Set also thins out denser areas to the target. |
Erase Details settings
| Setting | Range | Default | Description |
|---|---|---|---|
| Only Selected | on/off | off | Erase only the selected detail prototypes instead of all details. |
| Details | prototype grid | none | Detail prototypes to erase when Only Selected is on. |
Place Trees settings
| Setting | Range | Default | Description |
|---|---|---|---|
| Trees | prototype grid | none | Tree prototypes placed at random. |
| Mode | Scatter, Single | Scatter | Scatter paints trees with the brush. Single places one tree per click and shows a ghost preview. |
| Density | 0.05–5 | 0.6 | Trees per 100 m² spawned by every dab at full strength. The minimum spacing of the prototypes still applies. |
| Max Slope | 0–90° | 35 | Scattered trees are not placed on steeper slopes. |
| Avoid Water | on/off | on | Do not scatter trees under water. |
Erase Trees settings
| Setting | Range | Default | Description |
|---|---|---|---|
| Only Selected | on/off | off | Remove only trees of the selected prototypes. |
| Trees | prototype grid | none | Tree prototypes to remove when Only Selected is on. |
Decor tools
Decor tools place, erase and edit props such as rocks, ruins and fences from the terrain's Decor Library. If the terrain has none, the tool page offers Create Decor Library. The prototype grid has a search field and category filters.
| Tool | Id | What it does | Input and modifiers |
|---|---|---|---|
| Place Decor | decor.place | Places props, rocks and other decor objects one by one or scattered with the brush. | Single: click, Shift+click removes the nearest object. Scatter: brush, Shift removes decor under the brush. |
| Erase Decor | decor.erase | Removes decor objects under the brush. Locked objects are kept. Lower strength erases only near the brush centre. | Brush. |
| Select Decor | decor.select | Selects decor objects by clicking or dragging a rectangle, for moving, rotating, scaling or deleting. | Drag. Click: select. Drag: box select. Shift: add / toggle. |
Place Decor settings
| Setting | Range | Default | Description |
|---|---|---|---|
| Mode | Single, Scatter | Single | Single places one object per click with a ghost preview. Scatter paints objects with the brush. |
| Decor | prototype grid | none | Decor prototypes placed at random. With none selected, the first one of the library is used. |
| Density | 0.05–5 | 0.4 | Scatter: objects per 100 m² spawned by every dab at full strength. |
| Use Prototype Defaults | on/off | on | Takes random yaw, ground alignment and grid snapping from the prototype. |
| Random Yaw | on/off | on | Random rotation around the up axis (when not using prototype defaults). |
| Yaw | 0–360° | 0 | Rotation around the up axis when Random Yaw is off. |
| Scale | 0.1–5 | 1 | Multiplier applied to the prototype's random scale. |
| Align To Ground | 0–1 | 0 | 0 = upright, 1 = follow the ground slope (when not using prototype defaults). |
| Snap To Grid | on/off | off | Places objects at cell centres. |
| Random Variant | on/off | on | Uses a random prefab variant of the prototype. |
| Max Slope | 0–90° | 90 | Scatter: skips slopes steeper than this. 90 = no limit. |
| Avoid Water | on/off | off | Scatter: does not place objects under water. |
Erase Decor settings
| Setting | Range | Default | Description |
|---|---|---|---|
| Only Selected | on/off | off | Remove only objects of the selected prototypes. |
| Decor | prototype grid | none | Decor prototypes to remove when Only Selected is on. |
Select Decor settings
| Setting | Range | Default | Description |
|---|---|---|---|
| Pick Radius | 0.25–10 m | 1 | Minimum distance at which a click still picks an object (larger objects are picked within their footprint). |
| Select Locked | on/off | off | Allows selecting locked objects, for example to unlock them. |
Selection card
While Select Decor is active, the Decor tab shows the Selection card with the number of selected objects. Every editing button (Delete, Duplicate, Snap to Ground, Rotate 90°, Lock, Unlock) is one undo step. Select All and Clear only change the selection.
| Button | Action |
|---|---|
| Select All | Selects every decor object of the map (locked objects are skipped). |
| Clear | Clears the selection. |
| Delete | Deletes the selected objects. |
| Duplicate | Duplicates the selection one cell diagonally (+X and +Z). The copies become the selection and are unlocked. |
| Snap to Ground | Puts the selected objects back onto the ground. |
| Rotate 90° | Rotates the selection 90° clockwise around its centre. |
| Lock / Unlock | Locked objects cannot be selected or erased by the tools any more. Turn on Select Locked to select and unlock them. Even when selected that way, locked objects stay untouched by Delete and the handles. |
Moving, rotating and scaling with handles is described in Decor selection handles.
Water tools
Water is stored per vertex: a vertex is either wet, with a water surface height, or dry. The water tools use a hard selection, like the cliff tools. The Water at Cursor card shows the water level and depth under the mouse and whether it counts as shallow (walkable) or deep water, based on the tileset's shallow water limit.
| Tool | Id | What it does | Input and modifiers |
|---|---|---|---|
| Paint Water | water.paint | Paints lakes and rivers at the target height; ground above the water surface stays dry. | Brush. Shift: erase water. Ctrl+click: pick the height. |
| Erase Water | water.erase | Removes water from the vertices under the brush. | Brush. |
| Flood Fill | water.flood | Fills the basin under the cursor with water up to the target height in one click. | Click. Shift+click: drain the connected water. Ctrl+click: pick the height. |
Water height settings (Paint Water and Flood Fill)
| Setting | Range | Default | Description |
|---|---|---|---|
| Water Height | Cliff Level Plus Offset, Absolute Height, Picked Height | Cliff Level Plus Offset | How the water surface height is determined. |
| Level | 0–15 (palette) | 1 | Cliff level the water surface is based on (Cliff Level Plus Offset mode). |
| Offset | −8–16 m | 0.6 levels | Metres above the cliff level. It follows 0.6 × the map's cliff level height (1.2 m with 2 m levels) until you change it. |
| Absolute Height | −16–64 m | 3.2 | Water surface in map-local metres (Absolute Height mode). |
| Picked Height | −16–64 m | 3.2 | Height picked with Ctrl+click (Picked Height mode). A pick takes the water surface when the point is wet, otherwise the ground, and switches the mode to Picked Height. |
Paint Water settings
| Setting | Range | Default | Description |
|---|---|---|---|
| Force | on/off | off | Also flags vertices whose ground lies above the water surface, for example for waterfalls or swamps. |
Flood Fill settings
| Setting | Range | Default | Description |
|---|---|---|---|
| Max Vertices | 100–1,000,000 | 20,000 | Safety limit: a fill or drain that would cover more vertices is cancelled without changes. |
The default (level 1 + 0.6 levels) fills lakes dug one level below the base level 2 of a new map. Dig a basin with Raise / Lower Level and Shift, then click into it with Flood Fill.
Pathing tools
The pathing map (walkable, buildable, flyable, water) is derived automatically from slopes, cliffs, water, ground layers, trees and decor. The pathing tools paint manual overrides on top, with a hard selection in pathing cells. Turn on the overlay on the Pathing Overlay card or with P to see the result.
| Tool | Id | What it does | Input and modifiers |
|---|---|---|---|
| Paint Pathing | pathing.paint | Paints invisible pathing rules such as blockers, no-build zones or forced walkable areas. | Brush. Shift: remove the selected override. |
| Clear Pathing | pathing.clear | Removes all painted pathing overrides so the automatic pathing applies again. | Brush. |
Paint Pathing settings
| Setting | Range | Default | Description |
|---|---|---|---|
| Override | see below | Blocker | Which pathing override to paint. |
| Override | Effect |
|---|---|
| Blocker | Unwalkable and unbuildable: an invisible wall, typical for map borders and decoration areas. |
| Unwalkable | Ground units cannot walk here. |
| Unbuildable | Buildings cannot be placed here, for example to keep paths and expansions free. |
| Unflyable | Air units cannot fly here. |
| Force Walkable | Ground units can walk here even if slope, water or footprints would block it. |
| Force Buildable | Buildings can be placed here even if derived rules would forbid it. |
Pathing overlay colours
| Overlay | Colours |
|---|---|
| Walkability | Green = walkable, red = blocked, dark red = cliff, orange = too steep, blue = deep water, cyan = shallow water. |
| Buildability | Green = buildable, yellow = walkable but not buildable, red / dark red = not walkable. |
| Flyability | Light blue = flyable, magenta = not flyable. |
| Water | Cyan = shallow water, blue = deep water. |
| Combined | Everything at once, like the pathing view of classic RTS map editors. |
The rules used for the automatic part (maximum slopes, cliff margin and so on) are set on the RTS Terrain component; see Pathing Rules.
Marker tools
Marker tools add gameplay information to the map: where players start, named regions for triggers, and named points such as camera positions. Markers are drawn in the Scene View while a marker tool is active or Show Markers is on.
| Tool | Id | What it does | Input and modifiers |
|---|---|---|---|
| Start Locations | markers.start | Places the spawn point of a player. Click again to move it. | Click. Shift+click: remove the nearest start location. |
| Regions | markers.region | Drag rectangles to create named regions for game logic. | Drag. Shift+click: delete the region under the cursor. |
| Markers | markers.marker | Places named points with a direction, for example cameras or waypoints. | Click. Shift+click: remove the nearest marker. |
Start Locations settings
| Setting | Range | Default | Description |
|---|---|---|---|
| Player | Player 1–16 (palette) | Player 1 (Red) | Player whose start location is placed. Each player has one start location. |
| Yaw | 0–360° | 0 | Facing direction of the start location. |
| Symmetry Assigns Next Players | on/off | on | With symmetry, copies place the start locations of the following players. When off, only the original click places or moves the start location. |
Regions settings
| Setting | Range | Default | Description |
|---|---|---|---|
| Color | colour | translucent blue | Colour of new regions. |
| Snap To Cells | on/off | on | Snaps region borders to the cell grid. |
New regions get a unique name automatically.
Markers settings
| Setting | Range | Default | Description |
|---|---|---|---|
| Name | text | Marker | Name of new markers. A number is appended when the name is already used. |
| Tag | text | empty | Free text your game code uses to find markers, for example camera or waypoint. |
| Yaw | 0–360° | 0 | Facing direction of new markers. |
Auto Paint
Auto Paint paints the ground layers from the shape of the terrain: grass on flat ground, rock on steep slopes and along cliffs, sand at the shore, dirt patches broken up by noise. It is the fastest way to make a freshly sculpted or generated map look finished. You can then refine it by hand.
There are three ways to use it:
- the Auto Paint brush tool on the Paint tab paints the rules inside the brush and blends them with the existing paint by brush weight and strength. Shift paints the base layer instead, which removes rule painting;
- the Auto Paint Whole Map card on the Paint tab repaints every ground texel of the map in one undo step. It has a Profile field and a Create Profile button;
- the Apply To Map button in the profile's Inspector, and the generator's Paint stage.
Without a profile, built-in default rules are used. They pick their layers by the names of the tileset's ground layers.
Auto Paint profiles
- On the Paint tab, click Create Profile on the Auto Paint Whole Map card. This creates a profile with the default rules for the terrain's tileset and assigns it. Alternatively, use .
- Select the profile. In the Inspector, assign a Preview Tileset so rule cards show layer names and thumbnails. It is only used for display; the profile works with any tileset.
- Edit the rules, then click Apply To Map to repaint the selected or edited terrain. With several terrains and none selected, a menu lets you choose one.
- Click Use In Auto Paint Tool to make the brush tool paint with this profile.
| Profile setting | Default | Description |
|---|---|---|
| Base Layer | 0 | Layer that covers every texel before the rules are applied. |
| Start From Existing | off | Starts from the current splat weights instead of the base layer, which keeps hand painting where no rule matches. |
| Rules | – | Applied from top to bottom; later rules paint over earlier ones. Each rule card has an enable toggle, a name, its layer, ▲ / ▼ to reorder, duplicate and delete buttons, and a Conditions foldout. Add Rule and Reset To Defaults are below the list. |
For every splat texel, Auto Paint starts with 100 % of the base layer (or the existing weights), applies the enabled rules from top to bottom, and normalizes the result. Each enabled condition of a rule gives a weight between 0 and 1, with a soft transition at the range borders. The weights are multiplied, broken up by noise and scaled by the rule's strength.
Rule settings
| Setting | Default | Description |
|---|---|---|
| Name | Rule | Display name of the rule. |
| Layer | 0 | Ground layer (tileset index) painted by this rule. |
| Enabled | on | Disabled rules are skipped. |
| Use Height, Min Height, Max Height | off, 0, 20 | Paint only where the map-local ground height (metres) is inside the range. |
| Height Falloff | 0.5 | Soft transition outside the height range in metres (0 = hard edge). |
| Use Slope, Min Slope, Max Slope | off, 0, 90 | Paint only where the slope (degrees) is inside the range. |
| Slope Falloff | 5 | Soft transition outside the slope range in degrees. |
| Use Cliff Level, Min Cliff Level, Max Cliff Level | off, 0, 15 | Paint only on these cliff levels (hard edge). |
| Near Cliff Distance | 0 | Only paint within this distance of a cliff wall, in cells (0 = off). Fades out over the outer half. |
| Near Water Distance | 0 | Only paint within this distance of water, in cells (0 = off). Fades out over the outer half. |
| Noise Scale | 16 | Feature size of the noise in metres. |
| Noise Amount | 0 | How strongly the noise breaks up the rule (0 = no noise, 1 = patches). |
| Noise Seed | 0 | Rules with different seeds produce different patches. |
| Strength | 1 | Overall strength of the rule (0–1). |
| Blend Mode | Replace | How the rule combines with the rules above it (see below). |
| Blend mode | Effect |
|---|---|
| Add | Adds the rule's layer on top. Existing layers are reduced proportionally when the result is normalized. |
| Replace | Blends every layer towards the rule's layer by the rule weight. The usual choice. |
| Multiply | Multiplies the existing weight of the rule's layer by the rule mask, which removes the layer where the rule does not match. |
Default rules
The built-in rules use the layer whose name contains grass, meadow or green as the base layer, and look for dirt, rock and sand layers by similar keywords (layers 0–3 without a tileset).
| Rule | Paints | Conditions |
|---|---|---|
| Dirt Patches | dirt | Noise patches (scale 14 m), strength 0.55. |
| Sand Shore | sand | Within 3 cells of water, slightly broken up by noise. |
| Rock Slopes | rock | Slopes of 28° and steeper (8° falloff). |
| Rock Near Cliffs | rock | Within 1.6 cells of a cliff wall, broken up by noise, strength 0.85. |
Auto Paint from code
using RTSTerrainStudio;
using UnityEngine;

// Repaints the whole map with a profile, for example after your own procedural edits.
public class RepaintWithProfile : MonoBehaviour
{
    public RTSTerrain terrain;
    public RTSAutoPaintProfile profile;

    void Start()
    {
        if (terrain == null || terrain.Map == null || profile == null) return;

        // Evaluates the rules for every splat texel inside the rectangle (here: the whole map).
        RTSAutoPaint.Apply(terrain.Map, profile, terrain.Map.CellBounds);

        // Let the terrain upload the new splat maps and update dependent systems (pathing ground rules).
        terrain.NotifyChangedAll(MapLayers.Splat);
        terrain.ProcessPendingChanges();
    }
}
The RTS Terrain component
The RTS Terrain component shows one map. It builds the terrain mesh in chunks, renders the ground and cliffs with the tileset, keeps the pathing map up to date and offers queries such as height, water and pathing at a world position. Create it with , or add it to any GameObject with .
The menu item creates a ready-to-edit terrain: an RTS Terrain GameObject with the RTS Terrain, Vegetation Renderer, Water Renderer and Decor Manager components, the default tileset and libraries of the project, and a new flat .rtsmap file next to the active scene (or in Assets/Maps). If the project has no tileset yet, you are offered to create the demo content first.
Inspector
| Area | Contents |
|---|---|
| Header | Map name, world size, cell size and map asset, an Unsaved changes badge, and live statistics: Cells, Chunks, Map Memory, Trees, Decor, Detail Layers, Regions, Start Locations and Markers. |
| Actions | Open RTS Terrain Studio, Edit Terrain (turns Scene View editing on or off for this terrain), Save, Save As… and Reload. |
| Warnings | Problems with a one-click fix where possible: URP not active, missing shaders, no tileset (with a button to use the tileset the map was made for), texture arrays not built or outdated (Build), a map made for a different tileset, vegetation or decor in the map without a library, a terrain rotated around X or Z (Fix) or scaled (Reset Scale), and missing subsystem components (Add). |
| Assets | Map, Tileset, Vegetation and Decor fields, each with a New button that creates and assigns a new asset. |
| Chunks & Geometry, Cliff Shape, Physics, Rendering | The terrain settings (table below). |
| Pathing Rules | How the pathing map is derived (table below). It is rebuilt automatically after changes. |
| Default Map | Size and defaults of the map created when no map asset is assigned. |
| Rebuild Terrain | Destroys and recreates all chunks, textures and the pathing map; vegetation, water and decor rebuild too. Use it after changing settings from code or when something looks out of date. |
The same inspector is embedded in the window's Settings tab under Terrain Component. Assigning a tileset and the texture arrays is covered in Tilesets; map files are covered in Map assets.
The terrain uses only the Y rotation of its transform and ignores scale. To make a map bigger, add cells with Resize (RTSTerrain.ResizeMap), or create a new map with a larger Cell Size (MapCreationSettings.cellSize).
Terrain settings
These fields belong to RTSTerrainSettings (property RTSTerrain.Settings).
| Setting | Default | Description |
|---|---|---|
| Chunks & Geometry | ||
| Chunk Size | 32 | Cells per chunk side (16, 32 or 64). Smaller chunks rebuild faster while editing; larger chunks mean fewer draw calls. |
| Surface Subdivisions | 2 | Quads per cell side on smooth ground (1–4). 1 = classic RTS look, 2–4 = smoother hills. |
| Cliff Subdivisions | 4 | Sub-grid resolution used to trace rounded cliff contours inside a cliff cell (2–8). |
| Cliff Shape | ||
| Cliff Noise | 0.18 | Random horizontal displacement of cliff wall vertices, as a fraction of a cell (0–0.5). Gives a natural rock look. |
| Cliff Noise Scale | 1.6 | Scale of the cliff noise in world units (minimum 0.1). |
| Cliff Slant | 0.12 | How far the top edge of a cliff is pulled back to make walls slightly slanted, as a fraction of a cell (0–0.4). |
| Cliff Wall Segments | 3 | Vertical segments per cliff level for wall geometry (1–8). |
| Physics | ||
| Collider Mode | Mesh Collider | None: no colliders; use the terrain's raycast for queries. Mesh Collider: one MeshCollider per chunk, rebuilt after edits. |
| Chunk Layer | Default (0) | Layer of the chunk GameObjects, used by colliders and cameras. |
| Rendering | ||
| Cast Shadows | On | Shadow casting mode of the chunks. |
| Receive Shadows | on | Whether the chunks receive shadows. |
| Material Override | none | Optional material. When empty, a material using the RTS Terrain Studio/Terrain shader is created. |
| Show Grid | off | Shows the cell grid, also in Play Mode and builds. The editor's G toggle is separate and only affects editing. |
| Grid Opacity | 0.35 | Opacity of the grid (0–1). |
Pathing Rules
These fields belong to RTSPathingSettings (property RTSTerrain.PathingSettings). They decide how slopes, cliffs, water and ground layers become walkable and buildable areas. Painted overrides from the Pathing tools are applied on top, and the runtime pathing layer of your game after them.
| Setting | Default | Description |
|---|---|---|
| Max Walkable Slope | 42° | Ground steeper than this angle is not walkable. |
| Max Buildable Slope | 18° | Ground steeper than this angle is not buildable. |
| Cliff Margin | 0.25 | How far the blocked area extends beyond a cliff wall, as a fraction of a pathing cell (0–1). Larger values keep units further away from cliff edges. |
| Shallow Water Buildable | off | Allows buildings in shallow water. |
| Tree Footprint Scale | 1 | Multiplier for the pathing footprint radius of every tree. |
| Use Ground Layer Rules | on | Applies the pathing effect of the dominant ground layer, for example Unbuildable on rough rock. |
Default Map
The map created when no map asset is assigned. The New Map card of the Map tab starts with these values.
| Setting | Default | Description |
|---|---|---|
| Width / Height | 128 / 128 | Size in cells, multiple of 16 (16–1024). |
| Cell Size | 2 | Size of one cell in world units. |
| Cliff Level Height | 2 | World height of one cliff level. |
| Base Cliff Level | 2 | Initial cliff level of every vertex (0–15). |
| Base Ground Layer | 0 | Ground layer that initially covers the map. |
| Splat Resolution | 4 | Splat texels per cell (1, 2, 4 or 8). |
| Detail Resolution | 2 | Detail density texels per cell (1, 2 or 4). |
| Pathing Resolution | 2 | Pathing cells per map cell (1, 2 or 4). |
Subsystem components
The terrain only draws the ground and cliffs. Other parts of the map are shown by components on the same GameObject or elsewhere in the scene. The terrain inspector warns when one of the first four is missing and offers an Add button.
| Component | Added by the create menu | Purpose |
|---|---|---|
| Vegetation Renderer | yes | Renders painted grass and plants and the trees, GPU instanced or as prefab instances. Only regenerates the areas that changed. |
| Water Renderer | yes | Builds and renders the water surface per chunk, with the look of the tileset's water profile. For the best look, enable Depth Texture and Opaque Texture in the URP asset (or on the camera). |
| Decor Manager | yes | Shows the decor objects of the map and keeps them on the ground when heights change. |
| Environment | by the New Map Wizard (optional), or | Applies the map's sun, ambient light and fog to the scene. The original scene lighting is restored when it is disabled and is never written into the scene file. |
| Fog of War Manager | Computes fog of war for the local team. One per scene. | |
| Pathfinding Service | , or created on demand by RTSPathfindingService.GetOrCreate() | Runs the built-in path searches on the terrain's pathing map. |
Changing terrain settings from code
using RTSTerrainStudio;
using UnityEngine;

public class TerrainQualityOptions : MonoBehaviour
{
    public RTSTerrain terrain;

    // Called from a graphics options menu, for example.
    public void SetSmoothHills(bool smooth)
    {
        // Settings fields can be changed directly, but the chunks are only rebuilt on request.
        // Use 1, 2 or 4: an odd value such as 3 rounds Cliff Subdivisions up to a multiple of 6 (expensive).
        terrain.Settings.surfaceSubdivisions = smooth ? 2 : 1;
        terrain.RebuildAll();
    }

    public void UseStricterSlopes()
    {
        // Assigning new pathing settings rebuilds the pathing map automatically.
        RTSPathingSettings rules = terrain.PathingSettings.Clone();
        rules.maxWalkableSlope = 35f;
        rules.maxBuildableSlope = 12f;
        terrain.PathingSettings = rules;
    }
}
When you change the fields of the current PathingSettings instance instead of assigning a new one, call terrain.RebuildPathing() afterwards.
In-Game Editor
The in-game editor puts the RTS Terrain Studio map editor into your built game. Players and modders
can create, paint, save, load and play-test maps without Unity, just like the map editors that shipped with
classic RTS games. It runs on UI Toolkit, uses the same tools as the Unity editor window (Height, Cliffs, Paint, Vegetation,
Decor, Water, Pathing and Markers) and writes the same .rtsmap files. A map built in your game can be
copied into a Unity project and opened there unchanged, and the other way round.

Everything is in one component, RTSRuntimeEditor. Add it to a scene that has an RTS Terrain and a
camera, press Play, and you have a working editor. This chapter covers setup, every part of the interface, all
keyboard and mouse controls, the Play Test button, how your game code reacts to it, where maps are stored, how to
restyle the UI and what to check before you ship.
In the Unity editor, the Open Manual button of the Shortcuts & Help window (F1 or the ? button in the top bar) opens this chapter. In a build, the button opens the page you enter in Manual Url, for example your own modding guide. When that field is empty, the button is hidden in builds.
Try it in two minutes
The quickest way to see the in-game editor is the demo scene that comes with the package.
- Choose . This generates the demo textures, libraries, maps and scenes. You only need to do this once.
- In the Project window, open
Samples/Scenes/RTS Terrain Studio - In-Game Editor Demo. It contains the Sandbox map, an RTS In-Game Editor object, an RTS Demo Game object and a fog of war manager. - Press Play. The editor opens with a welcome hint. Pick a tool on the left (the Raise / Lower height tool is active by default) and paint on the terrain with the left mouse button.
- Hold Shift while painting to lower the ground. Use [ and ] to change the brush size. Drag with the right mouse button to move the camera and use the mouse wheel to zoom.
- Press F5 (or Play Test in the top bar). The demo game spawns units at the start locations and switches on the fog of war. Select units and right-click to move them.
- Press Esc or F5 to return to the editor. The map goes back to exactly how it was before the play test.
- Press Ctrl+S, type a name and press Enter to save your map.
Adding the in-game editor to your scene
Requirements
- An RTS Terrain in the scene with a map ().
- A camera. By default the editor uses
Camera.main, the camera tagged MainCamera. You can also assign any camera. - The
Resources/RTSTerrainStudio/UIfolder of the package. It contains the UI theme and style sheet.
Steps
- Open your scene and choose . This
creates an object named RTS In-Game Editor with the
RTSRuntimeEditorcomponent. If you right-click an object in the Hierarchy and use the menu there, the new object becomes a child of that object. - If the Console warns that there is no RTS Terrain, add one. If it warns that no camera is tagged MainCamera, either tag your camera or assign it to Target Camera.
- Optionally assign the terrain and camera explicitly and adjust the other settings (see Inspector reference).
- Press Play. The editor appears, or press F2 to open it if you turned off Start Visible.
The menu item is disabled in Play Mode. If the scene already contains an in-game editor, Unity asks whether to Create Another one or Select Existing. One editor per scene is enough. The component can also be added through Add Component ▸ RTS Terrain Studio ▸ In-Game Editor, and only one can exist on the same GameObject.
What the component creates at runtime
You do not need to build any UI or camera rig yourself. When it is enabled, RTSRuntimeEditor creates:
| Object | Purpose |
|---|---|
RTSEditSession | The editing session, available as Session. It holds the tools, brush, symmetry, selection and undo history and is the same class the Unity editor window uses. |
| Child object RTS In-Game Editor UI | Holds a UIDocument with the complete editor interface. It is destroyed again when the component is disabled. |
RTSRuntimeEditorCamera | Added to the target camera when Use Built In Camera is on. If the camera already has one, that component is used. A camera component that the editor added itself is removed again when the editor is destroyed. |
RuntimeToolGizmos | Draws brush outlines, selection boxes, decor previews, start locations and symmetry guides in the game view. Available as Gizmos. |
PanelSettings | Created when you leave Panel Settings empty. It uses the RTS theme and scales with the screen. When you assign panel settings that scale with the screen size and do not render into a texture, the editor uses a runtime copy of them instead, unless Enforce Minimum UI Scale is off (see Customizing the UI). |
How the terrain and camera are found
- Terrain: an assigned terrain is used as soon as it is enabled. If the field is empty, the editor
uses
RTSTerrain.Main, the first RTS Terrain in the scene. While no terrain is found, the editor checks again twice per second and shows the notice No RTS Terrain found. - Several terrains: if the scene contains more than one RTS Terrain, the Map menu lists them under Edited terrain. Switching to another terrain clears the undo history.
- Camera: if Target Camera is empty, the editor uses
Camera.mainand keeps looking for it. Until a camera exists, it shows the notice No camera found.
Inspector reference
| Setting | Default | Description |
|---|---|---|
| Scene | ||
| Terrain | empty | The terrain to edit. Empty uses the first RTS Terrain in the scene (RTSTerrain.Main). |
| Target Camera | empty | The camera used for picking, gizmos and the built-in editor camera. Empty uses Camera.main. |
| Use Built In Camera | on | Adds an RTSRuntimeEditorCamera to the target camera and controls it while the editor is visible. It is switched off during play tests. Turn this off if your own camera script should move the camera while editing. |
| Behaviour | ||
| Start Visible | on | Shows the editor when the scene starts. When off, the player opens it with the toggle key, or your code sets EditorVisible. |
| Toggle Key | F2 | Shows or hides the whole editor. Choose None to turn the key off. The close button in the top bar is hidden then, so your game has to open and close the editor itself. In web browsers and on phones and tablets the close button stays, because the Open Map Editor button brings the editor back there. |
| Start Tool | height.raise | The id of the tool that is active at start, for example paint.layer, veg.trees, decor.place or markers.start. If the id does not exist, the first tool is used. |
| Show First Time Hint | on | Shows the welcome hint the first time the editor opens, until the player clicks Got it or closes it. That choice is stored in PlayerPrefs. |
| Show Quit Command | on | Adds File ▸ Quit, which closes the application. In the Unity editor, it stops Play Mode. It is never shown on WebGL, iOS and Android. |
| Confirm Quit With Unsaved Changes | on | Asks before the application quits while the map has unsaved changes, also when the quit request comes from outside the editor (window close button, Alt+F4, Application.Quit). The editor is shown first and a running play test is stopped. Web builds cannot quit; there the browser asks Leave site? before the page is closed or reloaded. |
| Undo Memory MB | 512 | The most memory the undo history may use, in megabytes (minimum 16). When it is full, the oldest steps are dropped. A single step that needs more is not kept, and the history is cleared (see Limits and memory). The history also keeps at most 100 steps. Web builds use at most 192 MB, because the browser gives the whole game one limited memory heap. |
| Manual Url | empty | The web page that Open Manual in the help window opens in a build. If it is empty, the button is hidden in builds. In the Unity editor, an empty field opens this manual. |
| Files | ||
| Maps Folder | empty | The folder where maps are listed, loaded and saved. Empty uses the Maps folder in the storage folder RTSMapSerializer.StorageRoot. A relative path such as UserMaps is relative to the storage folder. An absolute path is used as it is. The storage folder is Application.persistentDataPath; in Web builds it is a folder in the browser storage that stays the same when the page address changes (see Maps in the browser). |
| Write Preview Images | on | Writes a small minimap image (192 × 192 pixels) next to every saved map. The map browser shows it. |
| User Interface | ||
| Panel Settings | empty | Optional UI Toolkit panel settings. If empty, the editor creates panel settings at runtime with the RTS theme. They scale with the screen size (1920 × 1080 reference) and never get smaller than 85 %, so text stays readable at 1280 × 720. |
| Enforce Minimum UI Scale | on | Keeps the editor readable in small windows and browser canvases. Assigned panel settings that scale with the screen size are copied at runtime (the asset itself is never changed), and the copy never scales the UI below 85 %. Turn it off to use the assigned asset as it is, for example when the editor shares one panel with your game HUD. |
| Ui Scale | 1 | An extra scale factor from 0.5 to 2. It applies to the panel settings that the editor creates at runtime and to the runtime copy of assigned panel settings. |
| Sorting Order | 1000 | The sorting order of the editor UI. The high default puts the editor above your game HUD. |
| Play Test | ||
| Playtest Controls When Taken Over | on | Keeps the play test bar (Back to Editor), Esc and F5 also when game code took the play test over (see Running your own match in the play test). Turn it off when your game has its own way back to the editor; it then calls RTSRuntimeEditorEvents.EndPlaytest(). Play tests that no game code took over always keep the controls. |
A tour of the interface
The screen is divided into five areas. Every button, field and status item shows a tooltip after you hover over it for a moment, and disabled buttons show one too. If you are not sure what something does, hover over it.
| Area | Position | Contents |
|---|---|---|
| Top bar | top edge | File and Map menus (and menus that game code adds), undo and redo, symmetry, view toggles, Play Test, help, hide panels, close. |
| Toolbar | left edge | Eight category buttons (keys 1 to 8), buttons for custom categories, and the tools of the selected category. |
| Tool panel | right edge | Name and description of the active tool, brush, symmetry, the tool's settings and extra commands. It can be collapsed. |
| Status bar | bottom edge | Information about the point under the cursor, the tool status, brush, undo memory and the map name. |
| Overlays | above the map | Toasts, tooltips, dialogs, the welcome hint, the play test bar and notices. |
Top bar
| Control | What it does |
|---|---|
| File | Opens the File menu (see below). |
| Map | Opens the Map menu (see below). |
| Undo / Redo | Undo (Ctrl+Z) and redo (Ctrl+Y). Their tooltips show the name of the step, for example Undo "Raise / Lower". The buttons are greyed out when there is nothing to undo or redo. |
| Symmetry: Off | Opens the symmetry menu. When symmetry is on, every stroke is mirrored or rotated, which makes fair competitive maps easy. The button shows the current mode, for example Symmetry: 180°. |
| Grid | Shows or hides the cell grid (G). |
| Pathing | Opens the pathing overlay menu. When an overlay is on, the button shows its mode, for example Pathing: Walkability. P turns the overlay on with the last used mode, or off. |
| Markers | Shows or hides start locations, regions and markers while other tools are active (M). It is on by default. |
| Play Test | Starts a play test (F5). |
| Help (?) | Opens the Shortcuts & Help window (F1). |
| Eye | Hides the panels for a clear view of the map (H). Editing still works. A small button Panels hidden - press H to show them brings them back. |
| Close (×) | Hides the editor and shows a toast with the key that opens it again. It is hidden when Toggle Key is None. In web browsers and on phones and tablets, where function keys are unreliable, it also shows an Open Map Editor button at the bottom left, and it is available without a toggle key (see The in-game editor in the browser). |
File menu
| Item | Shortcut | What it does |
|---|---|---|
| New Map... | Ctrl+N (Alt+N in web browsers) | Opens the New Map dialog. If the current map has unsaved changes, the editor asks first. Alt+N works on every platform. |
| Open... | Ctrl+O | Opens the map browser so you can pick a map. If the current map has unsaved changes, the editor asks first. |
| Save | Ctrl+S | Saves to the file the map came from. The first time, it opens Save Map As to ask for a name. |
| Save As... | Ctrl+Shift+S | Opens the map browser so you can save under a new name. |
| Download Map | Web builds only. Saves a copy of the map, including unsaved changes, as a .rtsmap file on the player's computer (usually in the Downloads folder). See Maps in the browser. | |
| Import Map... | Web builds only. Opens a .rtsmap file from the player's computer. It is added to the maps saved in this browser and opened. | |
| Show Maps Folder | Opens the maps folder in the file browser of the operating system. This item only exists on Windows, macOS and Linux, in the Unity editor and in desktop players. | |
| Quit | Closes the application and asks about unsaved changes first. Shown only when Show Quit Command is on, and never on WebGL, iOS or Android. |
Map menu
| Item | What it does |
|---|---|
| Map Info... | Name, author, description and the recommended number of players. |
| Resize... | Makes the map larger or smaller. |
| Generate... | Creates a random map layout from a seed. You can undo it in one step; when that step would need more than Undo Memory MB, the editor asks first whether to run it without undo. |
| Frame Whole Map | Moves the editor camera so the whole map is visible. Only available with the built-in camera. |
| Edited terrain | Only shown when the scene has more than one RTS Terrain. Choose which terrain you edit. Switching clears the undo history. |
Symmetry menu
| Mode | Copies | Typical use |
|---|---|---|
| Off | 1 | Paint without symmetry. |
| Mirror Left / Right | 2 | Mirrors across the vertical centre line. |
| Mirror Top / Bottom | 2 | Mirrors across the horizontal centre line. |
| Mirror 4-Way | 4 | Mirrors on both axes. |
| Rotate 180° | 2 | Point symmetry around the centre, typical for 1v1 maps. |
| Rotate 90° (4 players) | 4 | Rotational symmetry for four-player maps. Needs a square map; on a non-square map the entry is greyed out. |
| Mirror Diagonal | 2 | Mirrors across the diagonal. Needs a square map; on a non-square map the entry is greyed out. |
Reset Centre puts the symmetry centre back in the middle of the map. The tool panel's Symmetry section has Centre X and Centre Z sliders to move the centre. Purple guide lines on the terrain show the symmetry axes.
Pathing overlay menu
The overlay colours the terrain by what units can do there. Choose Off, Walkability (green = walkable, red = blocked), Buildability, Flyability, Water (shallow and deep) or Combined (walkable, buildable, water and blocked cells in one view). The Opacity entries set the overlay to 30 %, 55 % (default) or 80 %.
Toolbar (left)
The upper column has one button per tool category. The small number on each button is its key. The lower column lists the tools of the selected category with icon and name. Hover over a tool to see its description and hint.
| Key | Category | Description | Tools |
|---|---|---|---|
| 1 | Height | Raise, lower, smooth and shape the ground. | Raise / Lower, Smooth, Flatten, Set Height, Noise, Terrace, Erode |
| 2 | Cliffs | Classic RTS-style cliff levels, ramps and cliff materials. | Raise / Lower Level, Set Level, Ramp, Cliff Type, Clean Cliffs |
| 3 | Paint | Paint ground textures. | Paint Layer, Tile Paint, Fill / Replace, Smooth Paint, Auto Paint |
| 4 | Vegetation | Grass, flowers and trees. | Paint Details, Erase Details, Place Trees, Erase Trees |
| 5 | Decor | Place, erase and select objects (doodads). | Place Decor, Erase Decor, Select Decor |
| 6 | Water | Lakes, rivers and seas. | Paint Water, Erase Water, Flood Fill |
| 7 | Pathing | Decide where units can walk, build and fly. | Paint Pathing, Clear Pathing |
| 8 | Markers | Start locations, regions and named markers. | Start Locations, Regions, Markers |
The editor remembers the last tool you used in each category. Choosing a category with its button or number key
brings that tool back. Pressing the number key of the category you are already in moves to the next tool in it.
Custom tools that you register appear here automatically, with a settings UI built from their
[ToolSetting] fields. Custom tool categories and panels of your own add buttons to the category
column, placed by the order of their category; they have no number key (see Your own tabs, panels and menu commands).
Tool panel (right)
The header shows the icon and name of the active tool. Hover over the name to read the tool's description. The arrow button collapses the panel. Below the header, the panel has collapsible sections. Sections you collapse stay collapsed when you switch tools.
| Section | Shown for | Contents |
|---|---|---|
| (about) | every tool | The description and the usage hint of the tool, for example Click: place / move · Shift+click: remove the nearest. |
| Brush | brush tools | Shape (Circle, Square, Diamond, and Stamp when a custom stamp is set), Size (a logarithmic slider plus a field in metres), Strength, Hardness, Rotation, Random Rotation, Spacing, Jitter, and a Reset button in the section header. All tools share the same brush. |
| Symmetry | every tool | Symmetry mode, Centre X and Centre Z, and a warning when the mode needs a square map. |
| Settings | tools with options | The options of the active tool, such as target height, texture palettes, tree and decor thumbnails, cliff level or player. |
| Actions | some tools | Extra commands: Apply to Whole Map (Auto Paint), New Random Layout (Place Trees, Place Decor) and similar. |
| Selection | Select Decor | Delete, Duplicate, rotate (−15°, +15°, +90°), nudge half a cell (−X, +X, −Z, +Z), Smaller / Larger (10 %), Snap to the ground, Lock / Unlock, Select All, Clear. |
The panel and the status bar both say There is no map to edit. when the terrain has no map.
Status bar (bottom)
| Item | Example | Meaning |
|---|---|---|
| Cell | Cell 42, 17 | The cell under the cursor (x, z). |
| Height | Height 3.5 m | Ground height under the cursor in metres. |
| Level | Level 2 | The cliff level under the cursor (0 to 15). |
| Pathing | Walkable, Buildable | What units can do here, for example Shallow water, Cliff, Too steep, Blocked or No flying. |
| Water | Water 1.2 m or Dry | Water depth under the cursor. |
| Tool status | Information from the active tool, or its hint. | |
| Brush | Brush 8.0 m 50 % | Brush radius and strength. |
| Undo | Undo 12 4.2 MB | The number of undo steps and the memory they use. |
| Map name | ● Sandbox | The name of the map. A dot means there are unsaved changes, and Ctrl+S saves them. |
Toasts, tooltips and notices
- Toasts are short messages that appear above the status bar and fade out by themselves, for example Saved "Sandbox" or Undo: Raise / Lower. There are four kinds. Info and Success stay about 3 seconds, Warning 5 seconds and Error 6.5 seconds. Click a toast to dismiss it. At most four are shown at once. Toasts stay visible while the editor is hidden, so the message Editor closed. Press F2 to open it again. can be read.
- Open Map Editor: in web browsers and on phones and tablets, a button at the bottom left that appears after the close button was used and opens the editor again. With a keyboard it shows the toggle key, for example Open Map Editor (F2).
- Tooltips appear after about half a second over any control, also over disabled ones and during a play test. A click hides the tooltip until the pointer leaves the control.
- Welcome hint: a small panel with the four most important controls and the buttons All Shortcuts (F1) and Got it. You can bring it back with Open Welcome Hint in the help window.
- Notices: No RTS Terrain found or No camera found appear in the middle of the screen when the editor cannot work, with a short explanation of what to fix.
- Play test bar: during a play test, a small bar at the top centre says Play test running and has a Back to Editor (Esc or F5) button.
Dialogs
Dialogs are modal: while one is open, the map cannot be edited and shortcuts are off. Enter runs the highlighted (primary) button and Esc closes the dialog.
| Dialog | Opened by | Contents |
|---|---|---|
| New Map | File ▸ New Map... | Name; Size presets Tiny (64 × 64), Small (96), Medium (128), Large (192), Huge (256), Epic (384), Giant (512); Width and Depth (16 to 1024 cells, rounded to multiples of 16; in web browsers the limit is lower, see Limits); Cell Size 1, 2 or 4 m (2 m matches classic RTS maps); Base Level (cliff level 0 to 15; 2 leaves room to dig down for lakes and rivers); Base Layer (the ground texture). A line below shows the resulting size in metres and the estimated memory. A size that this device cannot run shows the reason, and Create stays disabled. The new map cannot be undone, so save first. |
| Generate Map | Map ▸ Generate... | Style (resets the shape options), Seed with a Random button, Symmetry; section Terrain: Cliffs, Plateaus, Ramps, Ramp Count, Water, Lake Coverage, Island, Border; section Content: Textures, Vegetation, Forests, Decor, Decor Count, Start Locations, Players. It replaces the content of the current map in one undo step. When that step would need more memory than Undo Memory MB, the editor first asks whether to run it without undo; Enter chooses Cancel. The settings are kept for the next time the dialog opens. |
| Map Info | Map ▸ Map Info... | Name, Author, Description (shown in the map browser), Players (1 to 16), plus statistics: size, start locations, trees, objects, regions. Applying is one undo step. |
| Resize Map | Map ▸ Resize... | Width and Depth (multiples of 16, with the same browser limit as New Map), Anchor (a 3 × 3 grid: which part of the map stays in place), Fill Level and Fill Layer for new areas. A line shows the estimated memory of the new size; a larger size that this device cannot run disables Resize. Resizing clears the undo history. When the map shrinks, content outside the new area is removed. |
| Open Map / Save Map As | File ▸ Open... / Save As... | The map browser. |
| Unsaved Changes | New, Open, Quit with unsaved changes | Save (saves first, and asks for a name if the map has none), Don't Save, Cancel. |
| Shortcuts & Help | F1 or the ? button | Every mouse and keyboard control (see Controls), Open Welcome Hint, Open Manual (when a manual is available) and Close. |
The map browser
File ▸ Open... (Ctrl+O) and File ▸ Save As...
(Ctrl+Shift+S) open the same browser, titled Open Map or
Save Map As. It lists every .rtsmap file in the maps folder.
| Part | Description |
|---|---|
| Folder line | The full path of the maps folder. Refresh reads the folder again, for example after you copied maps into it. In web builds the line says Saved in this browser. Use Download to keep a copy on your computer. and, in the Open browser, has an Import... button (see Maps in the browser). |
| Map list | One row per map with name, size, number of players and last modification date, newest first. Files that cannot be read are marked Unreadable or damaged file and cannot be opened. Hover over a row to see its file path (only the file name in web builds). |
| Details | The minimap preview, name, size in cells and metres, author, players, modification date and description of the selected map. The preview exists only if Write Preview Images was on when the map was saved. |
| Map Name | Save As only. The file name is made from this name. Clicking a map in the list copies its name into the field, so you can overwrite it. |
| Delete | Deletes the selected map file and its preview image, after you confirm. You cannot undo this. |
| Download | Web builds, Open browser only. Saves a copy of the selected map as a .rtsmap file on the player's computer. |
| Cancel / Open / Save | Open loads the selected map. Double-clicking a row or pressing Enter does the same. Save writes the map under the entered name. |
The browser reads only the small header of each file, so it opens quickly even when the folder holds many large maps.
Saving with a new name
- Press Ctrl+Shift+S. The name field already contains the current map name.
- Type a new name, for example
Glacier Pass (2v2), and press Enter. - If a different file with that name exists, the editor asks Replace Map?. Cancel is the default for Enter, so you have to click Replace to overwrite the file.
- The map is saved, a preview image is written and a toast confirms Saved "Glacier Pass (2v2)". Later, Ctrl+S saves to this file without asking.
If you save under a different name, the map's own name (shown in Map Info) changes too. This rename is a normal undo step called Rename Map.
Controls and shortcuts
The same list is available in the editor with F1. On macOS, Cmd works wherever Ctrl is listed. Number keys mean the number row on the main keyboard. Letter shortcuts follow the letter printed on the key, so Ctrl+Z is the key labelled Z on German (QWERTZ) and French (AZERTY) keyboards too. The brush keys follow the character they type, so [ and ] work wherever your keyboard has them, for example with AltGr. In web browsers a few keys behave differently; see The in-game editor in the browser.
Mouse
| Input | Action |
|---|---|
| Left mouse button | Paint or use the active tool. Hold and drag for a stroke. A whole stroke is one undo step. |
| Shift + left mouse button | The opposite action: lower instead of raise, erase instead of paint, remove instead of place. |
| Ctrl + left click | Pick a value from the terrain (height, ground layer, cliff level...) for tools that support it. |
| Right or middle mouse drag | Pan the camera ("grab the ground"). |
| Alt + left or right mouse drag | Rotate the camera. While Alt is held, the left button does not paint. |
| Mouse wheel | Zoom in and out, towards the point under the cursor. |
Camera (built-in editor camera)
| Key | Action |
|---|---|
| W A S D or arrow keys | Pan. Hold Shift to move faster. |
| Q / E | Rotate left / right. |
| F | Focus the camera on the point under the cursor. |
Brush and tools
| Key | Action |
|---|---|
| [ / ] | Smaller / larger brush (about 15 % per press). |
| - / = (or +) | Lower / higher strength (5 % per press). - and + on the number pad work too. |
| 1 to 8 | Select a tool category (Height, Cliffs, Paint, Vegetation, Decor, Water, Pathing, Markers). Press again for the next tool in the category. |
| Esc | Cancel the stroke you are painting. The terrain goes back to how it was when you pressed the button. |
File and history
| Key | Action |
|---|---|
| Ctrl+N or Alt+N | New map. In web browsers only Alt+N works, because the browser keeps Ctrl+N for a new window. |
| Ctrl+O | Open a map (map browser). |
| Ctrl+S | Save. Asks for a name the first time. |
| Ctrl+Shift+S | Save as. |
| Ctrl+Z | Undo. |
| Ctrl+Y or Ctrl+Shift+Z | Redo. |
View and editor
| Key | Action |
|---|---|
| G | Show or hide the cell grid. |
| P | Turn the pathing overlay on (last used mode, Combined at first) or off. |
| M | Show or hide start locations, regions and markers. |
| H | Hide or show the editor panels. |
| F1 | Shortcuts & Help. |
| F5 | Start a play test, or end the running play test. |
| Esc (during a play test) | End the play test and return to the editor. |
| F2 (the Toggle Key) | Show or hide the whole editor. This key does nothing during a play test. |
Decor selection (Select Decor tool only)
| Input | Action |
|---|---|
| Click / drag a box | Select objects. |
| Shift + click / box | Add objects to the selection or remove them from it. |
| Drag a selected object | Move the selection. The whole drag is one undo step. Esc during the drag puts the objects back. Locked objects cannot be dragged. |
| Click an object that is part of a group selection | Select only that object. |
| Delete / Backspace | Delete the selected objects. |
| Ctrl+D | Duplicate the selection one cell diagonally (+X and +Z). |
| Ctrl+A | Select every unlocked object. |
| Esc | Clear the selection. |
What Esc does
Esc does the first of these that applies:
- Closes an open popup menu.
- Takes the keyboard focus away from a text field or slider.
- Closes the top dialog.
- Cancels a decor drag (the objects go back).
- Cancels the stroke you are painting (toast Stroke cancelled).
- Clears the decor selection (Select Decor tool).
- Shows the panels again if they were hidden with H.
Shortcuts do nothing? While a text field has the keyboard focus, letter keys go into the field. While a dialog is open, only Enter and Esc work. Click on the map or press Esc, then try again. Painting and mouse-wheel zoom are also blocked while the pointer is over a panel.
The built-in editor camera
With Use Built In Camera on, the editor adds an RTSRuntimeEditorCamera to the target
camera. This orbit camera circles a focus point on the ground. It stays inside the terrain bounds plus a margin,
never goes below the ground, and tilts down more the higher you zoom out. It uses unscaled time, so it keeps working
while your game is paused (Time.timeScale = 0). The editor turns the camera on while the editor is
visible, and off while it is hidden and during play tests. After a play test, it returns to the position it had
before.
To change its behaviour, add RTSRuntimeEditorCamera to your camera yourself
(Add Component ▸ RTS Terrain Studio ▸ In-Game Editor Camera) and set the fields. The editor
uses an existing component instead of adding a new one.
| Setting | Default | Description |
|---|---|---|
| Movement | ||
| Pan Speed | 18 | Keyboard pan speed in metres per second at the lowest height. It grows with the height. |
| Fast Multiplier | 2.5 | Pan speed multiplier while Shift is held. |
| Edge Pan | off | Pan when the mouse touches the screen border. |
| Edge Pan Margin | 12 | Width of the screen border for edge panning, in pixels. |
| Rotate Speed | 100 | Rotation speed of Q / E in degrees per second. |
| Mouse Rotate Speed | 0.25 | Rotation of Alt + mouse drag in degrees per pixel. |
| Zoom | ||
| Min Height | 8 | Lowest camera height above the focus point, in metres. |
| Max Height | 120 | Highest camera height above the focus point, in metres. |
| Zoom Step | 0.14 | Height change per mouse wheel notch, as a fraction of the current height. |
| Zoom Towards Cursor | on | Zoom towards the point under the cursor instead of the screen centre. |
| Min Pitch | 40 | Pitch in degrees below the horizon at the lowest height. |
| Max Pitch | 70 | Pitch at the highest height. |
| Pitch Curve | ease in-out | Blend from Min Pitch (0) to Max Pitch (1) over the normalized height. |
| Limits & Smoothing | ||
| Ground Clearance | 3 | The smallest allowed distance between the camera and the ground below it, in metres. |
| Bounds Padding | 8 | Extra space around the terrain that the focus point may move into, in metres. |
| Smooth Time | 0.1 | Smoothing time in seconds (0 = no smoothing). |
From code, RTSRuntimeEditor.EditorCamera returns the component, or null when the built-in camera is off:
| Member | Description |
|---|---|
void Focus(Vector3 worldPosition, bool instant = false) | Moves the focus to a world position, smoothly unless instant is true. |
void FrameTerrain(bool instant = false) | Centres the camera above the terrain and zooms out to show most of it. New maps and resized maps are framed automatically. |
void SnapToTargets() | Jumps to the target position, rotation and height without smoothing. |
Vector3 FocusPoint, float Yaw, float Height | The current orbit (read-only). |
bool IsDragging, bool WantsAltDrag | True while the camera is being dragged, or while Alt is held. |
bool PointerBlocked, bool KeyboardBlocked | Set by the editor every frame while the pointer is over the UI, a text field has the focus or a dialog is open. |
RTSTerrain Terrain | The terrain used for bounds and ground height. |
Using your own camera script while editing: turn off Use Built In Camera. The
editor then only reads the target camera for picking and gizmos. Make sure your camera ignores input while
RTSRuntimeEditor.IsPointerOverUI is true, so that scrolling a panel does not also zoom the camera.
Play Test: trying the map in your game
Play Test (F5) turns the editor into your game for a moment: the editor UI makes room, your gameplay code spawns units and turns on its camera, and the player can try the map. Esc, F5 or Back to Editor ends the test, and the map goes back to exactly how it was before. Units, buildings, harvested trees and changed pathing all disappear.
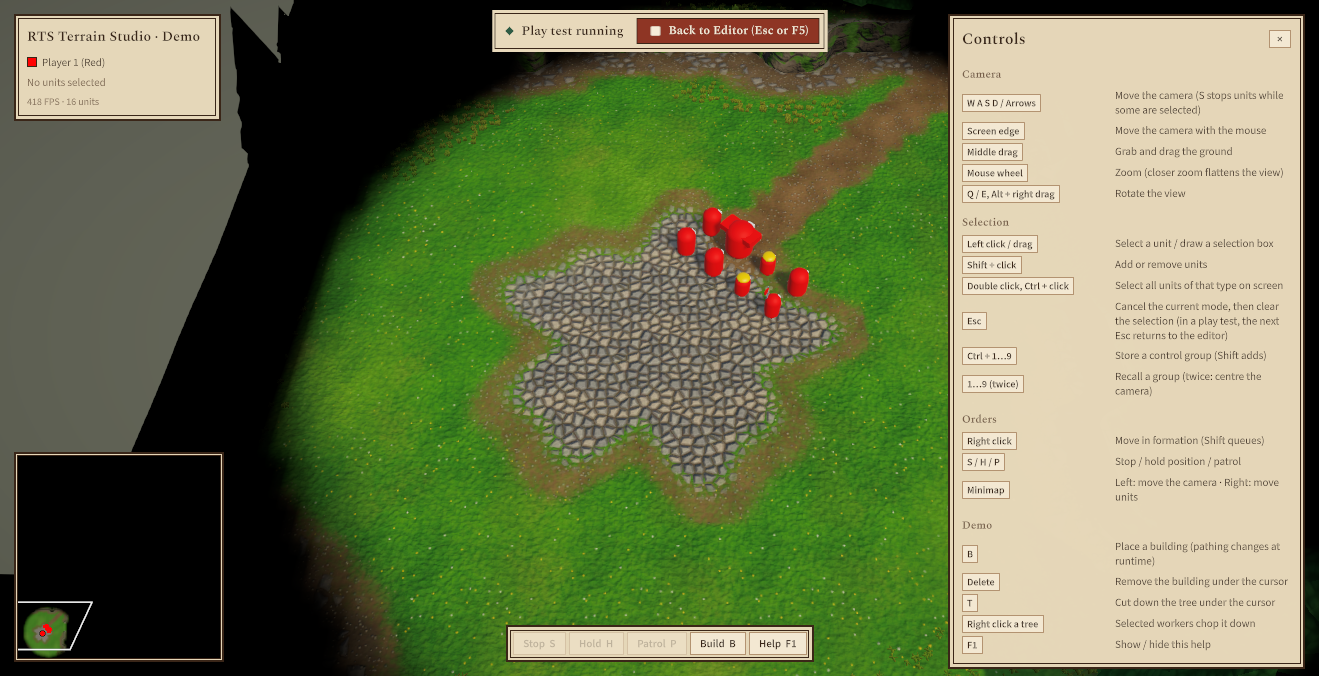
The editor does not know anything about your game. It reports the start and end of a play test through the static
class RTSRuntimeEditorEvents, and your game decides what to do. The sample RTSDemoGame
component () already listens to it. Add it to
your editor scene to get units, fog of war, minimap and HUD during play tests without writing code.
A complete game can also take the play test over and run its own match instead, with its player slots, AI and the units placed on the map: see Running your own match in the play test.
What happens step by step
| When | The editor... |
|---|---|
| Play Test is pressed |
|
| During the play test | Ignores all editing input, undo and file commands (they show Stop the play test first.), and the toggle key. Gameplay may change the map freely. |
Esc, F5, Back to Editor or RTSRuntimeEditorEvents.EndPlaytest() |
|
Undo history: the editor copies the snapshot back into the same map instance, so your undo history survives play tests. If gameplay replaced, reloaded or resized the map during the test, the snapshot is loaded as a new map instead. The toast then says (undo history was reset).
RTSRuntimeEditorEvents reference
RTSRuntimeEditorEvents lives in the core runtime (Runtime/Core). Your gameplay code
compiles and works even if you remove the in-game editor from a project.
| Member | Description |
|---|---|
static bool IsPlaytesting | True while a play test is running. |
static event Action<bool> PlaytestChanged | Raised when a play test starts (true) or ends (false). |
static event Func<RTSTerrain, MapData, bool> PlaytestRequested, static bool IsPlaytestTakenOver | Asks game code before a play test starts whether it runs the play test as its own match, and tells whether a handler did (see Running your own match in the play test). |
static void EndPlaytest(), static event Action PlaytestEndRequested | Ends the running play test from game code, for example from your own "Back to Editor" button. The editor restores the map. |
static bool BeginPlaytest(RTSTerrain terrain, MapData map) | Asks the PlaytestRequested handlers, then raises PlaytestChanged(true). The editor calls this; a custom editor of your own calls it too. |
static event Action<RTSTerrain> MapOpened | Raised after the in-game editor opened a map from a file or created a new map. |
static void ConsumeEscape() | Call this in a frame where your gameplay code used Esc itself, for example to cancel building placement. The editor then does not end the play test in that frame. |
static bool EscapeConsumedThisFrame | True when ConsumeEscape was called in the current frame. |
static void SetPlaytesting(bool playtesting) | Sets IsPlaytesting and raises PlaytestChanged. The editor calls this. To start a test from your own code, call RTSRuntimeEditor.StartPlaytest() instead, because only the editor takes the map snapshot. |
static void RaiseMapOpened(RTSTerrain terrain) | Raises MapOpened. The editor calls this. |
The events are cleared when Play Mode starts. Subscribe in OnEnable (or Awake /
Start) of a scene object, or in a [RuntimeInitializeOnLoadMethod(RuntimeInitializeLoadType.BeforeSceneLoad)]
method, not in a static constructor or an editor script, and unsubscribe in OnDisable.
Example: spawn units for a play test
This component spawns one unit per start location when a play test starts and turns on your gameplay systems (RTS camera, fog of war, HUD). When the test ends, it removes the units and turns the systems off again. Put it on any object in the editor scene and assign a unit prefab.
using System.Collections.Generic;
using UnityEngine;
using RTSTerrainStudio;

/// <summary>Starts a tiny "game" whenever the in-game editor runs a play test.</summary>
public class MyPlaytestGame : MonoBehaviour
{
    [Tooltip("Spawned once at every start location of the map.")]
    [SerializeField] GameObject unitPrefab;

    [Tooltip("Gameplay components that should only run during a play test, " +
             "for example your RTS camera script, the fog of war manager or your HUD.")]
    [SerializeField] Behaviour[] gameplaySystems = new Behaviour[0];

    readonly List<GameObject> spawned = new List<GameObject>();

    void OnEnable()
    {
        // Static event: always pair += in OnEnable with -= in OnDisable.
        RTSRuntimeEditorEvents.PlaytestChanged += HandlePlaytestChanged;
        SetSystemsEnabled(RTSRuntimeEditorEvents.IsPlaytesting);
    }

    void OnDisable()
    {
        RTSRuntimeEditorEvents.PlaytestChanged -= HandlePlaytestChanged;
        DespawnAll();
    }

    void HandlePlaytestChanged(bool playtesting)
    {
        if (playtesting) StartGame();
        else StopGame();
    }

    void StartGame()
    {
        var terrain = RTSTerrain.Main;          // the first RTS Terrain in the scene
        if (terrain == null || terrain.Map == null) return;

        foreach (var start in terrain.Map.StartLocations)
        {
            // Start locations are stored in map-local space: convert to world space
            // and put the unit on the ground.
            Vector3 position = terrain.LocalToWorld(start.position);
            position.y = terrain.GetHeight(position);
            Quaternion rotation = Quaternion.Euler(0f, terrain.transform.eulerAngles.y + start.yaw, 0f);

            var unit = Instantiate(unitPrefab, position, rotation);
            unit.name = "Player " + (start.player + 1) + " Unit";
            spawned.Add(unit);
        }
        SetSystemsEnabled(true);
    }

    void StopGame()
    {
        // Called BEFORE the editor restores the map, so everything is still in place.
        DespawnAll();
        SetSystemsEnabled(false);
    }

    void DespawnAll()
    {
        foreach (var unit in spawned)
            if (unit != null) Destroy(unit);
        spawned.Clear();
    }

    void SetSystemsEnabled(bool enabled)
    {
        foreach (var system in gameplaySystems)
            if (system != null) system.enabled = enabled;
    }
}
StartLocation.position is a Unity.Mathematics.float3, which converts to
Vector3 automatically. If your script is in its own assembly definition, add references to
RTSTerrainStudio.Runtime and Unity.Mathematics.
Example: sharing the Esc key with your game
Many RTS games use Esc to cancel an order or a building placement. Call
ConsumeEscape() in the frame you use the key, and the editor will not end the play test. The editor
checks this in LateUpdate, so the order in which your scripts run does not matter.
using UnityEngine;
using RTSTerrainStudio;

public class MyBuildingPlacement : MonoBehaviour
{
    bool placing;   // true while a building ghost follows the cursor

    void Update()
    {
        if (placing && RTSInput.GetKeyDown(RTSKey.Escape))
        {
            placing = false;                          // cancel the placement ...
            RTSRuntimeEditorEvents.ConsumeEscape();   // ... and keep the play test running
        }
    }
}
The samples RTSBuildingPlacementDemo, RTSCommandController and
RTSSelectionManager already do this. In the demo, the first Esc clears the selection
and the next one returns to the editor.
Play test checklist for your own game
- Keep your RTS camera script, fog of war manager and HUD disabled in the scene and enable them
in
PlaytestChanged(true). The demo scene does the same withRTSCameraControllerandRTSFogOfWarManager. - The editor's built-in camera is off during the test, so your camera script has full control of the camera.
- Remove everything you spawned in
PlaytestChanged(false). You do not need to undo map changes, because the editor restores the map. - Reset state that belongs to the terrain rather than to the map: hidden trees (
terrain.ShowAllTrees()), the runtime pathing layer (terrain.ClearDynamicPathing()) and an external fog of war source. - In multiplayer (Mirror integration), map edits made while a game is running are not streamed live. Call
RTSNetworkMapSync.SendMapToAll()to resend the map.
Saving and loading maps in builds
Where maps are stored
Maps are saved in RTSRuntimeEditor.MapsFolder. By default this is the Maps folder in
RTSMapSerializer.StorageRoot, also available as RTSMapSerializer.DefaultMapsFolder.
StorageRoot is Application.persistentDataPath on every platform except the web. The folder
is created on the first save. Unity picks persistentDataPath per platform. On Windows it is
under %USERPROFILE%\AppData\LocalLow\<Company>\<Product>, from the company and product
names in the Player Settings. On desktop, File ▸ Show Maps Folder opens the folder, and the map
browser shows the full path.
In web builds the maps are kept in the storage of the browser, and File ▸ Download Map and File ▸ Import Map... move them to and from the player's computer. See Maps in the browser.
For each map there are up to two files:
| File | Example | Description |
|---|---|---|
| Map | Glacier Pass (2v2).rtsmap | The complete map: heights, cliffs, textures, water, vegetation, decor, pathing, start locations, regions, markers, map info and environment. It uses the same format as maps in the Unity editor. |
| Preview | Glacier Pass (2v2).preview.png | A 192 × 192 minimap image for the map browser. It is written only when Write Preview Images is on, and deleted together with the map. |
The file name is made from the map name. Characters that file names cannot contain become _, trailing
dots are removed, and an empty name becomes New Map.
Unsaved changes
- The status bar shows a dot before the map name while there are unsaved changes.
- New Map, Open and Quit ask first: Save, Don't Save or Cancel.
- If the player closes the game window while the map has unsaved changes, the editor cancels the quit and asks too, unless Confirm Quit With Unsaved Changes is off. In a web browser, the browser itself asks Leave site? instead, before the tab is closed or reloaded; this follows the same option.
- A play test does not change the unsaved state. The editor restores it with the map.
- The map that the scene starts with (the map asset assigned to the terrain) has no file in the maps folder yet, so the first Ctrl+S asks for a name.
Testing in the Unity editor: if you edit a map with the in-game editor in Play Mode and then stop
Play Mode, Unity asks Save map changes made in Play Mode?. Save writes the changes into
the terrain's map asset in your project. Maps saved with Ctrl+S go to the maps folder
instead. You can copy such a .rtsmap file into your Assets folder to use it as a map
asset.
Shipping maps with your game
The map browser only lists the maps folder. To give players your own maps to start from, copy them there on the
first start. This example copies all files from StreamingAssets/Maps (maps and preview images) and
never overwrites a player's edited version:
using System.IO;
using UnityEngine;
using RTSTerrainStudio;

/// <summary>Copies bundled maps into the in-game editor's maps folder (desktop platforms).</summary>
public class InstallBundledMaps : MonoBehaviour
{
    [SerializeField] RTSRuntimeEditor editor;

    void Awake()
    {
        // Put your .rtsmap files (and optional .preview.png files) into Assets/StreamingAssets/Maps.
        string source = Path.Combine(Application.streamingAssetsPath, "Maps");

        // On Android and WebGL, StreamingAssets is not a normal folder: use UnityWebRequest there instead.
        if (!Directory.Exists(source)) return;

        string target = editor.MapsFolder;   // StorageRoot/Maps unless you changed it
        Directory.CreateDirectory(target);

        foreach (string file in Directory.GetFiles(source))
        {
            if (file.EndsWith(".meta")) continue;   // only matters when running in the Unity editor
            string destination = Path.Combine(target, Path.GetFileName(file));
            if (!File.Exists(destination)) File.Copy(file, destination);
        }
    }
}
Playing player-made maps in your game
Your game can load maps from the maps folder without the editor, for example in a custom game lobby.
RTSMapSerializer.TryReadHeaderFromFile reads the name, size, author and players without loading the
whole map, and also the header fields your game stores, such as a game mode.
RTSTerrain.LoadFromFile loads it.
using System;
using System.IO;
using UnityEngine;
using RTSTerrainStudio;

public static class MapLobby
{
    /// <summary>Logs every map in the default maps folder.</summary>
    public static void ListMaps()
    {
        string folder = RTSMapSerializer.DefaultMapsFolder;
        if (!Directory.Exists(folder)) return;

        foreach (string path in Directory.GetFiles(folder, "*" + RTSMapSerializer.FileExtension))
        {
            // Reads only the small header: fast, even for large maps.
            if (RTSMapSerializer.TryReadHeaderFromFile(path, out RTSMapHeader header))
                Debug.Log(header.name + " by " + header.author + ": " + header.width + " x " + header.height +
                          " cells, " + header.maxPlayers + " players, modified " + header.Modified);
        }
    }

    /// <summary>Loads a map file into the main terrain. Returns false when the file cannot be read.</summary>
    public static bool Play(string path)
    {
        var terrain = RTSTerrain.Main;
        if (terrain == null) return false;
        try
        {
            terrain.LoadFromFile(path);   // throws when the file is missing or damaged
            return true;
        }
        catch (Exception e)
        {
            Debug.LogError("Could not load " + path + ": " + e.Message);
            return false;
        }
    }
}
A map stores its content by id (ground layers, vegetation and decor prototypes). Player-made maps look right only with the same tileset, vegetation library and decor library that the editor scene's terrain uses, so assign the same assets to the terrain in your game scenes.
Controlling the editor from code
Everything in the UI can also be done from code through RTSRuntimeEditor (namespace
RTSTerrainStudio). The most useful members:
| Member | Description |
|---|---|
| State | |
bool EditorVisible { get; set; } | Shows or hides the whole editor (like the toggle key). Hiding it ends a stroke, closes dialogs and gives the terrain view back to the game. |
bool PanelsVisible { get; set; } | Hides only the panels (H). Editing still works. |
bool IsPlaytesting { get; } | True while a play test started by this editor is running. |
RTSKey ToggleKey { get; set; } | The show/hide key. RTSKey.None turns it off and hides the close button (except in web browsers and on phones and tablets, see HasReliableFunctionKeys). |
RTSTerrain Terrain { get; set; } | The edited terrain. Setting it switches terrains and clears the undo history. |
Camera TargetCamera { get; set; } | The camera used for picking and gizmos. |
RTSRuntimeEditorCamera EditorCamera { get; } | The built-in camera, or null. |
RTSEditSession Session { get; } | The edit session: tools, brush, symmetry, selection, undo. |
ToolCategory ActiveCategory { get; } | The category of the active tool; Custom while a custom category is shown. |
string ActiveCategoryId { get; } | The id of the category shown in the toolbar, built-in or custom. |
bool PlaytestControlsWhenTakenOver { get; set; } | The Playtest Controls When Taken Over option (see Play test hand-over). |
bool HasHover, Vector3 HoverWorldPosition | Whether the pointer is over the terrain, and the world position under it. |
bool IsPointerOverUI { get; } | True while the pointer is over an editor panel. |
bool ShowGrid, bool ShowMarkers | The G and M toggles. |
PathingOverlayMode? PathingOverlay, float OverlayOpacity | The pathing overlay (null = off) and its opacity (0 to 1). |
string MapsFolder { get; set; } | The maps folder. Empty means RTSMapSerializer.DefaultMapsFolder; a relative path is relative to RTSMapSerializer.StorageRoot. |
bool ShowQuitCommand, string ManualUrl | The File ▸ Quit item and the manual link (see the inspector). |
bool HasManual { get; } | True when Open Manual has a page to open. |
static bool CanShowFolders, static bool CanQuitApplication | Platform checks: desktop file browser available, and quitting is possible (not WebGL, iOS or Android). |
static bool RunsInBrowser, static bool StoresMapsInBrowser | RunsInBrowser is true in web builds, where the browser limits apply and New Map is Alt+N. StoresMapsInBrowser is true when maps are kept in the browser storage (WebGL players). See Web (WebGL) builds. |
static bool HasReliableFunctionKeys | False in web browsers and on mobile platforms. There the close button shows the Open Map Editor button. |
VisualElement RootElement, UIDocument Document, RuntimeToolGizmos Gizmos | The editor UI root, its UI document and the gizmo renderer. All are null before the component is enabled. |
| Commands | |
bool SetActiveTool(string toolId) | Activates a tool by id, for example "paint.layer". Returns false if the id does not exist. |
void SelectCategory(ToolCategory category), bool SelectCategory(string categoryId) | Like the number keys: the last tool used in the category, or the next tool if the category is already active. The id version also selects custom categories and categories with a panel. |
RTSTool GetRememberedTool(ToolCategory category), GetRememberedTool(string categoryId) | The last tool used in a category, or its first tool. |
List<ToolCategoryInfo> GetCategories() | The categories of the toolbar in display order. |
RegisterPanel(categoryId, createPanel), RegisterMenuItem(menuPath, action, enabled, tooltip) | Add panels and menu commands of your own (see Your own tabs, panels and menu commands). UnregisterPanel, HasPanel and UnregisterMenuItem remove and check them. |
void Undo(), void Redo() | Undo and redo. They do nothing during a play test. |
bool OpenMap(string path) | Loads a .rtsmap file. Unsaved changes are discarded without asking. |
bool SaveMap(string path) | Saves to a path, adds .rtsmap if needed and writes the preview image. |
bool SaveCurrent() | Like Ctrl+S. Returns true when the map was written immediately. If the map has no file yet, it opens Save As and returns false. |
void NewMap(MapCreationSettings settings) | Creates a new flat map without asking about unsaved changes. |
bool DeleteMapFile(string path) | Deletes a map file and its preview image. |
ShowNewMapDialog(), ShowOpenDialog(), ShowSaveAsDialog(), ShowGenerateDialog(), ShowMapInfoDialog(), ShowResizeDialog(), ShowHelp() | Open the dialogs with the same behaviour as the menus. New and Open ask about unsaved changes first. |
void StartPlaytest(), void StopPlaytest() | Start or end a play test. |
void TogglePathingOverlay() | Like P. |
void DeleteSelectedDecor(), void DuplicateSelectedDecor() | Delete or duplicate the decor selection. Each is one undo step. |
void ShowMapsFolder(), void OpenManual(), void Quit() | The File and Help commands. Quit asks about unsaved changes. |
bool DownloadMap(), void ImportMap() | Web builds only: File ▸ Download Map and File ▸ Import Map.... Browsers only show the file picker in response to a click or key press, so call ImportMap from a click handler. |
void ShowToast(string message, ToastType type = ToastType.Info) | Shows a toast. ToastType is Info, Success, Warning or Error. |
void ShowToast(string message, ToastType type, string key) | If a toast with the same key is still visible, it is updated instead of adding a new one. |
| Events | |
event Action<string> MapSaved | After a map was saved (full file path). |
event Action<string> MapLoaded | After a map was opened from a file (full path) or created (null). |
event Action<bool> VisibilityChanged | When EditorVisible changes. |
MapLoaded and RTSRuntimeEditorEvents.MapOpened are raised for File ▸ New and Open.
To react to every map change, including Resize and maps loaded by your own code, subscribe to
RTSTerrain.MapLoaded on the terrain.
Example: open the editor from your own menu
Many games open the map editor from the main menu instead of a key. Turn the toggle key off, open the editor from a button and add a "Back to Menu" button to the editor's top layer:
using UnityEngine;
using UnityEngine.UIElements;
using RTSTerrainStudio;

public class MapEditorLauncher : MonoBehaviour
{
    [SerializeField] RTSRuntimeEditor editor;   // with "Start Visible" turned off
    [SerializeField] GameObject mainMenu;       // your own menu UI

    void Start()
    {
        // No F2 key: the game decides when the editor is shown (on desktop this also hides the close button).
        editor.ToggleKey = RTSKey.None;

        // RootElement exists once the editor component is enabled (it is created in its OnEnable).
        // If you disable and enable the editor component later, its UI is rebuilt: add the button again.
        var back = new Button(BackToMenu) { text = "Back to Menu" };
        back.AddToClassList("rts-button");             // use the editor's button style
        back.style.position = Position.Absolute;
        back.style.right = 16;
        back.style.bottom = 56;                        // just above the status bar
        editor.RootElement.Add(back);                  // hidden together with the editor

        editor.VisibilityChanged += visible => mainMenu.SetActive(!visible);
    }

    /// <summary>Hook this up to a "Map Editor" button in your main menu.</summary>
    public void OpenEditor() => editor.EditorVisible = true;

    void BackToMenu()
    {
        if (editor.IsPlaytesting) editor.StopPlaytest();
        editor.EditorVisible = false;
        editor.ShowToast("Map editor closed", ToastType.Info);
    }
}
Example: hide your game HUD while editing
using UnityEngine;
using RTSTerrainStudio;

public class HudVisibility : MonoBehaviour
{
    [SerializeField] RTSRuntimeEditor editor;
    [SerializeField] GameObject hud;

    void OnEnable()
    {
        editor.VisibilityChanged += HandleVisibilityChanged;
        RTSRuntimeEditorEvents.PlaytestChanged += HandlePlaytestChanged;
        Refresh();
    }

    void OnDisable()
    {
        editor.VisibilityChanged -= HandleVisibilityChanged;
        RTSRuntimeEditorEvents.PlaytestChanged -= HandlePlaytestChanged;
    }

    void HandleVisibilityChanged(bool visible) => Refresh();
    void HandlePlaytestChanged(bool playtesting) => Refresh();

    // The editor stays "visible" during a play test (only its panels make room),
    // so both states are checked.
    void Refresh() => hud.SetActive(!editor.EditorVisible || RTSRuntimeEditorEvents.IsPlaytesting);
}
Customizing the UI
Where the styles live
File (in Resources/RTSTerrainStudio/UI) | Loaded as | Purpose |
|---|---|---|
RTSRuntimeTheme.tss | RTSRuntimeEditor.ThemeResourcePath = "RTSTerrainStudio/UI/RTSRuntimeTheme" | The theme style sheet. It imports Unity's default runtime theme (sliders, toggles, text fields, scroll views) and RTSRuntimeEditor.uss. |
RTSRuntimeEditor.uss | RTSRuntimeEditor.StyleSheetResourcePath = "RTSTerrainStudio/UI/RTSRuntimeEditor" | All styles of the editor. Every class name starts with rts-, and type selectors such as Label are scoped below .rts-root, so the editor never changes the look of your game UI, even if your panel uses this theme. |
If your panel settings use a different theme, the editor adds RTSRuntimeEditor.uss to its own root,
so it looks the same either way.
Colour tokens
All colours are variables defined on .rts-root. Change them to re-skin the whole editor:
| Variable | Default | Used for |
|---|---|---|
--rts-panel | rgb(232, 217, 187) | Parchment of the panels, bars and dialogs. |
--rts-panel-solid | rgb(243, 232, 210) | Menus and pop-ups. |
--rts-raised / --rts-sunken | rgb(243, 232, 210) / rgb(220, 202, 166) | Lighter sheets (selected tiles, cards) and recessed areas (map previews). |
--rts-hover / --rts-pressed | ink at 8 % / 14 % | Button states. |
--rts-border / --rts-border-strong / --rts-frame | rgb(179, 147, 113) / rgb(58, 38, 24) / rgb(58, 38, 24) | Hairlines and separators, strong outlines, panel frames. |
--rts-input | rgb(243, 232, 210) | Backgrounds of check boxes, slider handles, segmented buttons and multi-line fields. |
--rts-text / --rts-text-dim / --rts-text-faint | rgb(58, 38, 24) / rgb(119, 96, 74) / rgb(166, 140, 112) | Ink for text and icons, secondary text, hints. |
--rts-accent / --rts-accent-hover / --rts-accent-dim / --rts-accent-text / --rts-on-accent | oxblood rgb(142, 53, 36) family | Play Test, primary buttons, selected tools, slider fill; text on accent fills. |
--rts-danger / --rts-danger-dim | rgb(156, 42, 30) | Delete buttons. |
--rts-warning / --rts-success | rgb(154, 106, 18) / rgb(47, 92, 69) | Warning and note boxes. |
--rts-on-ink / --rts-on-ink-accent / --rts-on-ink-success / --rts-on-ink-warning | rgb(243, 232, 210) and lighter accents | Text and markers on the dark toasts and tooltips. |
--rts-scrim | rgba(40, 26, 14, 0.45) | Backdrop behind dialogs. |
--rts-radius / --rts-radius-small | 0px / 1px | Corner radius. |
Re-skinning without touching package files
Do not edit the files in the package's Resources folder directly. Importing the package again overwrites them.
Put your changes in your own style sheet instead.
- Create a style sheet in your project, for example
Assets/UI/MyEditorSkin.uss, and override the tokens. The selector:root .rts-rootis more specific than the package's.rts-root, so your values win:/* MyEditorSkin.uss: a forest-green accent and paler parchment */ :root .rts-root { --rts-accent: rgb(47, 92, 69); --rts-accent-hover: rgb(60, 112, 86); --rts-accent-dim: rgba(47, 92, 69, 0.12); --rts-accent-text: rgb(47, 92, 69); --rts-panel: rgb(238, 228, 206); } - Add the sheet to the editor's UI document at startup:
using UnityEngine;
using UnityEngine.UIElements;
using RTSTerrainStudio;

public class EditorSkin : MonoBehaviour
{
    [SerializeField] RTSRuntimeEditor editor;
    [SerializeField] StyleSheet skin;   // drag MyEditorSkin.uss here

    void Start()
    {
        // The document root holds the editor and its toast layer, so both get the new colours.
        editor.Document.rootVisualElement.styleSheets.Add(skin);
    }
}
You can also restyle single parts with the same approach. The main classes are .rts-topbar,
.rts-leftbar, .rts-toolpanel, .rts-statusbar, .rts-dialog,
.rts-popup, .rts-toast (with --success, --warning and
--error variants), .rts-hint, .rts-playtest-bar, .rts-button and
.rts-selected. The UI Toolkit Debugger (Window ▸ UI Toolkit ▸ Debugger) shows the classes of every
element while the game runs.
Panel settings, scale and sorting
- Panel Settings empty (default): the editor creates its own panel settings with the RTS theme. The UI scales with the screen height (1920 × 1080 reference) but never below 85 %. Ui Scale multiplies the result, which is useful for 4K screens or for players who want larger text.
- Your own Panel Settings: assign an asset to control the theme and scaling yourself.
creates a ready-made asset at
Resources/RTSTerrainStudio/UI/RTSRuntimePanelSettings.asset(RTS theme, scale with screen size, 1920 × 1080). The In-Game Editor Demo scene uses it. - Enforce Minimum UI Scale (on by default): if your asset scales with the screen size and does not render into a texture, the editor works with a runtime copy of it. The asset itself is never changed. The copy scales exactly like the asset on large screens, never gets smaller than 85 % in small windows, and Ui Scale multiplies it. Its sorting order is half a step above the asset, so the editor stays above a game HUD that uses the same asset (the HUD then has a panel of its own). Turn the option off to use the asset as it is, for example to share one panel with your game UI; Ui Scale and the 85 % minimum are not applied then.
- Web builds: the 85 % minimum is measured in CSS pixels, so the UI keeps the same size on high-resolution screens.
- Sorting Order: 1000 by default, so the editor covers your HUD. Lower it if some of your UI must appear above the editor.
- Adding your own controls: add elements to
RootElement(see the launcher example above). They are hidden together with the editor, and the pointer over them blocks painting like over any other panel.
Shipping the in-game editor
Work through this list before you build your game with the in-game editor.
- Run and fix what it reports. The Shader references check matters most for builds (see the next step).
- Shaders are included through
RTSShaderReferences. Unity leaves out of the build any shader that no material in the build uses. The package creates most of its materials at runtime (terrain, water, fog of war, and the editor's gizmo shadersHidden/RTS Terrain Studio/GizmoLinesandHidden/RTS Terrain Studio/GizmoGhost), so it keeps them in theResources/RTSTerrainStudio/RTSShaderReferencesasset. This asset is updated automatically after scripts compile, when shaders are imported and before every player build. If it is missing or out of date, use the Update fix of the validator. Without these shaders, the brush outlines and decor previews do not appear in the build. - Keep the
Resources/RTSTerrainStudiofolder withUI/RTSRuntimeTheme.tss,UI/RTSRuntimeEditor.ussandRTSShaderReferences.asset. The editor loads them by Resources path. If the theme is missing, the Console says Controls will be unstyled. - Panel Settings: if you assigned a Panel Settings asset, the scene references it and it is built automatically. If you left the field empty, the runtime panel settings load the theme from Resources (step 3).
- Input: the editor works with the Input System package and with the old Input Manager. See Input setup.
- Decide on the player-facing options: Manual Url (link to your modding guide, or leave it empty to hide the button), Show Quit Command (turn it off if your game has its own menu), Toggle Key and Start Visible.
- Maps folder: the default
Mapsfolder inRTSMapSerializer.StorageRoot(persistentDataPath) is writable on all desktop platforms. To give players example maps, copy them there on first start (see Shipping maps with your game). - Web builds: install the full-window template and read Web (WebGL) builds, which covers browser storage, downloads, keys and hosting.
- Custom tools and code stripping: with a Managed Stripping Level above
Minimal, mark your own tools with
[Preserve](see Code stripping and custom tools). - Content: players can only use the tileset, vegetation library and decor library assigned to the terrain in the editor scene. They are included in the build because the scene references them.
- Test a development build: paint, save, open, play test and quit with unsaved changes once.
Not shipping the in-game editor? Its code lives in Runtime/RuntimeEditor and the
menu support in Editor/RuntimeEditorSupport. A project that does not need it can delete the
Runtime/RuntimeEditor folder. RTSRuntimeEditorEvents stays in Runtime/Core,
so gameplay code that listens to play tests still compiles.
Troubleshooting
| Problem | Cause and solution |
|---|---|
| The notice No RTS Terrain found appears. | The scene has no enabled RTS Terrain, or the assigned terrain is disabled. Add one with or enable it. |
| The notice No camera found appears. | No camera is tagged MainCamera and Target Camera is empty. Tag your camera or assign it. |
| Clicking the map does nothing. | The pointer is over a panel, Alt is held (camera rotation), a dialog is open, or no tool is active. The status bar says Pick a tool on the left when no tool is active. |
| Shortcuts do nothing. | A text field has the keyboard focus or a dialog is open. Press Esc or click on the map. |
| F5 or F2 does nothing. | F5 only works while the editor is visible and not in a dialog. The toggle key is ignored during a play test (end it with Esc or F5 first) and while typing in a field. On Macs and many laptops the function keys are media keys: hold Fn, or use the Play Test button and, in web builds, the Open Map Editor button. |
| Esc ends the play test although my game used it. | Call RTSRuntimeEditorEvents.ConsumeEscape() in that frame (see the example). |
| Nothing happens during a play test. | No script listens to RTSRuntimeEditorEvents.PlaytestChanged. Add RTSDemoGame or your own component (see Play Test). |
| After a play test the toast says undo history was reset. | Your gameplay code replaced, reloaded or resized the map during the test. The map itself is restored correctly. |
| The UI is too small or too large. | Change Ui Scale. If you assigned your own Panel Settings that do not scale with the screen size, or turned Enforce Minimum UI Scale off, change the scaling in that asset instead. In a web build with a fixed-size template, install the full-window template (see The full-window template). |
| My HUD covers the editor, or the editor covers a menu. | Adjust Sorting Order (default 1000). |
| Controls look unstyled (white default Unity look). | The theme was not found in a Resources folder. Restore Resources/RTSTerrainStudio/UI. |
| Brush outlines and previews are missing in the build. | The gizmo shaders were left out of the build. Run and update the shader references. |
| The welcome hint never appears again. | The player dismissed it. Use Open Welcome Hint in the F1 window, or delete the PlayerPrefs key RTSTerrainStudio.InGameEditor.HintDismissed. |
| My maps are not in the map browser. | The browser lists only .rtsmap files directly in the maps folder shown at its top. Copy the files there and press Refresh. |
| A map shows Unreadable or damaged file. | The file is not a valid .rtsmap file, or it was cut short (for example by an interrupted copy). |
| Maps saved in a web build are gone. | The browser keeps them per website, so another address or deleted browsing data starts without maps, and Safari may delete the data of websites not used for seven days. Use File ▸ Download Map to keep copies (see Maps in the browser). |
| The editor has no tools in a build. | Code stripping removed them. Keep the package's Runtime/link.xml and mark your own tools with [Preserve] (see Code stripping and custom tools). |
Rendering & World Systems
This chapter explains how a map becomes pixels: how the terrain mesh is built and shaded, and how vegetation, water, decor and scene lighting are drawn. Each section starts with what you see and the settings you can change. Further down it covers the scripting API, the shader contract and the performance numbers that programmers need.
The rendering components
Every system reads the same MapData of an RTSTerrain and rebuilds only what an edit changed. The systems are separate components on the terrain GameObject. adds all of them for you.
| Component | Draws | Generated objects | Section |
|---|---|---|---|
RTSTerrain | Ground, cliffs, ramps (chunk meshes, one shared material), the cell grid, overlays and the brush cursor | "RTS Chunks" root with one child per chunk | Terrain rendering, Terrain shader |
RTSVegetationRenderer | Painted grass and plants (details), trees | Hidden "RTS Vegetation Objects" (collider proxies, GameObject trees) | Vegetation |
RTSWaterRenderer | Transparent water surface with depth colour, waves, refraction and foam | Hidden "RTS Water" root with one child per chunk that contains water | Water |
RTSDecorManager | Props and doodads, as GameObjects or GPU instanced | "RTS Decor" container for spawned objects | Decor |
RTSEnvironment (optional) | Nothing itself. It applies the map's sun, ambient light and fog to the scene | None | Environment |
Generated objects are marked DontSave. They are never written into your scene file: the .rtsmap file is the only source of truth, and everything is rebuilt from it when the scene opens. If you click a generated chunk, tree or water surface in the Scene View, the owning terrain is selected instead.
If one of the renderer components is missing, the RTSTerrain inspector shows a warning (for example "No Water Renderer: painted water is not shown.") with an Add button.
Terrain rendering
Chunks
The map is split into square chunks of 16, 32 (default) or 64 cells per side. Each chunk is a GameObject with a MeshFilter, a MeshRenderer, an optional MeshCollider and an RTSTerrainChunk component. All chunks share one material instance (RTSTerrain.TerrainMaterial), which keeps the terrain compatible with the SRP Batcher.
- Chunks are stored row by row: index =
z * ChunkCount.x + x. The last row and column can be smaller when the map size is not a multiple of the chunk size. - An edit rebuilds only the chunks it touches. Each changed rectangle is grown by one cell, because a vertex change also affects the normals and cliff shapes of the neighbouring cells. Painting close to a chunk border therefore rebuilds the neighbour chunk too.
- Ground texture painting does not rebuild meshes. Only the splat textures are updated (see splat resolution).
- Water painting does not rebuild terrain chunks either. Only the water renderer reacts to it.
The chunk mesh lives in map-local space: chunk objects have an identity local transform under the hidden RTS Chunks root of the terrain, which compensates the terrain's scale, so object space equals map-local space (X/Z from 0 to the world size of the map, Y up). The terrain transform may be moved and rotated around Y. Scale is ignored.
Mesh generation
RTSChunkMeshBuilder generates the chunk meshes with Burst jobs and writes them through Mesh.MeshDataArray:
- The requested chunks are collected into batches of up to
RTSChunkMeshBuilder.MaxChunksPerBatch(256) chunks, which limits peak memory on very large maps. - If only a few chunks need rebuilding (typical while painting), each chunk is split into bands of rows. The bands are generated on different worker threads and then merged, so even a single chunk edit uses all CPU cores.
BuildChunkGeometryJob(Burst, parallel) creates the triangles. Smooth and ramp cells become a regular grid of S × S quads (S = Surface Subdivisions). Cliff cells are traced on a finer sub-grid (Cliff Subdivisions) with marching squares. This produces rounded contours, a flat floor for each level and vertical walls in between.- Collider data is baked in parallel with
Physics.BakeMeshand assigned to the chunkMeshColliders. Buildfinishes all work before it returns, so an edit is visible in the same frame.
Neighbouring cells and chunks always produce bit-identical border vertices, because every vertex position depends only on its map position. That is why there are no cracks between chunks. The generator follows the reference surface MapGeometryView, which is also used by height queries, pathing and the water renderer. The rendered ground is therefore exactly the ground that gameplay sees.
The vertex format is RTSTerrainVertex (28 bytes: position, normal and a packed colour). The colour carries data for the shader: r = cliff wall mask, g = cliff type, b = baked ambient occlusion. There are no UVs or tangents: the shader maps textures from the vertex position.
Cliff wall shaping
Cliffs are generated procedurally, so they need no artist-made cliff pieces. Four settings control the look of the walls:
| Setting | Default | Range | Description |
|---|---|---|---|
| Cliff Noise | 0.18 | 0–0.5 | Random horizontal displacement of cliff wall vertices, as a fraction of a cell. Gives the walls a natural rock look. 0 = perfectly smooth walls. |
| Cliff Noise Scale | 1.6 | ≥ 0.1 | Feature size of the cliff noise in world units. Small values give fine, craggy rock; large values give broad bulges. |
| Cliff Slant | 0.12 | 0–0.4 | How far the top edge of a cliff is pulled back, as a fraction of a cell. Makes walls slightly slanted instead of perfectly vertical. |
| Cliff Wall Segments | 3 | 1–8 | Vertical segments per cliff level. More segments give the noise more vertices to work with (more relief) and cost more vertices. |
Noise plus slant can never move a vertex further than 45 % of a cell (RTSChunkMeshParams.MaxDisplacementFraction). If the two settings add up to more than that, both are scaled down together, so floor triangles next to a wall never fold over each other. Near ramps and the map border the displacement fades out, so those edges stay straight.
The wall geometry is also darkened at its foot by the baked ambient occlusion (vertex colour b). Where two walls meet on a cell edge, both use the same brightness, so stacked and merged cliffs look seamless.
Colliders and queries
With Collider Mode = MeshCollider (default) every chunk gets a MeshCollider on the Chunk Layer. It is rebuilt together with the mesh after each edit. Use it when your game relies on Unity physics (physics ray casts, rigidbodies, NavMesh baking).
With ColliderMode.None no colliders are created. The terrain can still be queried without physics: RTSTerrain.Raycast, GetHeight, GetNormal, GetCliffLevel, IsWater and GetPathing work against the analytic reference surface, in edit mode and at runtime. This saves the memory and cooking time of the colliders.
using RTSTerrainStudio;
using UnityEngine;

/// Finds the terrain point under the mouse, with or without chunk colliders.
public class TerrainPointer : MonoBehaviour
{
    [SerializeField] Camera viewCamera;

    void Update()
    {
        if (viewCamera == null) return;
        Ray ray = viewCamera.ScreenPointToRay(RTSInput.PointerPosition);

        // 1. Physics-free: works even when Collider Mode is None.
        //    RaycastAll tests every RTSTerrain in the scene and returns the nearest hit.
        if (RTSTerrain.RaycastAll(ray, out RTSTerrainHit hit))
        {
            Debug.Log($"Cell {hit.cell} at {hit.point}, cliff level {hit.terrain.GetCliffLevel(hit.point)}");
        }

        // 2. Unity physics: needs Collider Mode = MeshCollider.
        //    RTSTerrainChunk.GetTerrain maps the collider of a chunk back to its terrain.
        if (Physics.Raycast(ray, out RaycastHit physicsHit, 1000f))
        {
            RTSTerrain terrain = RTSTerrainChunk.GetTerrain(physicsHit.collider);
            if (terrain != null) Debug.Log($"Physics hit on terrain '{terrain.name}'");
        }
    }
}
Terrain rendering settings
These settings are in the RTSTerrain inspector, grouped into Chunks & Geometry, Cliff Shape, Physics and Rendering. Changing one in the inspector rebuilds the terrain automatically. From code, change terrain.Settings and then call terrain.RebuildAll().
| Setting | Default | Description |
|---|---|---|
| Chunk Size | 32 | Cells per chunk side (16, 32 or 64). Smaller chunks rebuild faster while editing; larger chunks mean fewer draw calls. See Choosing the chunk size. |
| Surface Subdivisions | 2 | Quads per cell side on smooth ground and ramps (1–4). 1 = classic RTS look, 2–4 = smoother hills. |
| Cliff Subdivisions | 4 | Sub-grid resolution used to trace rounded cliff contours inside a cliff cell (2–8). It is rounded up to an even number that is also a multiple of Surface Subdivisions (see Subdivisions). |
| Cliff Noise, Cliff Noise Scale, Cliff Slant, Cliff Wall Segments | see Cliff wall shaping | Look of the cliff walls. |
| Collider Mode | MeshCollider | None or MeshCollider (one per chunk, rebuilt after edits). |
| Chunk Layer | 0 (Default) | GameObject layer of the chunks. It is used by the colliders and by camera culling masks. Painted details are drawn on this layer too. |
| Cast Shadows | On | Shadow casting mode of the chunk renderers. |
| Receive Shadows | on | Whether the chunks receive shadows. |
| Material Override | empty | Optional material used instead of the default material (see Materials). |
| Show Grid | off | Draws the cell grid permanently (mainly for editing). |
| Grid Opacity | 0.35 | Opacity of the grid when Show Grid is on. |
The Rebuild Terrain button at the bottom of the inspector (RTSTerrain.RebuildAll()) destroys and recreates all chunks, textures and the pathing map. Vegetation, water and decor rebuild with it.
Materials, overlays and the grid
By default the terrain creates its own material from the shader RTS Terrain Studio/Terrain (RTSTerrain.TerrainShaderName). The terrain picks the material source in this order:
- Material Override in the terrain settings (
RTSTerrainSettings.materialOverride). - Material Override of the tileset (
RTSTileset.materialOverride), so every terrain using that tileset shares the look. - A new material using
RTS Terrain Studio/Terrain.
The terrain always works on a copy of the source material and fills it with the splat maps, texture arrays and map parameters. An override must use the terrain shader or a shader that declares the same properties (see Shader property contract).
Because the terrain renders a copy, later edits to the override material asset are not picked up automatically. Click Rebuild Terrain (or call RebuildAll()) after editing it. To change a value at runtime without a rebuild, set it on terrain.TerrainMaterial directly.
If the terrain shader cannot be found, for example in a player build that does not include it, the terrain is drawn with a plain grey URP Lit material. A warning is logged: "Shader 'RTS Terrain Studio/Terrain' was not found." Run . Its "Shaders included in builds" check creates the RTSShaderReferences asset, which keeps all package shaders in builds (see Builds).
Overlay. SetOverlayTexture(texture, opacity) lays any texture over the whole map, from the first vertex to MapData.WorldSize. The terrain colour is blended towards the texture RGB by texture alpha × opacity. The editor uses this for the pathing view. You can use it for heat maps, territory or build placement previews. The overlay is part of the surface colour, so it is lit and shadowed like the terrain.
Grid. SetGridVisible(visible, opacity) forces the anti-aliased cell grid on from code. Every 4th line is drawn thicker. In the Scene View the editor toggles it with G while editing. IsGridVisible is true when the grid is shown by code or by Show Grid.
using RTSTerrainStudio;
using Unity.Mathematics;
using UnityEngine;

/// Shows unwalkable cells in red on top of the terrain (one overlay pixel per cell).
public class WalkabilityOverlay : MonoBehaviour
{
    [SerializeField] RTSTerrain terrain;
    Texture2D overlay;

    public void Show()
    {
        MapData map = terrain != null ? terrain.Map : null;
        if (map == null) return;

        // One texel per cell. Point filtering keeps hard cell borders.
        overlay = new Texture2D(map.Width, map.Height, TextureFormat.RGBA32, false)
        {
            filterMode = FilterMode.Point,
            wrapMode = TextureWrapMode.Clamp
        };

        var pixels = new Color32[map.Width * map.Height];
        for (int z = 0; z < map.Height; z++)
        {
            for (int x = 0; x < map.Width; x++)
            {
                // Texture row 0 is the map edge at z = 0, like the map itself.
                Vector3 world = terrain.CellCenterToWorld(new int2(x, z));
                bool walkable = terrain.IsWalkable(world);
                // Alpha 0 leaves the terrain untouched, alpha 160 tints it red.
                pixels[z * map.Width + x] = walkable ? new Color32(0, 0, 0, 0) : new Color32(255, 40, 40, 160);
            }
        }
        overlay.SetPixels32(pixels);
        overlay.Apply(false, false);

        terrain.SetOverlayTexture(overlay, 0.8f);
    }

    public void Hide()
    {
        if (terrain != null) terrain.SetOverlayTexture(null, 0f);   // null hides the overlay
        if (overlay != null) Destroy(overlay);
        overlay = null;
    }

    void OnDisable() => Hide();
}
Rendering API of RTSTerrain at a glance:
| Member | Description |
|---|---|
Material TerrainMaterial | The material instance shared by all chunks (null before the terrain is enabled). |
Transform ChunkRoot | The "RTS Chunks" object that holds the chunk GameObjects. |
IReadOnlyList<RTSTerrainChunk> Chunks, int2 ChunkCount, int ChunkSizeInCells | The chunk grid. |
RTSTerrainChunk GetChunk(int2 chunkCoord), GetChunkAtCell(int2 cell) | Look up a chunk. Returns null outside the map. |
bool IsRenderingReady | True once chunks, textures and the material exist. |
Texture GetSplatTexture(int index) | Splat texture 0–3 (layer i lives in map i / 4, channel i % 4). |
void SetOverlayTexture(Texture tex, float opacity), OverlayTexture, OverlayOpacity | Map-wide overlay. Pass null or 0 to hide it. |
void SetGridVisible(bool visible, float opacity), IsGridVisible | Cell grid from code. |
void RebuildChunkMeshes(RectInt cellRect) | Rebuilds meshes and colliders of the touched chunks right away. Normally not needed: NotifyChanged does it. |
void RefreshMaterial() | Re-applies tileset, texture arrays and map parameters to the material right away. |
RTSTerrainChunk: Terrain, ChunkCoord, CellRect, Mesh, MeshRenderer, MeshCollider, LocalBounds, static GetTerrain(Collider) | Per chunk data. GetTerrain maps a physics hit back to its terrain. |
The terrain shader
RTS Terrain Studio/Terrain (Shaders/RTSTerrain.shader) is a hand-written URP 17.3 lit shader. It supports Forward, Forward+ and Deferred rendering, the SRP Batcher, shadows, SSAO, decals, light layers, light cookies and lightmaps. You never edit its material by hand: all properties are filled by the terrain from the map and its tileset.
Features
| Feature | What it does | Controlled by |
|---|---|---|
| 16 ground layers | Up to 16 splat-blended layers, sampled with planar XZ mapping. Only layers with a visible weight at a pixel are sampled (dynamic branches), so painting more layers on the map does not make every pixel more expensive. | Tileset ground layers; Tile Size, Tint, Normal Strength, Smoothness, Metallic |
| Height blending | In a transition the layer with the higher texture height wins, so grass grows between stones instead of fading over them. Contrast = Height Blend² × 16; 0 gives a plain linear blend. | Per layer Height Blend (0–1) plus a height source: a height map (R channel) or the albedo alpha (Height From Albedo Alpha) |
| Anti-tiling | In regions picked by low-frequency noise, the texture fades to a second sample with rotated and scaled UVs, which breaks the visible repetition. At full strength about half the ground uses the second sample. It costs one extra texture sample in those regions. | Per layer Anti Tiling (0–1) |
| Macro variation | A large-scale brightness and a subtle warm/cool hue variation over the whole map. It hides repetition from a distance. Cliffs get half the strength. | Tileset Macro Variation (0–1, default 0.25) |
| Triplanar cliffs | Up to 4 cliff types are projected along all three axes, so vertical walls never look stretched. Normals use a whiteout blend. Where two cliff types meet they cross-fade over a short band. | Tileset cliff layers; Triplanar Sharpness (1–16, default 6) |
| Slope rock | Ground steeper than about 50° gradually turns into the cliff material (fully rock above about 63°), so steep hills never show stretched grass. The rock pokes through the ground where its height texture is high. | Automatic |
| Occlusion | Baked vertex AO at the foot of cliffs, times a cavity term from the cliff height texture. | Automatic |
| Cell grid | Anti-aliased lines (thicker every 4 cells). They fade out in the distance before they could cause moiré patterns. | Show Grid / SetGridVisible / G in the Scene View |
| Overlay | Map-wide RGBA overlay (pathing view, heat maps). | SetOverlayTexture; P cycles the pathing overlay in the Scene View |
| Brush cursor | The brush outline and falloff are projected in the shader at the exact surface position, so what you see is where you paint (independent of display scaling). Up to 4 positions for symmetry painting. It is drawn last, so it stays visible in the fog of war. | RTSBrushPreview (set by the editor tools) |
| Fog of war (fallback) | When the fog of war renderer feature is not installed, the shader darkens unexplored and not visible areas itself. | RTSFogOfWarManager (see Fog of War) |
| No tileset fallback | Without a tileset the terrain renders neutral grey ground and darker grey cliffs instead of failing. | Automatic |
| Lighting options | Turn off specular highlights and environment reflections for cheaper shading. | Material toggles Specular Highlights / Environment Reflections (on an override material) |
Most of these values are tileset settings: see Tilesets for how to author the layers.
Passes: ForwardLit (UniversalForward), GBuffer (UniversalGBuffer, not on GLES/GLCore), ShadowCaster, DepthOnly, DepthNormals and Meta. All passes except GBuffer target Shader Model 3.5, so the terrain also renders on WebGL 2.0 and OpenGL ES 3.0; the GBuffer pass needs 4.5. The render queue is Geometry-100, so the large terrain fills the depth buffer before other opaque objects are drawn. LOD cross-fade is not used.
Turning off specular highlights and reflections
For low-end devices, or for a flatter painted look, use an override material with the lighting toggles turned off:
- In the Project window choose and name it, for example,
Terrain Low End. - In the material inspector set the shader to .
- Untick Specular Highlights and/or Environment Reflections at the bottom of the material inspector. Leave the other properties alone, the terrain overwrites them.
- Assign the material to Material Override of the tileset (all terrains using it) or of one terrain (Rendering section of the
RTSTerraininspector). - If the terrain does not change immediately, click Rebuild Terrain.
Use a material asset for this, not a material created from code. Unity only keeps the shader variants of material keywords that a material asset in the build uses, so a keyword set only from code may be stripped from player builds.
Shader property contract
All properties are set by the rendering code of RTSTerrain, using the ids in RTSShaderIDs. A custom shader must declare the properties it uses with the same names. Scalars and vectors live in the UnityPerMaterial constant buffer (SRP Batcher).
| Property | Type | Content |
|---|---|---|
_RTS_SplatMap0 … _RTS_SplatMap3 | Texture2D, linear RGBA | Splat weights. Layer i is in map i / 4, channel i % 4. All weights sum to 1. UV = positionOS.xz * _RTS_MapSize.zw. Sampled bilinear, clamped. |
_RTS_AlbedoArray | Texture2DArray, sRGB | RGB = albedo, A = height (0.5 when a layer has no height). Slices 0–15 = ground layers, 16–19 = cliff layers (RTSTileset.CliffSliceOffset). |
_RTS_NormalArray | Texture2DArray, linear | RGB = tangent space normal × 0.5 + 0.5 (already unpacked from DXT5nm/BC5 when the array is built). |
_RTS_LayerData | Texture2D 20 × 4, float, read with Load | One column per array slice, see the table below. |
_RTS_LayerCount | float | Number of ground layers of the tileset, at least 1 (clamped 1–16). Without a tileset RTSTerrain sends 1, a neutral layer-data setup and placeholder texture arrays (RTSTextureArrayBuilder.FallbackResolution = 128), so the terrain shows grey ground and darker grey cliffs. The shader also treats 0 as "no data" and then draws RTS_FALLBACK_GROUND_ALBEDO / RTS_FALLBACK_CLIFF_ALBEDO without reading _RTS_LayerData; this only happens with a custom material used outside RTSTerrain. |
_RTS_MapSize | float4 | (world size X, world size Z, 1 / X, 1 / Z). |
_RTS_MapParams | float4 | (cell size, cliff level height, macro variation, triplanar sharpness). The stock shader does not use the cliff level height; it is there for customisations such as height-based tinting. |
_RTS_OverlayTex, _RTS_OverlayOpacity | Texture2D RGBA, float | Map-wide overlay. Opacity 0 = off. |
_RTS_GridParams | float4 | (enabled 0/1, opacity, unused, unused). |
_SpecularHighlights, _EnvironmentReflections | float toggles | Keywords _SPECULARHIGHLIGHTS_OFF, _ENVIRONMENTREFLECTIONS_OFF. |
_RTS_LayerParams[20], _RTS_LayerTints[20], _RTS_LayerParams2[20] | float4 arrays | The same per-layer values as float4 arrays, for custom shaders written against arrays. The stock shader reads only _RTS_LayerData. |
RTSShaderIDs.WorldToMap (_RTS_WorldToMap) is reserved and is not set by RTSTerrain. Use object space (positionOS), which is map-local space for chunk meshes.
_RTS_LayerData layout (column = array slice):
| Row | x | y | z | w |
|---|---|---|---|---|
| 0 | 1 / tile size | normal strength | smoothness | height blend |
| 1 | tint RGB as a linear colour (Color.linear) | metallic | ||
| 2 | anti tiling | has height (0/1) | layer used (0/1) | 0 |
| 3 | minimap colour (not read by the shader) | |||
A cliff slot (16–19) with "layer used" = 0 renders as cliff slot 16. Cliff types painted beyond the tileset's cliff count still show rock.
Mesh input: POSITION (map-local), NORMAL (smooth, object space), COLOR (r = cliff wall mask, g = cliff type × 85 / 255, so types 0–3 map to 0, 1/3, 2/3 and 1, b = ambient occlusion, a = unused). No UVs, no tangents.
Globals (from Shaders/Include/RTSCommon.hlsl, shared by all package shaders):
| Global | Set by | Content |
|---|---|---|
_RTS_FogOfWarTex, _RTS_FogOfWarParams, _RTS_FogOfWarUnexplored, _RTS_FogOfWarExplored, _RTS_FogOfWarEnabled | RTSFogOfWarManager | Visibility texture (R = visible, G = explored), mapping and tints. HLSL: RTS_SampleFogOfWar(positionWS), RTS_ApplyFogOfWar(color, positionWS). |
_RTS_BrushPositions[4], _RTS_BrushRotations[4], _RTS_BrushCount, _RTS_BrushParams, _RTS_BrushColor, _RTS_BrushMask | RTSBrushPreview | Brush cursor. HLSL: RTS_BrushCursor(positionWS) returns colour (rgb) and coverage (a). |
_RTS_Wind | RTSVegetationRenderer | xy = direction, z = strength, w = speed. |
Writing a custom terrain shader
All of the terrain's surface logic is in one include file, Shaders/Include/RTSTerrainInput.hlsl. The pass files only turn the resulting surface into lighting. To change the look, start from a copy of the package shader:
- Copy
Shaders/RTSTerrain.shaderand the wholeShaders/Includefolder into a folder of your own project (for exampleAssets/MyGame/Shaders), keeping the relative layout. The shader includes its pass files asInclude/…, and the includes reference each other by relative path. - Rename the shader in the first line of your copy, for example
Shader "MyGame/Terrain", so it does not clash with the original. - Make your changes, usually in
RTS_EvaluateTerrainSurfaceof your copy ofRTSTerrainInput.hlsl. - Create a material with your shader and assign it as Material Override (tileset or terrain). The material asset also makes sure the shader ends up in player builds.
- Click Rebuild Terrain.
Working on copies means that importing the package again never overwrites your changes.
Example: snow on high plateaus. Add this at the end of RTS_EvaluateTerrainSurface in your copy, right before return surface;:
// Snow on everything above cliff level 6. positionOS.y is the map-local ground height, and
// _RTS_MapParams.y the height of one cliff level, so their ratio is the (fractional) cliff level.
half level = (half)(positionOS.y / max(_RTS_MapParams.y, 1e-3));
// Soft border between level 5.5 and 6.5; cliff walls (cliffBlend = 1) stay rocky.
half snow = smoothstep(5.5h, 6.5h, level) * (1.0h - surface.cliffBlend);
surface.albedo = lerp(surface.albedo, half3(0.92h, 0.94h, 0.97h), snow);
surface.smoothness = lerp(surface.smoothness, 0.35h, snow);
The main building blocks of RTSTerrainInput.hlsl:
| Function / type | Purpose |
|---|---|
struct RTSTerrainSurface | Result of the surface evaluation: albedo, metallic, smoothness, occlusion, per-pixel and geometric normal (object space), tangent frame, cliffBlend (0 = ground, 1 = cliff). |
RTS_EvaluateTerrainSurface(positionOS, normalOS, vertexColor, dPdx, dPdy) | The complete surface: cliff coverage, ground, cliffs, height-based transition, macro variation, occlusion. |
RTS_EvaluateGround(positionXZ, dPdx, dPdy, detileNoise), RTS_AccumulateGroundLayer(…) | Splat-blended ground layers with height blending and anti-tiling (float accumulator RTSGroundAccumulator). |
RTS_EvaluateCliff(cliffTypeValue, positionOS, dPdx, dPdy, normalOS), RTS_SampleCliffLayer(…), RTS_TriplanarWeights(normalOS, sharpness) | Triplanar cliff material and cross-fade between cliff types. |
RTS_LoadLayerData(slice) → RTSLayerData | Reads one column of _RTS_LayerData. |
RTS_DecodeArrayNormal(encoded, strength) | Decodes a normal array texel. |
RTS_EvaluateNoise(positionXZ), RTS_ValueNoise, RTS_Hash21 | Procedural noise (no texture), stable on mobile GPUs. |
RTS_GridMask(…), RTS_ApplyEditorOverlays(…) | Grid lines and overlay texture. |
RTS_CreateSurfaceData(surface) | Converts the surface into URP's SurfaceData. |
| Constants | RTS_MAX_GROUND_LAYERS (16), RTS_CLIFF_SLICE_OFFSET (16), RTS_MAX_CLIFF_TYPES (4), RTS_MIN_LAYER_WEIGHT (1/255), RTS_FALLBACK_GROUND_ALBEDO, RTS_FALLBACK_CLIFF_ALBEDO |
Texture sampling uses explicit gradients (SampleGrad). The gradients dPdx/dPdy are computed once at the top of the fragment shader, outside any branch. Keep it that way if you add your own samples inside branches, otherwise mip-map seams appear at branch borders.
The forward pass applies, in this order: surface evaluation, editor overlays, URP lighting (UniversalFragmentPBR), Unity fog, fog of war and the brush cursor.
Vegetation
RTSVegetationRenderer draws two kinds of vegetation from the map:
- Details: grass, flowers and small plants painted as a density. They are generated per patch by Burst jobs and drawn with procedural GPU instancing. They never exist as GameObjects.
- Trees: individually placed instances, either GPU instanced (fastest) or spawned as prefab GameObjects (for gameplay such as harvesting).
Both are organised in patches of RTSVegetationRenderer.PatchCells (16) × 16 cells. Patches are the unit of culling and of incremental rebuilds: an edit regenerates only the patches it touched. The renderer works in edit mode and play mode, for Game and Scene View cameras.
Setup
- Select the terrain GameObject. If it has no Vegetation Renderer, click Add next to the warning in the
RTSTerraininspector (or use ). - Assign a Vegetation Library in the Assets section of the
RTSTerraininspector. Without a library the Vegetation Renderer inspector warns: "The terrain has no vegetation library, so nothing can be drawn." - Paint details and place trees with the Vegetation tools (key 4 in the Scene View while editing).
- For trees drawn instanced, tick Enable GPU Instancing on their materials. lists materials where it is off and can fix them with one click.
The library defines the prototypes (meshes, textures, colours, sizes, distances). See Vegetation Library for every prototype field.
The Vegetation Renderer inspector shows live statistics (Visible Details, Total Details, Visible Trees, Tree Objects, Colliders) and has a Rebuild button (RebuildAll()) and a Select Library button.
Renderer settings
| Setting | Default | Description |
|---|---|---|
| Quality | ||
| Detail Density Multiplier | 1 | Multiplies the number of detail instances per texel (0–2, 0 = no details). Changing it regenerates all details. |
| Detail Distance Multiplier | 1 | Multiplies the render distance of every detail prototype (0.1–3). |
| Tree Distance Multiplier | 1 | Multiplies the render distance of every instanced tree prototype (0.1–3). |
| Wind | ||
| Wind Direction | (1, 0.35) | Horizontal wind direction in world space (x = world X, y = world Z). |
| Wind Strength | 0.6 | Global wind strength (0–3). Each prototype and material scales it further. |
| Wind Speed | 1.6 | Speed of the wind animation (0–10). |
| Rendering | ||
| Draw Details | on | Draw density-painted details. |
| Draw Trees | on | Draw GPU instanced trees. |
| Draw In Scene View | on | Also draw vegetation in Scene View cameras. |
| Crossed Quad Count | 3 | Number of quads of the generated grass mesh for Crossed Quads details (2–3). Changing it rebuilds the vegetation. |
| Collider Layer | 0 | Layer of the collider proxies created for instanced trees. |
Details
For every painted detail layer and patch, DetailScatterJob (Burst) scatters instances from the density map. A density of 255 gives the prototype's Max Density instances per detail texel, times the Detail Density Multiplier. Instances skip slopes steeper than Max Slope and, with Avoid Water, flooded ground. They can tilt with the ground (Align To Ground) and get a colour between Healthy Color and Dry Color from noise.
The instances of a patch are uploaded into a structured GraphicsBuffer and drawn with Graphics.RenderMeshPrimitives through the internal shader Hidden/RTS Terrain Studio/Detail. WebGL 2.0 has no structured buffers, and OpenGL ES 3 does not guarantee them in vertex shaders, so on those devices the instances go into a float texture instead (two texels per instance). The renderer picks the path at runtime, and the grass looks the same. The shader reads each instance from the buffer or texture and handles wind, a smooth shrink-out over the last 25 % of the render distance, root darkening, translucency and the fog of war fallback. Each patch is frustum and distance culled per camera.
| Render mode | Mesh | Material |
|---|---|---|
CrossedQuads | Generated grass mesh with 2 or 3 crossed quads (Crossed Quad Count) | Created from the prototype Texture (alpha clipped at 0.5) |
Mesh | The prototype Mesh (all sub-meshes) | If the material already uses Hidden/RTS Terrain Studio/Detail it is used as it is. Otherwise a detail material is created from its main texture and colour. Its alpha cutoff is kept only if the source material alpha-clips. |
Other shaders cannot read the instance data, so Mesh-mode details always render with the detail shader. Custom shader features of the source material (vertex animation, special lighting) are not used for details. Use a tree prototype instead if you need them.
Details cast shadows only when the prototype's Cast Shadows is on (off by default). They are drawn on the terrain's Chunk Layer, without light probes or reflection probes.
Trees: instanced or GameObject
Each tree prototype chooses a Spawn Mode:
Instanced (default) | GameObject | |
|---|---|---|
| Rendering | Graphics.RenderMeshInstanced, up to 1023 instances per draw call, culled per patch by frustum and Render Distance × Tree Distance Multiplier | One prefab instance per tree, rendered by Unity like any GameObject |
| LOD | LOD0 and LOD1 of a LODGroup, chosen per patch group with Unity's LODGroup rule (respects QualitySettings.lodBias). Prefabs without a LODGroup use all their active MeshRenderers. | The prefab's own LODGroup |
| Per-instance tint | Yes, for materials using RTS Terrain Studio/Vegetation (random between Tint A and Tint B) | No |
| Colliders | Pooled capsule proxies (see below) | The colliders of the prefab |
| Scripts on the prefab | Not run (nothing is instantiated) | Run normally |
| Best for | Forests, scenery, large tree counts | Trees with gameplay: harvesting, animation, custom scripts |
In both modes the trees are placed at ground height + position.y, rotated by their yaw and uniformly scaled. They re-ground automatically when the terrain is edited. Spawned trees and collider proxies live under a hidden "RTS Vegetation Objects" child of the terrain and follow its transform.
Instanced trees need Enable GPU Instancing on their materials. If it is off, the renderer draws through a hidden instancing copy of the material (the project asset is never changed). In edit mode the copy re-syncs with the source about 4 times per second. In player builds the instancing variants of such materials may be stripped, so tick the checkbox (the project validator can do it for you).
The renderer keeps each part's shadow casting mode and rendering layer mask. Parts set to Shadows Only (shadow proxies) work as expected. A prototype with Cast Shadows off turns shadows off for all its parts.
Tree colliders
When a tree prototype has Colliders enabled:
- Instanced mode: every tree gets an invisible GameObject "Tree Collider" with a
CapsuleCollider(Collider Radius, Collider Height, scaled with the tree) and anRTSTreeInstancecomponent (IsColliderProxy= true). The proxies are pooled and reused, and they use the renderer's Collider Layer. - GameObject mode: the colliders of the prefab are used. The renderer adds an
RTSTreeInstanceto every spawned tree.
Either way, hit.collider.GetComponentInParent<RTSTreeInstance>() tells you which tree a physics query hit. Pathing and fog of war do not need colliders: they use the prototype's Footprint Radius and Blocks Vision.
Wind
The renderer pushes the global _RTS_Wind vector (direction, strength, speed) to all shaders every frame. The total sway of a plant is:
- Details: global Wind Strength × the prototype's Wind Strength (0–1).
- Trees and plants using
RTS Terrain Studio/Vegetation: global Wind Strength × the material's Wind Strength, weighted by Wind Mode. Object Height bends more towards the top, relative to Wind Reference Height. Vertex Color R uses the red vertex colour as a per-vertex weight (paint 0 on the trunk and 1 on branch tips). Leaf Flutter adds a fast, small movement on top.
Set Wind Strength to 0 on the renderer to stop all wind, for example for a calm night scene.
The Vegetation shader
RTS Terrain Studio/Vegetation is a lit foliage shader for tree and plant prefab materials. It supports the SRP Batcher, GPU instancing with per-instance tint (_RTS_InstanceTint), Forward+, DBuffer decals, the Rendering Debugger, APV and lightmaps, plus the fog of war fallback. Other instancing-capable materials (such as URP Lit) work too, but without per-instance tint, translucency and wind.
| Property | Default | Description |
|---|---|---|
| Albedo, Color | white | Base texture (alpha used for clipping) and colour. |
| Alpha Clipping, Alpha Cutoff | on, 0.5 | Alpha test for leaves. Clipping is on without any keyword; the inverted keyword _ALPHATEST_OFF turns it off. |
| Use Normal Map, Normal Map, Normal Strength | off, –, 1 | Optional normal map (_NORMALMAP). |
| Smoothness, Specular Color | 0.2, dark grey | Specular response. |
| Wrap Lighting | 0.35 | Softens the light falloff on leaves (0–1). |
| Translucency, Translucency Color | 0.6, light green | Light shining through leaves when looking towards the sun. |
| Wind Mode | Object Height | Off, Vertex Color R or Object Height. |
| Wind Strength, Wind Reference Height, Leaf Flutter | 1, 6, 0.5 | Material-side wind scale (multiplied with the renderer's global wind). |
| Cull | Off | Face culling. Off renders both sides of leaf cards. |
| Receive Shadows | on | Keyword _RECEIVE_SHADOWS_OFF when off. |
For code that creates vegetation materials: alpha clipping is on by default. Enable the keyword _ALPHATEST_OFF (RTSVegetationShaderIDs.VegetationAlphaTestOffKeyword) only when you want to disable clipping.
Quality multipliers
The three quality fields scale the library values without editing the library. They are ideal for graphics options in your game menu:
using RTSTerrainStudio;
using UnityEngine;

/// Applies a vegetation quality level (0 = low, 1 = medium, 2 = high) to every terrain in the scene.
public static class VegetationQuality
{
    public static void Apply(int level)
    {
        foreach (RTSTerrain terrain in RTSTerrain.All)
        {
            if (!terrain.TryGetComponent(out RTSVegetationRenderer vegetation)) continue;

            switch (level)
            {
                case 0:
                    vegetation.detailDensityMultiplier = 0.4f;   // fewer grass blades (regenerates details)
                    vegetation.detailDistanceMultiplier = 0.6f;  // grass disappears earlier
                    vegetation.treeDistanceMultiplier = 0.7f;    // instanced trees culled earlier
                    vegetation.crossedQuadCount = 2;             // 2 quads per grass tuft instead of 3
                    break;
                case 1:
                    vegetation.detailDensityMultiplier = 0.75f;
                    vegetation.detailDistanceMultiplier = 0.8f;
                    vegetation.treeDistanceMultiplier = 1f;
                    vegetation.crossedQuadCount = 3;
                    break;
                default:
                    vegetation.detailDensityMultiplier = 1f;
                    vegetation.detailDistanceMultiplier = 1f;
                    vegetation.treeDistanceMultiplier = 1.2f;
                    vegetation.crossedQuadCount = 3;
                    break;
            }
            // The renderer notices the changed values on its next update and rebuilds what is needed.
        }
    }
}
Tree API and harvesting
| Member | Description |
|---|---|
bool RemoveTree(uint id) | Removes the tree from the map, deactivates its GameObject or collider proxy immediately, notifies the terrain (MapLayers.Trees, so pathing reopens the footprint and the fog of war drops the vision blocker) and raises TreeRemoved. It does not record undo. Returns false when no tree has this id. |
event Action<RTSVegetationRenderer, TreeInstanceData> TreeRemoved | Raised by RemoveTree with the data of the removed tree. |
bool SetTreeHidden(uint id, bool hidden), bool IsTreeHidden(uint id), void ShowAllTrees() | Hide a tree for gameplay without changing the map: it is no longer drawn, its collider proxy or GameObject is released and its pathing footprint opens. The same as the methods of RTSTerrain; see Harvesting trees without changing the map. |
bool TryFindNearestTree(Vector3 worldPosition, float maxDistance, out TreeInstanceData tree) | Nearest tree measured on the ground plane (XZ). Mathf.Infinity searches the whole map. |
GameObject GetTreeObject(uint id) | The spawned prefab instance (GameObject mode) or the collider proxy (instanced with colliders). Otherwise null. |
Vector3 GetTreeWorldPosition(in TreeInstanceData tree) | World position of the tree root (ground height + offset). |
void RebuildAll(), void ProcessChanges() | Full rebuild; apply pending map changes now (normally automatic every frame). |
VisibleDetailInstances, VisibleTrees, TotalDetailInstances, SpawnedTreeObjects, TreeColliderCount | Statistics. The "visible" values are for the most recently rendered Game or Scene camera. |
RTSTreeInstance: TreeId, Owner, IsColliderProxy, TryGetData(out TreeInstanceData), Remove(), Hide() | Component on spawned trees and collider proxies. Remove() is the same as Owner.RemoveTree(TreeId), Hide() the same as Owner.SetTreeHidden(TreeId, true). |
using RTSTerrainStudio;
using UnityEngine;

/// A minimal lumberjack: chops the nearest tree in reach, or the tree under the mouse.
public class Lumberjack : MonoBehaviour
{
    [SerializeField] RTSVegetationRenderer vegetation;
    [SerializeField] Camera viewCamera;
    [SerializeField] float reach = 2f;
    public int wood;

    void OnEnable()
    {
        if (vegetation != null) vegetation.TreeRemoved += HandleTreeRemoved;
    }

    void OnDisable()
    {
        if (vegetation != null) vegetation.TreeRemoved -= HandleTreeRemoved;
    }

    /// Physics-free: finds the nearest tree around this unit on the ground plane.
    public bool ChopNearestTree()
    {
        if (vegetation == null) return false;
        if (!vegetation.TryFindNearestTree(transform.position, reach, out TreeInstanceData tree)) return false;
        return vegetation.RemoveTree(tree.id);
    }

    /// Physics based: needs "Colliders" on the tree prototype.
    public bool ChopTreeUnderMouse()
    {
        if (viewCamera == null) return false;
        Ray ray = viewCamera.ScreenPointToRay(RTSInput.PointerPosition);
        if (!Physics.Raycast(ray, out RaycastHit hit, 500f)) return false;

        // Works for collider proxies (instanced trees) and for colliders inside spawned tree prefabs.
        var tree = hit.collider.GetComponentInParent<RTSTreeInstance>();
        return tree != null && tree.Remove();
    }

    void HandleTreeRemoved(RTSVegetationRenderer renderer, TreeInstanceData tree)
    {
        wood += 10;
        Vector3 position = renderer.GetTreeWorldPosition(tree);
        Debug.Log($"Tree {tree.id} felled at {position}. Wood: {wood}");
    }
}
The sample scripts include a complete harvesting demo (RTSTreeHarvestDemo: workers walk to a tree, chop it and play a falling animation with RTSFallingTreeEffect). Read it for a full gameplay example, including how harvested trees are restored when a play test ends.
Removing a tree changes the map. In the in-game editor or the Unity Editor the map is then marked as having unsaved changes. Game code usually works on a map loaded for the match and never saves it back. To fell trees for one match only, hide them instead (SetTreeHidden): the map stays unchanged, and ShowAllTrees() brings the forest back for the next match.
Water
RTSWaterRenderer renders the painted water as chunked, transparent meshes. Every vertex flagged as water has its own surface height, so lakes on different cliff levels are possible. The meshes follow MapGeometryView.SampleWater, which is exactly what gameplay queries and pathing use. Water chunks use the terrain's chunk size, are generated by Burst jobs (WaterChunkMeshJob), and exist only where there is water. Only the chunks an edit touched are rebuilt.
Setup
- Make sure the terrain GameObject has a Water Renderer (, or the Add button in the
RTSTerraininspector). - Open the active URP asset and enable Depth Texture and Opaque Texture, and set Opaque Downsampling to None (see below). checks and fixes this. A camera can also turn both on for itself.
- Paint water with the Water tools (key 6 in the Scene View while editing).
- Change the look in the Water section of the tileset inspector (the tileset's water profile).
URP requirements
| Setting (URP asset or camera) | Needed for | Without it |
|---|---|---|
| Depth Texture: on | Depth colour, shore foam and the soft shoreline around objects standing in the water, and refraction that leaves out objects in front of the water (_CameraDepthTexture) | The water uses the depth stored in its mesh. Depth colour, foam and the soft shore remain, but they ignore objects standing in the water. |
| Opaque Texture: on | Refraction (_CameraOpaqueTexture) | Plain alpha blending without refraction. |
| Opaque Downsampling: None (URP asset) | A sharp lake bottom and sharp submerged objects | The underwater scene looks blurry (URP's default is 2x Bilinear). |
URP decides per camera: a camera's own Depth Texture and Opaque Texture settings (in the Rendering section of its inspector) override the URP asset, and the Scene view always uses the asset. The water matches its material to each camera right before that camera renders, so every view gets the best water it can. Cameras that do not render the water layer are skipped, and overlay cameras never get the opaque texture.
The Water Renderer inspector shows a message for each missing setting, with a Select URP Asset button. In Play Mode it also takes the main camera's own settings into account. A missing texture never breaks the water: views without it use the fallback described above. The water just looks considerably better with both textures enabled.
From code: RTSWaterMaterialUtility.CheckPipelineSupport(Camera camera, out bool depthTexture, out bool opaqueTexture) tells you what URP generates for one camera, resolved the same way URP does (pass null to check the URP asset alone). CheckPipelineSupport(out bool depthTexture, out bool opaqueTexture) checks the views that show the water: in builds the main camera (or the URP asset without one), in the editor also the URP asset, because the Scene view uses it. Both return false when URP is not active. RTSWaterMaterialUtility.IsOpaqueTextureDownsampled() checks the downsampling.
Renderer settings
| Setting | Default | Description |
|---|---|---|
| Material Template | empty | Optional material. Its shader and properties are copied, then the tileset's water profile is applied on top. Use it to tune values the profile does not cover: Reflection Strength, Specular Strength, Foam Tile Size, Foam Lines, Shore Fade. |
| Cast Shadows | off | Water surfaces normally only receive shadows. |
| Receive Shadows | on | Main light shadows on the water. This also works for the runtime material in player builds. |
| Render Layer | 4 (Water) | GameObject layer of the water chunks (RTSWaterRenderer.DefaultLayer is Unity's built-in Water layer). |
| Wave Amplitude Multiplier | 1 | Scales the profile's Wave Height (0–4, 0 = still water). |
| Cell Subdivisions | 2 | Quads per cell side (1–4). Higher values give smoother shorelines and waves and cost more vertices. |
| Light Probe Usage | Off | Off lights all chunks with the ambient probe. Blending probes would give each chunk a slightly different ambient colour and show steps along chunk borders. |
| Reflection Probe Usage | Blend Probes | In Forward+ probes are evaluated per pixel. In Forward each chunk picks the probes of its own bounds, so with several probes neighbouring chunks may reflect different ones. |
Inspector buttons: Rebuild (RebuildAll()) and Refresh Material (RefreshMaterial(), re-applies the template and the profile). The inspector also shows the chunk grid, the chunks with water, the total vertex count and where the profile comes from.
Water profile (tileset)
The look and the pathing rules come from RTSTileset.water (a WaterProfile). Without a tileset a shared default profile is used. Treat it as read-only, and use WaterMath.CreateDefaultProfile() or WaterProfile.Clone() when you need an editable copy.
| Field | Default | Description |
|---|---|---|
| Shallow Color | teal, alpha 0.55 | Colour of shallow water (alpha = opacity). |
| Deep Color | dark blue, alpha 0.95 | Colour reached at Color Depth (alpha = opacity). |
| Color Depth | 3 m | Depth at which the deep colour is fully reached. |
| Shallow Depth Limit | 0.9 m | Water deeper than this is deep water (not walkable). Shallower water is walkable, as in classic RTS games. |
| Normal Map, Normal Strength, Normal Tile Size | none, 0.6, 8 m | Surface ripples. Without a normal map the surface uses only the vertex waves. |
| Flow Speed | (0.03, 0.02) | Scrolling of the normal map. |
| Wave Height | 0.05 m | Amplitude of the vertex waves (times the renderer multiplier). |
| Smoothness | 0.92 | Surface smoothness. |
| Refraction | 0.03 | Strength of the refraction offset (0–0.2). |
| Foam Color, Foam Distance, Foam Texture | white 0.8, 0.6 m, none | Shore foam. Foam Distance also calms the waves in shallow water. |
| Minimap Color | blue | Colour of water on the minimap. |
The Water shader
RTS Terrain Studio/Water (RTSWaterMaterialUtility.ShaderName) is a transparent URP shader. The chunk meshes provide map-local positions plus per-vertex water data (depth, coverage and distance to the shore, up to ShoreSearchRadius = 4 cells). Features:
- Depth colour from shallow to deep, with soft shorelines that fade where the water meets the ground.
- Four directional vertex waves, calmed in shallow water so the surface never lifts above the beach.
- Scrolling normal map ripples, refraction of the underwater scene, sun specular and reflection probes.
- Shore foam (procedural lines or a foam texture).
- Main and additional lights (including per-vertex additional lights), light cookies, light layers, receive shadows and the fog of war fallback. SRP Batcher compatible.
The material is created at runtime (WaterMaterial, shared by all chunks) and filled with RTSWaterMaterialUtility.ApplyProfile. The shader is referenced by a serialized field on the component, so it is included in builds.
In per-vertex mode, additional lights add diffuse light only (no specular, no shadows), like URP's own vertex lighting.
Water renderer API
| Member | Description |
|---|---|
Material WaterMaterial | Runtime material shared by all chunks (null while disabled). |
Material MaterialTemplate { get; set; } | Optional template. Setting it refreshes the material. |
WaterProfile Profile | Tileset profile or the shared default. |
Transform ChunkRoot, ChunkCountX, ChunkCountZ, ActiveChunkCount, VertexCount, bool HasWater | Chunk grid and statistics. |
MeshRenderer GetChunkRenderer(Vector2Int chunkCoord) | Renderer of a chunk, or null when the chunk has no water. |
void RebuildAll(), void RebuildCells(RectInt cellRect), void RefreshMaterial() | Full rebuild, partial rebuild, material refresh. |
event Action<RTSWaterRenderer> MeshesRebuilt | Raised after a full or partial rebuild. |
RTSWaterChunk: Owner, Terrain, ChunkCoord, CellRect | Marker on the hidden chunk objects. |
WaterMath: water for gameplay
WaterMath answers water questions without physics. All positions are in world space.
| Method | Returns |
|---|---|
GetWaterHeight(RTSTerrain, Vector3, out float height), GetWaterHeight(Vector3, out float height) | World Y of the still water surface. False when dry or outside the terrain. The second overload finds the terrain with RTSTerrain.FindAt. |
GetWaterDepth(RTSTerrain, Vector3, out float depth) | Water surface minus ground in metres. False when dry. |
Classify(RTSTerrain, Vector3, out float depth) | WaterDepthClass.Dry, Shallow or Deep (using Shallow Depth Limit). |
IsShallowWater(…), IsDeepWater(…), GetShallowDepthLimit(RTSTerrain) | Shortcuts for the classification. |
GetWaterSurface(RTSTerrain, Vector3, float time, out float height, out Vector3 normal) | The animated surface exactly as rendered: still height + waves, calmed near the shore, including the renderer's Wave Amplitude Multiplier. |
float ShaderTime | The clock the shader animates with (Time.time in play mode and players, Time.realtimeSinceStartup in edit mode). Pass it as time so CPU and GPU waves match. |
SampleWaveOffset(Vector3, float waveHeight, float time) | Wave offset without shore calming. |
EvaluateWaves(float2, float time), EvaluateWaveSurface(float2, float time, float amplitude, out float offset, out float3 normal), WaveAttenuation(float depth, float foamDistance) | Burst-compatible building blocks for job systems (for example thousands of floating units). |
GetProfile(RTSTerrain), CreateDefaultProfile() | The profile in use; a fresh default profile that is safe to modify. |
using RTSTerrainStudio;
using UnityEngine;

/// Makes a boat float on the animated water surface and keeps it out of shallow water.
public class FloatingBoat : MonoBehaviour
{
    [SerializeField] float draft = 0.15f;        // how deep the hull sits in the water
    [SerializeField] float heading;              // yaw in degrees, set by your movement code
    [SerializeField] float tiltSmoothing = 4f;

    void LateUpdate()
    {
        Vector3 p = transform.position;
        RTSTerrain terrain = RTSTerrain.FindAt(p);
        if (terrain == null) return;

        // ShaderTime is the clock the water shader uses, so the boat bobs in sync with the rendered waves.
        if (!WaterMath.GetWaterSurface(terrain, p, WaterMath.ShaderTime, out float height, out Vector3 normal))
            return; // dry ground: leave the boat alone

        transform.position = new Vector3(p.x, height - draft, p.z);

        // Tilt with the wave normal, keep our own heading.
        Quaternion target = Quaternion.FromToRotation(Vector3.up, normal) * Quaternion.Euler(0f, heading, 0f);
        transform.rotation = Quaternion.Slerp(transform.rotation, target, 1f - Mathf.Exp(-tiltSmoothing * Time.deltaTime));
    }

    /// Boats need deep water: use this before accepting a move order.
    public static bool CanSailTo(Vector3 world)
    {
        RTSTerrain terrain = RTSTerrain.FindAt(world);
        return terrain != null && WaterMath.Classify(terrain, world, out _) == WaterDepthClass.Deep;
    }
}
Decor
RTSDecorManager keeps the scene in sync with the map's decor (doodads: rocks, crates, ruins, fences, any prefab). It listens to the terrain's change events and works incrementally. An edit touches only the instances that were added, removed or changed. Objects are reused when only their transform changes, and pooled when they are removed. Terrain height edits re-ground the instances in the changed area. Loading a map or changing the decor library rebuilds everything.
Spawn modes
Each prototype in the decor library chooses a Spawn Mode:
GameObject (default) | Instanced | |
|---|---|---|
| Representation | A copy of the prefab (variant) under the "RTS Decor" child, with an RTSDecorInstance component | Drawn with Graphics.RenderMeshInstanced (first LOD level of the prefab), up to 1023 instances per draw call |
| Culling | Unity's own | Per patch (frustum + Max Draw Distance) |
| Scripts, colliders, animation | Yes | No (no objects exist) |
| Tint | Through a MaterialPropertyBlock (_BaseColor and _Color) | Only for shaders that support it (see Per-instance tint) |
| Best for | Interactive or destructible props, a few hundred to a few thousand objects | Static scenery in large numbers |
Placement rule: position = LocalToWorld(x, ground + y + prototype yOffset, z), or the stored absolute height with the KeepHeight flag. Rotation = terrain rotation × instance rotation, scale = instance scale. Spawned prefabs keep the rotation and scale authored on their root on top of that.
Instanced decor needs Enable GPU Instancing on its materials. If it is off, a runtime copy with instancing is used and a warning asks you to tick the checkbox. Use the project validator to fix all materials at once.
The prototype fields (variants, random rotation and scale, tint, footprint, vision blocking, shadows) are described in Decor Library.
Manager settings
| Setting | Default | Description |
|---|---|---|
| Show In Scene View | on | Draw instanced decor in Scene View cameras. Spawned GameObjects are always visible. |
| Max Draw Distance | 0 | Instanced decor farther than this from the camera is not drawn (0 = no limit). |
| Shadow Culling Margin | 12 m | Extra margin around patches for frustum culling, so props just outside the view still cast shadows into it. |
| Instanced Tint | on | Pass per-instance tints to instanced decor whose shader supports it. |
| Patch Size | 16 | Side length of a culling and query patch in cells (4–64). Changing it rebuilds the decor. |
| Pool Capacity Per Prefab | 64 | Removed GameObject decor is kept inactive for reuse, up to this many objects per prefab. |
| Log Missing Prototypes | on | Logs one warning per missing prototype id, missing library or destroyed prefab. |
The Decor Manager inspector shows Instances, GameObjects, Instanced and Sync (whether changes are pending), plus the buttons Rebuild (RebuildAll(): destroys and recreates everything, clears the pools, re-reads the prefabs), Sync Now (SyncNow()) and Select Library.
Placeholders
If a map references a prototype id that is missing from the library, or the terrain has no decor library at all, or a prefab was deleted, the instance is shown as a small magenta cube. Nothing is lost: the instance stays in the map, and it appears normally again once the prototype is back. IsPlaceholder(id) tells you whether an instance is a placeholder. Placeholders count as instanced.
Magenta cubes after opening a map from someone else usually mean the terrain uses a different decor library than the one the map was made with. Assign the right library in the RTSTerrain inspector.
Per-instance tint with your own shaders
Instanced decor is tinted per instance only when the shader can read the tint from the instancing buffer. URP Lit, Simple Lit and Unlit keep their material colour. Shaders opt in with a SubShader tag:
| Tag | Constant | The shader must |
|---|---|---|
"RTSInstanceTint" = "True" | RTSDecorManager.InstanceTintShaderTag | Multiply its albedo with the instanced _RTS_InstanceTint (rgb = tint, a = 1). The package's RTS Terrain Studio/Vegetation shader is detected automatically. |
"RTSInstancedColor" = "True" | RTSDecorManager.InstancedColorShaderTag | Read _BaseColor and _Color with UNITY_ACCESS_INSTANCED_PROP from a UNITY_INSTANCING_BUFFER. The values written are material colour × tint. |
Decor API: picking, queries and events
Picking and queries need no colliders. Each instance is tested as an oriented box built from the prefab's mesh bounds, so they work for both spawn modes, even with instanced decor that has no GameObject.
| Member | Description |
|---|---|
bool TryPick(Ray worldRay, float maxDistance, out uint instanceId) (+ overload with out float hitDistance) | Nearest instance hit by a world ray. |
int QueryRadius(Vector3 world, float radius, List<uint> results) | Adds the ids within a radius on the ground plane. The list is not cleared. Allocation free. An IEnumerable<uint> overload allocates a new list. |
int QueryLocalRect(Rect localRect, List<uint> results) | Adds the ids whose pivot lies inside a map-local XZ rectangle (box selection). |
GameObject GetInstanceObject(uint id) | The spawned object, or null (instanced or unknown id). |
ContainsInstance, TryGetInstance(uint, out DecorInstanceData), IsInstanced, IsPlaceholder | Instance lookups (data as of the last sync). |
TryGetWorldBounds(uint, out Bounds), TryGetObjectMatrix(uint, out Matrix4x4) | World bounds; object root matrix including the prefab's authored root rotation and scale. |
Matrix4x4 GetWorldMatrix(in DecorInstanceData), GetWorldMatrix(in DecorInstanceData, string prototypeId) | Pivot world matrix, also for data that is not in the map yet (placement previews). |
SpawnedCount, InstancedCount, InstanceCount, Container, PatchSize, HasPendingChanges | State and statistics. |
InstancesRebuilt, InstancesChanged | After a full rebuild; after an incremental update. |
InstanceSpawned, InstanceDespawning | An object was spawned or taken from the pool; an object is about to be pooled or destroyed. Objects kept through a soft rebuild do not fire InstanceSpawned again. |
RTSDecorInstance: InstanceId (0 while pooled), PrototypeId, Variant, Owner, Prototype, IsLive, TryGetData, static FromCollider(Collider) | Component on every spawned object root. Its fields are filled before the prefab's own Awake/OnEnable run, so your prefab scripts can read them there. |
using System.Collections.Generic;
using RTSTerrainStudio;
using Unity.Mathematics;
using UnityEngine;

/// Click a decor object to destroy it; Shift+click destroys everything within 5 m of the click.
public class DecorDemolisher : MonoBehaviour
{
    [SerializeField] RTSDecorManager decor;
    [SerializeField] Camera viewCamera;

    // Reused every click: QueryRadius appends to it and never allocates.
    readonly List<uint> nearby = new List<uint>();

    void Update()
    {
        if (decor == null || viewCamera == null || !RTSInput.GetMouseButtonDown(0)) return;

        Ray ray = viewCamera.ScreenPointToRay(RTSInput.PointerPosition);
        // Works for GameObject and instanced decor alike, without colliders.
        if (!decor.TryPick(ray, 500f, out uint id, out float distance)) return;

        if (RTSInput.Shift)
        {
            nearby.Clear();
            decor.QueryRadius(ray.GetPoint(distance), 5f, nearby);
            foreach (uint other in nearby) Remove(other);
        }
        else
        {
            Remove(id);
        }
    }

    void Remove(uint id)
    {
        RTSTerrain terrain = decor.Terrain;
        MapData map = terrain.Map;
        int index = map.FindDecorIndex(id);
        if (index < 0) return;

        DecorInstanceData data = map.Decor[index];
        map.Decor.RemoveAt(index);

        // Tell the terrain what changed. The decor manager removes (pools) the object,
        // and the pathing map reopens the footprint automatically.
        int2 cell = map.LocalToCell(data.position.xz);
        terrain.NotifyChanged(MapLayers.Decor, new RectInt(cell.x, cell.y, 1, 1));
    }
}
using RTSTerrainStudio;
using UnityEngine;
/// Gives every spawned decor object of the category "Destructible" some hit points.
public class DestructibleDecorSetup : MonoBehaviour
{
[SerializeField] RTSDecorManager decor;
void OnEnable()
{
if (decor != null) decor.InstanceSpawned += HandleSpawned;
}
void OnDisable()
{
if (decor != null) decor.InstanceSpawned -= HandleSpawned;
}
void HandleSpawned(RTSDecorManager manager, RTSDecorInstance instance)
{
// Prototype looks up the library entry, e.g. its category or footprint.
DecorPrototype prototype = instance.Prototype;
if (prototype == null || prototype.category != "Destructible") return;
// Pooled objects come back here when they are reused, so add the component only once.
if (!instance.TryGetComponent(out Health health)) health = instance.gameObject.AddComponent<Health>();
health.hitPoints = 100;
}
}
/// Example gameplay component.
public class Health : MonoBehaviour
{
public int hitPoints;
}Only GameObject-mode prototypes raise InstanceSpawned, because instanced decor creates no objects.
Environment
Every map stores its own lighting in MapData.Environment: sun colour, intensity and rotation, ambient colour and fog. A snowy map can therefore ship with cold light and a desert map with warm light. The RTSEnvironment component applies these values to the scene when a map is loaded and whenever the environment changes.
Setup
- Choose . This creates an "Environment" GameObject with
RTSEnvironment, plus a directional light "Sun" if the scene has none. If the open scenes already contain an environment, you can select it instead. Several environments would fight over the same lighting settings. - Alternatively, add to the terrain GameObject (the
RTSTerraininspector offers an Add button). - Edit the values on the Map tab of the editor window (), card Environment: Sun Colour, Sun Intensity, Sun Rotation (x = pitch above the horizon, y = yaw), Ambient Colour, Fog, Fog Colour, Fog Density. Edits are undoable and saved with the map.
- Or light the scene by hand and click Capture From Scene (editor window) or Use Current Lighting (component inspector) to store the current sun, ambient and fog in the map, as one undo step.
The applied lighting is a preview. It is not recorded in Undo and does not mark the scene dirty. Right before the scene is saved, the original scene lighting is restored, and afterwards the map lighting is applied again. The map lighting is therefore never written into your scene file. Restore Scene Lighting in the inspector brings back the lighting from before the first apply.
Component settings
| Setting | Default | Description |
|---|---|---|
| Terrain | empty | Terrain whose map lighting is applied. Empty = the RTSTerrain on this GameObject, otherwise the main terrain (RTSTerrain.Main). A terrain enabled later is picked up automatically. |
| Sun | empty | Directional light used as the sun. Empty = RenderSettings.sun, or the brightest enabled directional light. |
| Apply In Edit Mode | on | Apply the map lighting while editing. When off, it is applied only in play mode. |
| Apply Sun | on | Apply sun colour, intensity and rotation (world space). |
| Apply Ambient | on | Apply the ambient light. |
| Ambient Mode | Trilight | Flat = one ambient colour. Trilight = sky / equator / ground gradient derived from the map's ambient colour. |
| Sky Factor | 1.2 | Trilight: sky colour = ambient × this factor (0–3). |
| Ground Factor | 0.55 | Trilight: ground colour = ambient × this factor (0–3). |
| Apply Fog | on | Apply fog on/off, colour and density. |
| Fog Mode | Exponential Squared | Falloff mode used when fog is applied (the map stores only colour and density). |
| Restore On Disable | on | Restore the scene lighting from before the first apply when the component is disabled. |
Map defaults for a new map: sun colour warm white (1, 0.956, 0.84), intensity 1.2, rotation (50, −30), ambient (0.45, 0.5, 0.58), fog off, fog colour (0.6, 0.68, 0.75), density 0.004.
For a day/night cycle in your game, drive the sun light directly from your own script. RTSEnvironment only re-applies the map values when a map is loaded or its environment changes. Alternatively, untick Apply Sun and keep only ambient and fog from the map.
Environment API
| Member | Description |
|---|---|
void Apply() | Applies the map's environment to the scene now (respects Apply In Edit Mode). |
void CaptureFromScene(RTSEditSession session) | Writes the scene lighting into the map as one undo step of the session. |
void CaptureFromScene(RTSToolContext ctx = null) | Writes the scene lighting into the map. Undo is recorded only inside RTSEditSession.RunOperation. |
void RestoreSceneState() | Restores the lighting saved before the first apply. |
RTSTerrain Terrain { get; set; }, Light Sun { get; set; }, bool CanApply | Bound terrain, sun light, whether applying is currently allowed. |
static Light FindSun() | RenderSettings.sun when it is a directional light, otherwise the brightest enabled directional light. |
using RTSTerrainStudio;
using UnityEngine;

/// Switches the current map to a stormy mood. RTSEnvironment applies it immediately.
public static class StormLighting
{
    public static void Apply(RTSTerrain terrain)
    {
        MapData map = terrain != null ? terrain.Map : null;
        if (map == null) return;

        // Work on a copy, then assign it: this is how the editor tools change the environment too.
        EnvironmentSettings env = map.Environment.Clone();
        env.sunColor = new Color(0.7f, 0.75f, 0.85f);
        env.sunIntensity = 0.45f;
        env.ambientColor = new Color(0.3f, 0.33f, 0.4f);
        env.fog = true;
        env.fogColor = new Color(0.45f, 0.48f, 0.52f);
        env.fogDensity = 0.012f;
        map.Environment = env;

        // MapLayers.Environment tells RTSEnvironment (and the in-game editor) that the lighting changed.
        terrain.NotifyChanged(MapLayers.Environment, map.CellBounds);
    }
}
Performance guide
The defaults run well on desktop for typical RTS maps (128–256 cells per side). This section explains what each setting costs, so you can tune large maps and mobile builds deliberately.
Quick checklist
- Keep the Burst package installed and Burst compilation enabled ().
- Build the tileset's texture arrays in the editor with Compress Arrays on, for the platform you ship (the tileset inspector shows the format and an estimated size).
- Tick Enable GPU Instancing on every material of instanced trees, details and decor (the project validator does it with one click).
- Use
Instancedspawn mode for scenery trees and props. KeepGameObjectmode for objects with gameplay. - Pick the splat resolution and the array resolution for the platform (see below). Both mostly cost memory.
- Run Validate Map (Map tab ▸ Validation). It warns about too many trees (20 000), GameObject trees (1 500), decor (6 000), GameObject decor (2 000), detail layers (8) and large maps (over 512 cells).
Choosing the chunk size
| Chunk Size | Draw calls (256 × 256 map) | Rebuild cost per edit | Use for |
|---|---|---|---|
| 16 | 256 chunks | Smallest: fastest brush feedback | Small maps, heavy editing (in-game editor on slower machines) |
| 32 (default) | 64 chunks | Balanced | Most maps |
| 64 | 16 chunks | Largest: each edit rebuilds up to 64 × 64 cells, plus neighbours at borders | Large maps where editing is rare (shipped maps, players only watch) |
Each chunk is one draw call per rendered view (the main camera and every shadow cascade), and SRP Batcher batches them cheaply because they share one material. Chunks are also the unit of culling, so smaller chunks cull more precisely when the camera is close to the ground.
Subdivisions
The vertex count of smooth ground grows with Surface Subdivisions squared:
| Surface Subdivisions | Vertices of a flat 32 × 32 chunk | Effective Cliff Subdivisions with the default 4 (with 8) |
|---|---|---|
| 1 | 1 089 | 4 (8) |
| 2 (default) | 4 225 | 4 (8) |
| 3 | 9 409 | 6 (12) |
| 4 | 16 641 | 4 (8) |
Cliff Subdivisions is rounded up to an even number that is also a multiple of Surface Subdivisions, so cliff cells and smooth cells share every border vertex. With 3 surface subdivisions the cliff sub-grid becomes a multiple of 6, which is expensive. Prefer 1, 2 or 4. Each cliff cell costs roughly (cliff subdivisions)² × 2 triangles plus its walls (Cliff Wall Segments rows per level), so maps with many cliffs benefit most from moderate cliff settings.
A chunk vertex is 28 bytes. Indices are 16-bit as long as a chunk stays below 65 536 vertices. A flat 256 × 256 map at 2 subdivisions has roughly 260 000 vertices, about 10 MB of vertex and index data. Cliffs add to that, and chunk colliders need their own cooked data.
Splat resolution
The splat resolution (texels per cell: 1, 2, 4 or 8, default 4) is chosen when a map is created (New Map wizard). It sets how finely ground textures can be painted. Splat data always consists of 4 RGBA32 maps (16 bytes per texel), and it exists three times: in the map data, in the textures' CPU copy and on the GPU (both with mip maps, +33 %).
| Map size (cells) | Splat res 2 | Splat res 4 (default) | Splat res 8 |
|---|---|---|---|
| 128 × 128 | 1 MiB data + 1.3 MiB GPU | 4 MiB + 5.3 MiB | 16 MiB + 21 MiB |
| 256 × 256 | 4 MiB + 5.3 MiB | 16 MiB + 21 MiB | 64 MiB + 85 MiB |
| 512 × 512 | 16 MiB + 21 MiB | 64 MiB + 85 MiB | 256 MiB + 341 MiB |
| 1024 × 1024 | 64 MiB + 85 MiB | 256 MiB + 341 MiB | 1 GiB + 1.3 GiB |
(Add the GPU value once more for the textures' CPU copy.) Painting cost is low: only the changed rows are copied. On textures over 1 million texels, a changed area up to 512 × 512 texels uploads only that area. Its mip chain is rebuilt on the CPU by a Burst job (SplatMipDownsampleJob) and copied into place on the GPU.
Res 2 is enough for the hard, classic RTS-style tile look (Tile Paint). Res 4 gives soft, detailed transitions. Res 8 is for very small cell sizes or close-up cameras only. A splat texture has (cells × resolution) texels per side: keep that at or below 2048 for Web builds and 4096 for mobile devices (see Memory limits and warnings).
Texture array resolution
Each tileset packs its ground and cliff textures into two Texture2DArrays (albedo/height and normal) with 20 slices each, at the tileset's Array Resolution (256, 512, 1024 default, 2048). Memory of both arrays together, including mip maps:
| Array Resolution | Uncompressed RGBA32 | BC7 / DXT5 (desktop, consoles) | ASTC 6×6 (Android, iOS) |
|---|---|---|---|
| 256 | 13 MiB | 3.3 MiB | 1.5 MiB |
| 512 | 53 MiB | 13 MiB | 5.9 MiB |
| 1024 (default) | 213 MiB | 53 MiB | 24 MiB |
| 2048 | 853 MiB | 213 MiB | 95 MiB |
With Compress Arrays on, the tileset inspector bakes compressed arrays for the active build platform: BC7 for Windows, macOS, Linux and consoles, ASTC 6×6 for Android, iOS, tvOS and visionOS, for Web the texture compression of the build (DXT5, ASTC 6×6 or ETC2 RGBA8), DXT5 otherwise. When built arrays are missing, or out of date in the editor, the renderer builds uncompressed RGBA32 arrays on the GPU instead. That is fine for quick iteration, but it costs four times the memory of BC7. Player builds rebuild outdated arrays before the build (see Texture arrays in player builds). The arrays are shared by all terrains that use the same tileset.
A GPU or browser that cannot sample the baked format gets the arrays decompressed by Unity when they load, at about four times the memory. Players free the CPU copy of built arrays the first time they use them, so in a player the built arrays only take the GPU memory listed in the table.
To check which arrays a running game uses, take a capture in the Memory Profiler and search for render textures named "RTS Albedo Array (…)" and "RTS Normal Array (…)". If you find them, the runtime-built uncompressed arrays are in use.
Detail distance and vegetation
- Details are the most likely bottleneck on the GPU, because grass is many small, alpha-clipped triangles. The visible count scales with Render Distance² × density. Halving the detail distance cuts the drawn grass to about a quarter.
- Detail memory: every painted patch keeps its instances on the GPU, regardless of the camera: 32 bytes per instance. Example: one detail layer at full density (Max Density 6, detail resolution 2 = 4 texels per cell) over a whole 256 × 256 map gives about 1.6 million instances, about 50 MB. Paint grass where it matters, or lower Max Density.
- Detail shadows are off by default. Turning them on renders all grass again for every shadow cascade.
- Trees: instanced trees cost one draw call per 1 023 instances per part per patch group. Use a LODGroup with a cheap LOD1. GameObject trees cost a GameObject each (keep below about 1 500).
- Decor: set Max Draw Distance for instanced decor in large maps. GameObject decor is culled by Unity but still costs a GameObject each (keep below about 2 000).
- Water: Cell Subdivisions 1 quarters the water vertices compared with the default 2.
Burst and jobs
All heavy loops run in Burst-compiled jobs: chunk meshes (BuildChunkGeometryJob, CopyChunkPartsJob), splat mips (SplatMipDownsampleJob), water meshes (WaterChunkMeshJob), detail scattering (DetailScatterJob), tree matrices (TreeMatrixJob) and decor placement (DecorPlacementJob, DecorPartMatricesJob). Brushes, pathing, fog of war, the pathfinder and the minimap baker use Burst as well. Chunk colliders are baked in parallel on worker threads.
- The mesh jobs compile synchronously, so the first build after a domain reload is not done by a slow managed fallback.
- Measure in a player build or with Burst safety checks off (). Editor safety checks and the Jobs Debugger make jobs noticeably slower.
- With Burst compilation disabled everything still works, but mesh rebuilds and brush strokes become many times slower.
- Web builds have no worker threads, so all jobs run one after the other on the main thread. Operations on the whole map take noticeably longer there (see Rendering and performance of Web builds).
Profiling
Open and look for these markers on the main thread:
| Marker | What it measures |
|---|---|
RTSVegetation.Update | Applying map changes to vegetation (includes the two build markers below). |
RTSVegetation.BuildDetails | Regenerating dirty detail patches. |
RTSVegetation.BuildTrees | Rebuilding instanced tree groups. |
RTSVegetation.Draw | Culling and issuing vegetation draw calls for one camera. |
Switch the CPU module to Timeline to see the job names listed above on the worker threads. On the GPU, use the Frame Debugger () to count terrain chunk, detail and instanced draws. The inspectors of the Vegetation Renderer, Water Renderer and Decor Manager show live instance and vertex counts. The RTSTerrain inspector shows the chunk count and the map memory.
Memory numbers
RTSMapMemory estimates the memory of a map from its size and resolutions alone, so the tools can warn before a map is created, resized or loaded. A map needs memory for:
- Map data (
RTSMapMemory.EstimateDataBytes, the Map Memory value in theRTSTerraininspector,MapData.GetMemoryUsage()): 11 bytes per vertex (height, cliff level, flags, cliff type, water height), 16 bytes per splat texel, 1 byte per pathing texel and 1 byte per detail texel and detail layer. - Splat textures on the GPU (
EstimateGpuBytes): the 4 RGBA32 splat maps with their mip maps, about 21 bytes per splat texel. - The CPU copy of the splat textures: the same amount again in main memory. The textures stay readable, so a brush stroke uploads only the painted area.
- The pathing map derived from the map: 1 byte per pathing texel.
- One whole-map undo step while editing: Generate, Auto Paint Map and heightmap imports keep a copy of every changed layer before and after the operation, about twice the map data.
RTSMapMemory.EstimateRuntimeTotalBytes adds up the first four (in a game); with includeEditingCopies: true it adds the undo step as well (while editing). Typical values with detail resolution 2, pathing resolution 2 and one detail layer:
| Map size (cells) | Splat res | Splat texture side | Map data | Splat textures (GPU) | In a game | While editing |
|---|---|---|---|---|---|---|
| 128 × 128 | 4 | 512 | 4.3 MiB | 5.3 MiB | 15 MiB | 24 MiB |
| 256 × 256 | 4 | 1024 | 17 MiB | 21 MiB | 60 MiB | 94 MiB |
| 256 × 256 | 8 | 2048 | 65 MiB | 85 MiB | 236 MiB | 366 MiB |
| 512 × 512 | 4 | 2048 | 69 MiB | 85 MiB | 240 MiB | 378 MiB |
| 512 × 512 | 8 | 4096 | 261 MiB | 341 MiB | 944 MiB | 1.43 GiB |
| 1024 × 1024 | 4 | 4096 | 275 MiB | 341 MiB | 962 MiB | 1.48 GiB |
| 1024 × 1024 | 8 | 8192 | 1.02 GiB | 1.33 GiB | 3.69 GiB | 5.73 GiB |
- Doubling the map side or the splat resolution needs about four times the memory.
- The splat maps are by far the largest part. Splat resolution 2 needs a quarter of resolution 4: 1024 × 1024 cells at resolution 2 need about 258 MiB in a game.
- While a file loads, its decompressed data (about the map data again) exists for a moment as well.
On top of that come the tileset texture arrays (53 MiB per tileset at 1024 with BC7, see Texture array resolution), the chunk meshes and colliders (see Subdivisions), the detail instances (32 bytes each), the fog of war and minimap textures and the lists of trees, decor and markers. The editor's undo history has its own memory budget (see Limits and memory).
Memory limits and warnings
MapMemoryCheck compares these estimates with the limits of the platform you build for:
| Rule | Platform | Result |
|---|---|---|
| More than 1 GB of memory while editing | All | Warning: loading, saving and generating take a while, and computers with little memory can run out of it. |
| Splat textures larger than 2048 × 2048 texels | Web | Error |
| Map data larger than 512 MB (the largest map a Web player loads, see Safety limits and read options) | Web | Error |
| The map needs more than half of the memory heap of the page while it loads (the map data twice, the CPU copy of the splat textures and the pathing map). The heap is the WebGL Maximum Memory Size of the Player Settings, 2 GB by default; in a Web player the check always assumes 2 GB. | Web | Error |
| Splat textures larger than 4096 × 4096 texels | Mobile (Android, iOS, tvOS) | Error |
Splat textures larger than the graphics card supports (SystemInfo.maxTextureSize) | The device the in-game editor runs on | Error; on mobile devices it replaces the 4096 rule |
In short: Web builds take at most 512 × 512 cells at splat resolution 4 (or 1024 × 1024 at resolution 2), mobile builds at most 1024 × 1024 at resolution 4. On desktop nothing is blocked; very large maps only get the warning.
Where the check appears:
- New Map Wizard, step Size: the estimate below the size cards, with a warning or error banner. With an error, Next and Create Map do not continue, and the footer says why. The summary of the Create step shows a Memory row.
- Editor window, Map tab: New Map and Resize show the estimate and a warning or error box. Both refuse a size with an error; shrinking a map that is already too large is still allowed. The Map card shows how much the current map needs in a game.
- Map validator: the warning or error appears as an issue (settings
memoryWarningMBandtargetPlatform, see Thresholds). - In-game editor: New Map and Resize show the estimate and are disabled for a size this device cannot run. Open and Import check the size from the first bytes of the file, before the map is loaded.
In the Unity editor the platform is the active build target (). Switch to the Web or a mobile profile to check your maps for it, or set targetPlatform of the validator. In a player, the in-game editor checks against the device it runs on; in Play Mode against the Unity editor itself.
using RTSTerrainStudio;
using UnityEngine;

public static class MemoryCheckExample
{
    // Checks a planned map size against Web builds, for example before your own tool creates it.
    public static bool FitsWebBuilds(int width, int height, int splatResolution)
    {
        // Detail resolution 2, pathing resolution 2, no detail layers yet (a new map).
        MapMemoryEstimate estimate = MapMemoryCheck.Evaluate(width, height, splatResolution, 2, 2, 0, MapTargetPlatform.WebGL);
        Debug.Log(estimate.Summary);   // 512, 512, 4: "About 374.9 MB of memory while editing, 239.4 MB in a game."
        if (estimate.Severity != MapIssueSeverity.Info) Debug.LogWarning(estimate.Problem);
        return !estimate.IsBlocked;
    }

    // The memory of the map a terrain shows, including its detail layers.
    public static void LogCurrentMap(RTSTerrain terrain)
    {
        long game = RTSMapMemory.EstimateRuntimeTotalBytes(terrain.Map);
        long editing = RTSMapMemory.EstimateRuntimeTotalBytes(terrain.Map, includeEditingCopies: true);
        Debug.Log($"In a game: {game / (1024 * 1024)} MB, while editing: {editing / (1024 * 1024)} MB");
    }
}
Recommended map sizes
Maps can be 16 to 1024 cells per side, in steps of 16. The default is 128 × 128 cells of 2 m.
| Size (cells) | Typical use | Notes |
|---|---|---|
| 64–128 | 1v1 and small skirmish maps, mobile | Everything rebuilds instantly. A good size for the in-game editor on any device. |
| 128–256 | 2–4 players | The sweet spot. All defaults are tuned for it. |
| 256–512 | Large maps, 4–8 players | Desktop. Consider splat res 2–4 and Chunk Size 32–64. Web builds take at most 512 cells at splat res 4. |
| over 512 | Very large maps | Desktop. Editing and pathing rebuilds take longer. The map validator shows an info with the memory estimate, or a warning above 1 GB while editing (see Memory limits and warnings). Watch the splat memory and consider splitting the world into several RTSTerrains. |
Several terrains can be placed next to each other, each with its own transform. RTSTerrain.FindAt and RTSTerrain.RaycastAll find the right one for a world position.
Mobile notes
- Texture arrays: build them with the Android/iOS platform active, so they are baked as ASTC 6×6 (once built, player builds keep them up to date for the active platform). Array Resolution 512 is usually enough on phones.
- Splat resolution: 2 texels per cell quarters the splat memory compared with the default 4.
- Layers: each ground layer visible at a pixel costs texture samples. Use fewer layers per area and set Anti Tiling to 0 on layers where tiling is not noticeable (it saves the second sample).
- Lighting: use an override material with Specular Highlights and Environment Reflections off (see above).
- OpenGL ES and WebGL 2.0: the shaders target Shader Model 3.5, so they run on OpenGL ES 3.0 devices and in browsers. These APIs guarantee only 16 fragment textures per draw, and the terrain's forward pass uses 10 of its own. The Mobile URP asset of Unity's URP project templates (main light shadows, reflection probe blending) already adds 4 more, and light cookies reach the limit. A variant that needs more textures fails to load and the terrain disappears or renders pink. In the URP asset used for GLES devices and Web builds, turn reflection probe blending off when your scenes do not blend probes, and keep light cookies, decals, SSAO, additional light shadows and adaptive probe volumes off unless needed. The comment Texture slot budget in
Shaders/Include/RTSTerrainInput.hlsllists the cost of each URP feature. - Water: if you turn off Depth Texture or Opaque Texture in the mobile URP asset to save bandwidth, the water switches to its fallback: no refraction without the opaque texture, and shores that ignore objects in the water without the depth texture. A camera that turns them on for itself still gets the full water. Use Cell Subdivisions 1.
- Vegetation: lower Detail Density and Detail Distance multipliers, Crossed Quad Count 2, detail shadows off.
- Physics: if your game does not use Unity physics on the terrain, set Collider Mode to
Noneand useRTSTerrain.Raycast/RaycastAllfor picking. - Geometry: Surface Subdivisions 1 (the classic RTS look) and Cliff Wall Segments 2 reduce vertices considerably.
A low-end preset from code
using RTSTerrainStudio;
using UnityEngine;

/// Applies cheap settings to a terrain and its systems, e.g. from a "Low" graphics option.
public static class LowEndPreset
{
    public static void Apply(RTSTerrain terrain)
    {
        if (terrain == null) return;

        // Terrain mesh: fewer vertices, larger chunks, no colliders (picking uses RTSTerrain.Raycast).
        RTSTerrainSettings s = terrain.Settings;
        s.surfaceSubdivisions = 1;
        s.cliffSubdivisions = 4;
        s.cliffWallSegments = 2;
        s.chunkSize = ChunkSize._64;
        s.colliderMode = ColliderMode.None;
        // Settings changed from code are applied by a rebuild (the inspector does this automatically).
        terrain.RebuildAll();

        if (terrain.TryGetComponent(out RTSVegetationRenderer vegetation))
        {
            vegetation.detailDensityMultiplier = 0.4f;
            vegetation.detailDistanceMultiplier = 0.5f;
            vegetation.treeDistanceMultiplier = 0.7f;
            vegetation.crossedQuadCount = 2;
        }

        if (terrain.TryGetComponent(out RTSWaterRenderer water))
        {
            water.cellSubdivisions = 1;   // rebuilt automatically when the value changes
        }

        if (terrain.TryGetComponent(out RTSDecorManager decor))
        {
            decor.maxDrawDistance = 120f; // instanced props beyond 120 m are skipped
        }
    }
}
ColliderMode.None removes the chunk colliders. Anything in your game that uses Physics.Raycast against the terrain, rigidbodies standing on it or NavMesh baking from chunk colliders stops working. Switch only if you use the physics-free queries.
Gameplay Systems
RTS Terrain Studio is more than a map editor. The maps you build come with the systems a classic RTS game needs: a fog of war that follows cliff levels and trees, a pathing map with built-in pathfinding, ready-made sample gameplay scripts (camera, units, selection, orders, minimap, HUD) and a demo content generator that creates textures, models, maps and playable demo scenes.
This chapter covers each system in turn. Every section starts with what you can do without code, then lists the components and their settings, and ends with the scripting API for programmers.
Just want to play? Run , double-click the scene RTS Terrain Studio - Gameplay Demo that gets selected in the Project window, and press Play. See Demo scenes.

Fog of war
The fog of war hides what a player cannot see. It follows the classic RTS rules:
- Per team. Visibility is tracked for up to 32 teams (team indices 0 to 31). Each unit or building gives vision to its own team.
- Three states. Ground that a team has never seen is black (unexplored). Ground it has seen before but cannot see right now is dimmed (explored). Ground it sees right now is shown normally (visible).
- Explored memory. Each team remembers what it has explored, until you reset it.
- Line of sight with cliff levels. A unit sees its own cliff level and everything below it. Higher ground is never visible from below, and it blocks the view of the cells behind it.
- Blockers. Trees (and decor you mark as vision blocking) hide the cells behind them.
- Alliances and shared vision. Teams can share their vision one way or both ways.
- Hidden enemies. Enemy units disappear while you cannot see them. Buildings stay visible as "ghosts" once you have discovered them.
The visibility is computed by Burst jobs a few times per second and stored in a texture. The texture is smoothed over time and blurred on the GPU, so the fog edges move softly instead of jumping from cell to cell. A game that computes visibility itself, for example in a lockstep simulation or on a server, can hand it to the manager instead (see Fog of war from your own simulation).
Quick start: add a fog of war to your scene
- Open a scene that contains an RTS Terrain.
- Choose . This creates a
Fog of WarGameObject with anRTSFogOfWarManagercomponent and selects it. - If your URP renderer does not have the fog of war renderer feature yet, a dialog offers to add it. Click Add Feature. (You can also do it later with , or by hand, see Rendering.)
- Add an
RTSFogOfWarRevealercomponent () to every unit and building that should see. Set its Team and Radius. - Add an
RTSFogOfWarHideablecomponent () to every object that enemies should not see. Set its Team. Use Hide When Not Visible for units and Ghost When Explored for buildings. - Press Play. The map is black except around the revealers of the Local Team (team 0 by default).
The fog runs in Play Mode only. To see it while you edit, enable Preview In Edit Mode on the manager (or click Enable Preview in its inspector). Hideables only hide objects in Play Mode; in Edit Mode everything stays visible.
The sample unit RTSUnit already requires and configures a revealer and a hideable. If you use the samples (or RTSDemoGame), you do not need to add these components by hand. RTSDemoGame even creates the manager for you when the scene has none.
How visibility is computed
The map is divided into fog cells. With the default Resolution Per Cell of 2 and the default map cell size of 2 m, one fog cell is 1 m wide. For every revealer, the manager:
- Finds the eye level: the cliff level at the revealer's exact position, plus its Height Bonus.
- Visits every fog cell inside the sight Radius.
- Depending on Line Of Sight, traces a line from the revealer to the cell. The cell is visible when its own cliff level is not higher than the eye level and no cell on the way is higher than the eye level or (with blockers) holds a tree or blocking decor. The blocking cell itself is visible, so you see the edge of a forest but not what is behind it.
- Marks the cell as visible and explored for the revealer's team, and for every team that receives this team's vision.
| Line Of Sight mode | Behaviour | Use it for |
|---|---|---|
None | Revealers see a full circle. Cliffs and trees do not block. Cheapest mode. | Games without line of sight, very large unit counts. |
CliffLevels | Classic RTS rule: a revealer sees its own cliff level and everything below it. Higher ground blocks the view. | Open maps, or when trees should not block vision. |
CliffLevelsAndBlockers (default) | Like CliffLevels, and trees and vision-blocking decor hide the cells behind them. | The full classic RTS experience. |
Which objects block vision is set in the libraries:
- Trees: the Blocks Vision option of a tree prototype in the vegetation library (on by default). The blocked area is the tree's Footprint Radius times the instance scale. A tree removed from the map (
RemoveTree) stops blocking; a tree that gameplay only hid (SetTreeHidden, see Hidden trees) still blocks the view. - Decor: the Blocks Vision option of a decor prototype in the decor library (off by default). The blocked area is the prototype's footprint (circle or rotated box), scaled with the instance.
Watch towers, hills and flying scouts: give their revealer a Height Bonus of one or more levels so they can look over higher cliffs, or enable Ignore Line Of Sight for air units so nothing blocks them.
Map edits are tracked automatically (in the editor, in the in-game editor and from gameplay code that calls RTSTerrain.NotifyChanged). Cliff level edits (MapLayers.CliffLevels / VertexFlags) re-sample only the changed cells plus a one-cell margin. Tree and decor edits rebuild the vision blocker raster for the whole map on the next update. A NotifyChangedAll call rebuilds the cliff raster completely.
RTSFogOfWarManager
One manager per scene computes and renders the fog for one terrain. Create it with or . If several managers are enabled, only the first one (RTSFogOfWarManager.Active) is used and the inspector warns you.
| Setting | Default | Description |
|---|---|---|
| Map | ||
| Terrain | empty | Terrain covered by the fog. Empty means RTSTerrain.Main (the first enabled terrain). |
| Resolution Per Cell | 2 | Fog cells per map cell and axis: 1, 2 or 4. Higher values give smoother edges but cost more. It is lowered automatically so the fog grid stays at or below 2048 cells per axis. Changing it rebuilds the grid and clears the exploration. |
| Simulation | ||
| Update Interval | 0.1 | Seconds between visibility updates. 0 updates every frame. |
| Local Team | 0 | Team whose view is rendered and used by hideables (0 to 31). Switch it in the inspector to check what other players see. |
| Shared Vision | all 0 | For each receiving team, a bit mask of the teams that share their vision with it (bit t = team t). Usually set from code, see Alliances. |
| Line Of Sight | CliffLevelsAndBlockers | How cliffs and objects block sight. See How visibility is computed. |
| Compute All Teams | off | Compute visibility for every team, not only the local one. Needed by servers (interest management) and by AI code that asks what another team can see. |
| Start Explored | off | The whole map starts explored: no black areas, only the dimmed fog. Applied when the fog grid is created. |
| Reveal All | off | Debug: everything is visible and explored for every team. |
| Look | ||
| Unexplored Color | black, alpha 1 | Colour of areas that were never explored. Alpha is the strength. |
| Explored Color | (0.3, 0.32, 0.38), alpha 0.6 | Tint multiplied onto explored areas that are not visible right now. Alpha is the strength. |
| Fade Speed | 4 | How fast the fog fades in and out (full fades per second). 0 is instant. |
| Blur Iterations | 1 | GPU blur passes applied to the fog texture (0 to 4, 0 = off). |
| Blur Upscale | 2 | Resolution multiplier of the blurred texture (1 to 4). Higher values give rounder edges. Lowered automatically so the blurred texture stays at or below 2048 pixels. |
| Editor | ||
| Preview In Edit Mode | off | Runs the fog of war in Edit Mode as a preview. |
| Shaders | ||
| Blur Shader, Minimap Shader | assigned automatically | Referenced here so the hidden shaders are included in player builds. Leave them as they are. |
The inspector also shows live statistics (state, where the visibility comes from, fog grid size, memory, active revealers, number of updates), a live preview of the fog texture (red = visible now, green = explored, black = never seen) and these buttons:
| Button | What it does |
|---|---|
| Explore All | Marks the whole map as explored for the local team. |
| Reset Exploration | Forgets everything every team has explored. |
| Update Now | Recomputes visibility immediately, or applies the data of an external visibility source again. |
| Rebuild Terrain Data | Re-reads cliff levels and blockers from the terrain. |
The Visibility statistic says Revealers, or External (External (waiting) until the source has data) while game code provides the visibility. The revealers statistic then shows Not used, and a message names the source.
RTSFogOfWarRevealer
Gives its team vision around the GameObject. Put it on units, buildings, wards and anything else that sees. The revealer registers itself with the manager when it is enabled; the manager reads its position on every update, so the component costs nothing per frame. Select it to see its sight radius as a yellow circle in the Scene view.
| Setting | Default | Description |
|---|---|---|
| Team | 0 | Team that receives the vision (0 to 31). |
| Radius | 12 | Sight radius in metres. |
| Height Bonus | 0 | Extra cliff levels the revealer can see over (watch towers, hills, flying scouts). |
| Ignore Line Of Sight | off | See over cliffs and blockers (air units). |
| Reveal When Disabled | off | Keep revealing while this component or its GameObject is disabled, until it is destroyed. |
Revealers with Reveal When Disabled on GameObjects that are already inactive when the scene loads are collected once when the manager is enabled. Objects you instantiate inactive later (object pools, additive scenes) never run Awake, so register them yourself with RTSFogOfWarManager.RegisterRevealer(revealer), or set RevealWhenDisabled = true from code.
RTSFogOfWarHideable
Hides the renderers (and optionally canvases and colliders) of an enemy object while the local team cannot see it. Objects of the local team, and of teams that share their vision with it, are never hidden. Only the components that were enabled when the object got hidden are enabled again when it becomes visible, so your own enable/disable logic keeps working.
| Setting | Default | Description |
|---|---|---|
| Team | 0 | Team that owns the object (0 to 31). |
| Mode | HideWhenNotVisible | HideWhenNotVisible: shown only while the position is visible right now (units). GhostWhenExplored: stays shown after it was discovered, even when the area is fogged again (buildings and neutral props, as in classic RTS games). |
| Require Sighting | on | Ghost mode only: the object must have been seen once. When off, an explored area is enough to show it. |
| Hide Canvases | on | Also disable Canvas components (health bars, name plates). |
| Hide Colliders | off | Also disable colliders while hidden, so hidden enemies cannot be clicked. Keep it off on authoritative servers and hosts: their physics queries must still hit units the local player cannot see. |
| Pivot | empty | Optional transform whose position is tested. Empty means this transform. |
The hideable raises VisibilityChanged(bool) when the object is shown or hidden. Call RefreshComponents() after you add or remove child renderers at runtime.
Rendering: renderer feature and shader fallback
The fog can be drawn in two ways. The choice is made per camera, so the fog is never applied twice.
| Path | When it is used | What is darkened |
|---|---|---|
| RTS Fog Of War renderer feature (recommended) | The camera renders with a Universal Renderer that contains the feature. | Everything on screen: terrain, vegetation, water, decor, units and any custom material. The sky is left untouched. |
| Shader fallback | The camera's renderer does not contain the feature. | Only the package's own terrain, water and vegetation shaders. Units and props with other materials are not darkened (enemy units are still hidden by their hideables). |
Adding the renderer feature by hand:
- Select your Universal Renderer Data asset (the renderer used by your game cameras).
- In its inspector, click Add Renderer Feature and choose RTS Fog Of War.
- Repeat this for every renderer used by game cameras, for consistent results.
Or let fix it: it adds the feature to the default renderer of every URP asset in use.
| Feature setting | Default | Description |
|---|---|---|
| Show In Scene View | on | Draw the fog in Scene view cameras too. When off, Scene view cameras of this renderer show the map without fog. |
| Render Pass Event | AfterRenderingTransparents | When the fog is drawn. The default runs before post processing, so bloom and tonemapping are applied on top of the fog. |
The feature requests the camera depth texture by itself and uses it to rebuild the world position of every pixel. RTSFogOfWarRendererFeature.IsActive tells you whether an enabled feature exists in any renderer of the active URP asset; it is informational only.
Custom shaders (advanced). The manager publishes the fog as shader globals: _RTS_FogOfWarTex (R = visible, G = explored), _RTS_FogOfWarParams (min X, min Z, 1/size X, 1/size Z in world space), _RTS_FogOfWarUnexplored, _RTS_FogOfWarExplored and _RTS_FogOfWarEnabled. The package shaders include Shaders/Include/RTSCommon.hlsl (after URP's Core.hlsl) and call its helper on the lit colour. A custom URP shader can do the same for the fallback path:
#include "Packages/com.unity.render-pipelines.universal/ShaderLibrary/Core.hlsl"
// Include RTSCommon.hlsl after Core.hlsl. Adjust the path if you moved the package folder.
#include "Assets/RTSTerrainStudio/Shaders/Include/RTSCommon.hlsl"

half4 frag(Varyings input) : SV_Target
{
    half3 color = /* your lit colour */ half3(1, 1, 1);
    // Darkens unexplored and fogged areas. Does nothing while the renderer feature handles this camera.
    color = RTS_ApplyFogOfWar(color, input.positionWS);
    return half4(color, 1);
}
Scripting the fog of war
All fog of war types live in the RTSTerrainStudio namespace. Get the scene's manager with RTSFogOfWarManager.Active (listen to the static event ActiveChanged if managers come and go).
| Member | Description |
|---|---|
| Queries | |
bool IsVisible(Vector3 world, int team) | True when the team sees the position right now (own and shared vision). False for teams that are not computed (see IsTeamComputed). |
bool IsExplored(Vector3 world, int team) | True when the team has seen the position at least once. |
bool IsVisibleToLocalTeam(Vector3), bool IsExploredByLocalTeam(Vector3) | Shortcuts for the local team. |
uint GetVisibilityMask(Vector3 world) | Bit mask of the computed teams that see the position (bit t = team t). Ideal for server interest management. |
uint GetExploredMask(Vector3 world) | Bit mask of the teams that have explored the position. |
bool IsTeamComputed(int team) | Always true with Compute All Teams, otherwise only for the local team. |
bool TryGetFogCell(Vector3, out int2), Vector3 FogCellToWorld(int2) | Convert between world positions and fog cells. |
bool IsCellVisible(int2, int team), bool IsCellExplored(int2, int team) | Cell versions of the queries. |
int GetCellLevel(int2), bool IsCellBlocked(int2) | Cliff level and blocker state used for line of sight. |
Vector2 SampleDisplayedFog(Vector2 normalizedMapPosition) | Smoothed values shown on screen for the local team (x = visible, y = explored). Returns (1, 1) when no fog is active. |
| Reveal and exploration | |
void RevealArea(Vector3 world, float radius, int team, float duration, bool ignoreLineOfSight = false) | Reveals a circle for a team (flares, "reveal map area" abilities). duration is in game time in Play Mode and real time in the Edit Mode preview. 0 or less reveals for one update only. |
void ClearTemporaryReveals() | Removes all areas revealed with RevealArea. |
void ExploreAll(int team), void ExploreAllTeams() | Marks the whole map as explored. |
void ResetExploration(), void ResetExploration(int team) | Forgets the exploration (areas visible right now are explored again on the next update). |
| Alliances and shared vision | |
void SetAlliance(int teamA, int teamB, bool allied) | Shares vision in both directions, or removes it. |
void SetSharedVision(int sourceTeam, int receiverTeam, bool shared) | Lets receiverTeam see what sourceTeam sees (one direction). |
void SetSharedVisionMask(int receiverTeam, uint sourceTeams), uint GetSharedVision(int receiverTeam) | Replace or read the whole mask of a receiving team. |
bool HasSharedVision(int sourceTeam, int receiverTeam), uint GetViewMask(int team) | Read sharing; the view mask includes the team itself. |
bool IsFriendlyToLocalTeam(int team) | True for the local team and teams that share their vision with it. Their objects are never hidden. |
| External visibility | |
IFogOfWarVisibilitySource ExternalVisibilitySource | Visibility computed by your own code (a simulation, a server, a replay) instead of the revealers; null by default. FogOfWarVisibilityBuffer is a ready-made source. See Fog of war from your own simulation. |
bool HasExternalVisibilitySource, bool IsExternalVisibilityPending | Whether a source is used, and whether its data is not shown yet. |
| Update control | |
void RequestUpdate(), void ForceUpdate() | Recompute on the next update, or immediately. With an external source, they apply its data again. |
void MarkTerrainDirty() | Full rebuild of the cliff level raster. Map edits are tracked automatically; you rarely need this. |
void MarkBlockersDirty() | Rebuild the blocker raster after you moved trees or decor from code without calling RTSTerrain.NotifyChanged. |
event Action Updated | Raised after every visibility update, after the hideables have been refreshed. |
| State | |
IsSimulating, IsRunning, IsRenderingFog, HasGrid, HasVisibilityData | Whether the fog runs, has a grid, and has computed at least once. |
FogTexture, RawFogTexture, FogWidth, FogHeight, FogCellSize, Version, ActiveRevealerCount, MemoryUsage | Grid and texture information. |
int EffectiveResolutionPerCell | Fog cells per map cell actually used. Lower than ResolutionPerCell on huge maps, where the grid is clamped to MaxFogGridSize (2048). |
RTSTerrain Terrain, RTSTerrain BoundTerrain | The terrain to cover (null = RTSTerrain.Main) and the terrain the grid is currently built for. |
| Settings (same as the inspector) | |
ResolutionPerCell, LocalTeam, LineOfSight, ComputeAllTeams, RevealAll, FadeSpeed, BlurIterations, BlurUpscale | Settable properties. Changing ResolutionPerCell rebuilds the grid and clears the exploration. |
const int MaxTeams (32), const int MaxFogGridSize (2048) | Team limit and the largest fog grid side. |
| Registries | |
static IReadOnlyList<RTSFogOfWarRevealer> Revealers, static IReadOnlyList<RTSFogOfWarHideable> Hideables | All enabled revealers and hideables of all managers. |
static RegisterRevealer / UnregisterRevealer, RegisterHideable / UnregisterHideable | Called by the components themselves; you only need them for custom components. |
| RTSFogOfWarHideable and RTSFogOfWarRevealer | |
bool IsVisible, bool HasBeenSighted (hideable) | Current state, and whether the object was ever seen (ghost mode). |
Vector3 TestPosition (hideable) | The position tested against the fog (the Pivot, or the transform). |
void Reevaluate(), void ResetSighting() (hideable) | Re-test now; forget that the object was sighted. |
event Action<bool> VisibilityChanged (hideable) | Raised when the object appears or disappears for the local team. |
bool IsRevealing (revealer) | True while the revealer counts (enabled, or Reveal When Disabled is on). |
Example: a flare ability and a visibility check.
using RTSTerrainStudio;
using UnityEngine;

// Reveals an area for a few seconds and tells whether a target can be attacked.
public class ScoutAbilities : MonoBehaviour
{
    [SerializeField] int team = 0;          // the team that casts the flare
    [SerializeField] float flareRadius = 15f;
    [SerializeField] float flareSeconds = 5f;

    // Call this with the world position the player clicked.
    public void CastFlare(Vector3 worldPosition)
    {
        var fog = RTSFogOfWarManager.Active;
        if (fog == null) return; // no fog of war in this scene

        // ignoreLineOfSight: true lets the flare see over cliffs and trees, like an air unit.
        fog.RevealArea(worldPosition, flareRadius, team, flareSeconds, ignoreLineOfSight: true);
    }

    // True when our team may target something at this position.
    public bool CanTarget(Vector3 targetPosition)
    {
        var fog = RTSFogOfWarManager.Active;
        // Without a running fog, everything is visible.
        if (fog == null || !fog.IsRunning) return true;
        // For teams other than the local one, enable "Compute All Teams" on the manager,
        // otherwise IsVisible returns false for them.
        return fog.IsVisible(targetPosition, team);
    }
}
Example: alliances and a unit spawned from code.
using RTSTerrainStudio;
using UnityEngine;

public class TeamSetup : MonoBehaviour
{
    [SerializeField] GameObject unitPrefab;

    void Start()
    {
        var fog = RTSFogOfWarManager.Active;
        if (fog != null)
        {
            fog.SetAlliance(0, 2, true);       // teams 0 and 2 see what the other sees
            fog.SetSharedVision(3, 0, true);   // team 0 also sees what team 3 sees (one way)
        }
        SpawnUnit(1, new Vector3(40f, 0f, 40f));
    }

    // Creates an enemy unit that sees and can be hidden by the fog of war.
    void SpawnUnit(int team, Vector3 position)
    {
        var go = Instantiate(unitPrefab, position, Quaternion.identity);

        // Reuse components the prefab may already have (RTSFogOfWarHideable allows only one per object).
        if (!go.TryGetComponent(out RTSFogOfWarRevealer revealer))
            revealer = go.AddComponent<RTSFogOfWarRevealer>();
        revealer.Team = team;
        revealer.Radius = 12f;               // metres

        if (!go.TryGetComponent(out RTSFogOfWarHideable hideable))
            hideable = go.AddComponent<RTSFogOfWarHideable>();
        // Subscribe BEFORE setting Team and Mode: in Play Mode both setters re-test the object immediately,
        // so a unit spawned in the fog is hidden (and the event raised) right away.
        // React when the unit appears or disappears for the local player (sounds, minimap pings ...).
        hideable.VisibilityChanged += visible => Debug.Log(go.name + (visible ? " spotted" : " lost"));
        hideable.Team = team;
        hideable.Mode = FogOfWarHideMode.HideWhenNotVisible;
        // The current state after configuring.
        Debug.Log(go.name + (hideable.IsVisible ? " starts visible" : " starts hidden"));
    }
}
Minimap with fog of war
RTSFogOfWarMinimapUtility darkens a minimap image with the fog of the local team, as on a classic RTS minimap. The minimap must cover exactly the map area, with UV (0, 0) at the map origin corner and UV (1, 1) at the opposite corner. Images baked with RTSMinimapBaker have this layout. The sample RTSMinimapUI uses this utility.
| Method | Description |
|---|---|
static bool Composite(Texture minimap, RenderTexture destination, RTSFogOfWarManager manager = null) | GPU path, ideal for a live minimap. Call it after Updated or every few frames. Without an active fog the minimap is copied unchanged. Returns false when the shader is unavailable. |
static bool CompositeCpu(Texture2D source, Texture2D destination, RTSFogOfWarManager manager = null) | CPU path (Burst job), no render textures needed, for example for screenshots. source must be readable; destination must be a readable RGBA32 texture of the same size (it may be the same texture). |
static bool CompositeCpu(NativeArray<Color32> source, NativeArray<Color32> destination, int width, int height, RTSFogOfWarManager manager = null) | CPU path on raw pixel buffers. |
static void ReleaseResources() | Destroys the cached material and command buffer. Called automatically before domain reloads; call it yourself when the minimap is closed for good. |
using RTSTerrainStudio;
using UnityEngine;

// Bakes the map once and keeps a fogged copy in a render texture.
// Show Output with a RawImage (uGUI) or a UI Toolkit Image.
public class FoggedMinimap : MonoBehaviour
{
    [SerializeField] int size = 256;      // longest side in pixels

    Texture2D baked;
    RenderTexture output;
    RTSFogOfWarManager fog;

    public RenderTexture Output => output;

    void OnEnable()
    {
        var terrain = RTSTerrain.Main;
        if (terrain == null) return;

        baked = RTSMinimapBaker.Bake(terrain, size);   // map image with cliffs, water, trees ...
        if (baked == null) return;
        output = new RenderTexture(baked.width, baked.height, 0, RenderTextureFormat.ARGB32);

        fog = RTSFogOfWarManager.Active;
        if (fog != null) fog.Updated += Refresh;          // refresh after each visibility update
        Refresh();
    }

    void OnDisable()
    {
        if (fog != null) fog.Updated -= Refresh;
        if (output != null) { output.Release(); Destroy(output); }
        if (baked != null) Destroy(baked);
    }

    void Refresh()
    {
        if (baked != null && output != null)
            RTSFogOfWarMinimapUtility.Composite(baked, output, fog);
    }
}
Multiplayer hints
- Each client runs its own fog of war for its own Local Team. The fog is never sent over the network.
- On an authoritative server, enable Compute All Teams and use
GetVisibilityMask(position)to decide which clients receive which units. A single lookup per unit is very cheap. - Keep Hide Colliders off on hideables on the server and on a listen-server host, so server-side raycasts still hit units the host player cannot see. Filter player selection with
IsVisibleToLocalTeaminstead. - Alliances are local settings. Call
SetAllianceon the server and on the clients if clients should show allied vision. - In a lockstep game, or when the server sends each client its visibility, compute the visibility in your simulation and show it with an external visibility source, so every machine shows exactly what the simulation decided.
The Mirror integration does all of this for you: RTSNetworkFogOfWar configures the manager (the server computes all teams, a client only its own), and RTSFogOfWarInterestManagement never sends enemy units hidden by the fog (anti-maphack). See the Mirror integration chapter.
Performance and limits
- Visibility is computed by Burst jobs every Update Interval seconds (0.1 by default), not every frame. Revealers and hideables are kept in internal lists, so nothing searches the scene per frame.
- Memory is about 18 bytes per fog cell. A 128 × 128 map with Resolution Per Cell 2 has a 256 × 256 grid, about 1.2 MB.
- Large maps: the grid is limited to 2048 cells per axis, and the resolution per cell is lowered automatically to stay within it.
- None is the cheapest line of sight mode; CliffLevelsAndBlockers is the most expensive, but lines are only traced for revealers that have a higher cell or a blocker near them.
- The fog texture is axis aligned with the map. A rotated terrain logs a warning.
- After tree or decor edits the vision blocker raster is rebuilt for the whole map; cliff edits only update the changed area.
Nothing is fogged? Check that the manager is enabled and you are in Play Mode (or Preview In Edit Mode is on), that Reveal All is off, and that the terrain has a map. If only the terrain is fogged but units and props are not, add the RTS Fog Of War renderer feature. If everything is black, no revealer of the local team (or of a team sharing vision with it) is active. The inspector's "No revealers exist" message only appears when the scene has no revealer at all, so also check the Team of your revealers against Local Team.
Pathing and pathfinding
Every RTS Terrain keeps a pathing map: a grid that says, for each small square of the map, whether ground units can walk there, whether buildings can be placed, whether air units can fly, and whether there is water. It is derived automatically from the terrain and updated while you edit. On top of it, the package ships a fast built-in pathfinder (Burst A*) that you can use without any third-party package.
If you prefer the A* Pathfinding Project or Unity's NavMesh, the integrations build their graphs from the same pathing map; see their chapters.
The pathing map
The pathing map has PathingResolution pathing cells per map cell and axis (1, 2 or 4, chosen when the map is created; default 2). With the default 2 m map cells, a pathing cell is 1 m wide. Each cell stores a set of PathingFlags:
| Flag | Meaning |
|---|---|
Walkable | Ground units can walk here. |
Buildable | Buildings can be placed here. |
Flyable | Air units can fly here. Set everywhere, unless an Unflyable effect removes it: a painted pathing override, the runtime pathing layer, the ground layer rule of the tileset or a decor prototype's Footprint Effect. |
ShallowWater | Shallow water: walkable, not buildable by default. |
DeepWater | Deep water: for naval units only. |
Cliff | The cell touches a cliff wall. |
Blocked | The cell is blocked by a tree or decor footprint. |
Steep | The cell is too steep for ground units. |
How the flags are derived. The rules are applied in this order, as Burst jobs:
- Terrain. Cliff walls (widened by Cliff Margin) become
Cliff. Slopes above Max Walkable Slope becomeSteep. Water deeper than the tileset's shallow depth limit becomesDeepWater, otherwiseShallowWater.Flyableis set everywhere.Buildable= walkable, flatter than Max Buildable Slope and dry (or shallow water with Shallow Water Buildable). Then the pathing effect of the dominant ground layer is applied (for example "Unbuildable" on rough rock). A valid ramp between two cliff levels is tested only on its fine height, so it stays walkable; ramps are never buildable. - Footprints. Trees block a circle (Footprint Radius of the tree prototype × instance scale × Tree Footprint Scale): they set
Blockedand remove Walkable and Buildable. Decor applies its prototype's Footprint Effect (by default Unwalkable and Unbuildable) in a circle or rotated box. Decor instances with theIgnorePathingflag are skipped. - Manual overrides painted with the Pathing tools (below). An Unwalkable effect also removes Buildable, unless Force Buildable is set.
- The runtime pathing layer that gameplay sets with
RTSTerrain.SetDynamicPathing, for example for buildings and gates. It follows the same rules as the manual overrides, wins over them and is never saved (see Building placement and runtime pathing changes).
The map is rebuilt incrementally: when you edit a region, only that region (plus a small margin) is derived again, and the result is exactly the same as a full rebuild. Trees that gameplay hid with RTSTerrain.SetTreeHidden are left out of the footprints. The values of the flags (Walkable = 1 … Steep = 128) are fixed, so the bytes can be copied or compared between machines (see Deterministic pathing and checksums).
Pathing rules (RTSPathingSettings)
Select the RTS Terrain and open the Pathing Rules section of its inspector. Changing a value rebuilds the pathing map.
| Setting | Default | Description |
|---|---|---|
| Max Walkable Slope | 42 | Ground steeper than this angle (degrees) is not walkable. |
| Max Buildable Slope | 18 | Ground steeper than this angle (degrees) is not buildable. |
| Cliff Margin | 0.25 | How far (fraction of a pathing cell) the blocked area extends beyond a cliff wall. Larger values keep units further away from cliff edges. |
| Shallow Water Buildable | off | Allow buildings in shallow water. |
| Tree Footprint Scale | 1 | Multiplier for the pathing footprint radius of every tree. |
| Use Ground Layer Rules | on | Apply the pathing effect of the dominant ground layer (set per layer in the tileset, e.g. "Unbuildable" on rough rock). |
From code, assign new settings with terrain.PathingSettings = settings (this rebuilds), or change fields of the current instance and call terrain.RebuildPathing().
Painting pathing by hand
Sometimes the automatic rules are not what you want: an invisible wall at the map border, a no-build zone to keep an expansion free, or a walkable bridge. Use the Pathing tools (7 in the Scene view selects the Pathing category):
| Tool / Override | Effect |
|---|---|
| Paint Pathing: Blocker | Unwalkable and unbuildable: an invisible wall (map borders, decoration areas). |
| Paint Pathing: Unwalkable | Ground units cannot walk here. |
| Paint Pathing: Unbuildable | Buildings cannot be placed here (keep paths and expansions free). |
| Paint Pathing: Unflyable | Air units cannot fly here. |
| Paint Pathing: Force Walkable | Ground units can walk here even if slope, water or footprints would block it. |
| Paint Pathing: Force Buildable | Buildings can be placed here even if the derived rules forbid it. |
| Clear Pathing | Removes all painted overrides under the brush, so the automatic pathing applies again. |
Hold Shift with Paint Pathing to remove the selected override. Painting a mode removes the override that contradicts it (painting Force Walkable removes Unwalkable), so a cell never holds conflicting rules.
Pathing overlays
An overlay colours the terrain by its pathing, like the pathing view of classic RTS map editors. Turn it on with:
- the Pathing dropdown in the Scene view overlay (Pathing: Off, Walkability, Buildability, Flyability, Water, Combined);
- the Pathing Overlay dropdown and opacity slider in the RTS Terrain Studio window;
- P in the Scene view, which cycles Off → Walkability → Buildability → Combined → Off (shortcut
RTS Terrain Studio/Cycle Pathing Overlay, rebindable in , on macOS ); - the pathing view of the in-game editor.
| Mode | Colours |
|---|---|
| Walkability | Green = walkable, red = blocked, dark red = cliff, orange = too steep, blue = deep water, cyan = shallow water. |
| Buildability | Green = buildable, yellow = walkable but not buildable, red / dark red = not walkable. |
| Flyability | Light blue = flyable, magenta = not flyable. |
| Water | Cyan = shallow water, blue = deep water. |
| Combined | Everything at once (classic RTS-style pathing view). |
In your own game, show an overlay with a PathingOverlayController. It keeps the texture up to date when the pathing changes:
using RTSTerrainStudio;
using UnityEngine;

// Shows the buildability overlay on the terrain while this component is enabled (e.g. in build mode).
public class BuildModeOverlay : MonoBehaviour
{
    [SerializeField] RTSTerrain terrain;
    [SerializeField, Range(0f, 1f)] float opacity = 0.6f;

    PathingOverlayController overlay;

    void OnEnable()
    {
        if (terrain == null) terrain = RTSTerrain.Main;
        if (terrain == null) return;
        overlay = new PathingOverlayController(terrain, PathingOverlayMode.Buildability);
        // The texture can be replaced (for example after a map resize): re-assign it when that happens.
        overlay.TextureChanged += texture => terrain.SetOverlayTexture(texture, opacity);
        terrain.SetOverlayTexture(overlay.Texture, opacity);
    }

    void OnDisable()
    {
        if (terrain != null) terrain.SetOverlayTexture(null, 0f);
        overlay?.Dispose();   // destroys the overlay texture
        overlay = null;
    }
}
Switch the displayed information with overlay.Mode = PathingOverlayMode.Walkability (it redraws the texture), or force a full redraw with overlay.Refresh(); there is no need to create a new controller.
For one-off textures use PathingOverlay.CreateOrUpdate(map, mode, ref texture), PathingOverlay.UpdateRegion(...) and PathingOverlay.DestroyTexture(ref texture); PathingOverlay.GetColor(flags, mode) returns the legend colour of a flag combination.
To show cells of your own grid as blocked, for example the planned buildings of a build mode, assign a mask to overlay.ExtraBlocked and call overlay.Refresh(pathingCells) after you change it. The mask only changes the picture (see Showing planned buildings on the overlay).
Reading the pathing map from code
Member (on RTSTerrain) | Description |
|---|---|
PathingFlags GetPathing(Vector3 world) | Flags at a world position (None outside the map or before pathing is built). |
bool IsWalkable(Vector3 world), bool IsBuildable(Vector3 world) | Shortcuts for the two most used flags. |
PathingMap Pathing | The pathing grid: Width, Height, CellSize, Flags (one byte per cell, index = z × Width + x), Get(x, z), Version, and ComputeChecksum() (CRC-32 of the flags, see Checksums). |
bool KeepFlagsWithoutTrees | Also keeps Pathing.FlagsWithoutTrees, the flags as they would be without trees, with GetWithoutTrees(x, z) and IsBlockedOnlyByTrees(x, z). Off by default (see Which cells do trees block?). |
SetDynamicPathing(...), ClearDynamicPathing(...), GetDynamicPathing(x, z) | The runtime pathing layer for buildings, gates and bridges (see Runtime pathing layer). |
SetTreeHidden(id, hidden), ShowAllTrees() | Hide trees for gameplay; their footprints open (see Hidden trees). |
event Action<RTSTerrain, RectInt> PathingChanged | Raised after a full or partial rebuild, with the changed rectangle in pathing cells. Survives map reloads. The sample units use it to re-plan. |
RTSPathingSettings PathingSettings, void RebuildPathing() | Rules and a full rebuild. |
ClearanceMap GetPathingClearance() | The clearance map, brought up to date (see Unit size). |
void RegisterPathingReader(JobHandle), void CompletePathingReaders() | For your own jobs that read Flags or clearance: the terrain waits for them before it writes pathing data. |
Finding a path: RTSPathfinder
RTSPathfinder searches a path on the pathing map with a Burst-compiled A*: 8 directions without corner cutting, clearance for large units, and string pulling for smooth paths. A blocked start or goal is replaced by the nearest free cell. It runs synchronously on the main thread, which is fine for a few requests per frame and in Edit Mode.
using System.Collections.Generic;
using RTSTerrainStudio;
using UnityEngine;

public class PathDebug : MonoBehaviour
{
    [SerializeField] Transform target;
    readonly List<Vector3> path = new List<Vector3>();

    void OnDrawGizmos()
    {
        var terrain = RTSTerrain.Main;
        if (terrain == null || target == null) return;

        // A unit with a radius of 0.6 m: the path keeps that distance from obstacles.
        var options = PathRequestOptions.ForUnit(0.6f);
        PathResult result = RTSPathfinder.FindPathDetailed(terrain, transform.position, target.position, options, path);

        // Success = reached the goal, Partial = closest reachable point.
        Gizmos.color = result.status == PathStatus.Success ? Color.green : Color.yellow;
        for (int i = 1; i < path.Count; i++) Gizmos.DrawLine(path[i - 1], path[i]);
    }
}| Method | Description |
|---|---|
static PathStatus FindPath(RTSTerrain, Vector3 startWorld, Vector3 endWorld, List<Vector3> resultWorld) | Uses PathRequestOptions.Default. |
static PathStatus FindPath(RTSTerrain, Vector3, Vector3, PathRequestOptions, List<Vector3>) | resultWorld is cleared and receives the waypoints, start and end included. |
static PathResult FindPathDetailed(RTSTerrain, Vector3, Vector3, PathRequestOptions, List<Vector3>) | Also returns length, statistics and whether the start or goal was moved. |
static void DisposeSharedBuffers() | Frees the search buffers (also done automatically on domain reload and quit). |
PathRequestOptions (start from PathRequestOptions.Default or PathRequestOptions.ForUnit(radius)):
| Field | Default | Description |
|---|---|---|
unitRadius | 0 | Radius of the unit in world units. Paths keep this distance to obstacles. Clearance only applies when required contains Walkable: for naval (DeepWater) or air (Flyable) requests unitRadius has no effect. The clearance map measures distances to non-walkable cells, and the map border counts as an obstacle. The same applies to PathingQueries.FindNearest, LineOfSight and Raycast. |
required | Walkable | Flags every cell of the path must have (None is treated as Walkable). |
allowShallowWater | true | Allow walking through shallow water (fords). |
maxSearchNodes | 500000 | Maximum expanded nodes before the search gives up (0 = unlimited). |
smoothPath | true | Remove unnecessary waypoints with grid line of sight (string pulling). |
snapToGround | true | Set the Y of every waypoint to the ground height. |
allowPartial | true | When the goal is unreachable, return a path to the closest reachable cell. |
goalSearchRadius | 16 | When the goal cell is blocked, search this far (world units) for the nearest free cell. |
| PathStatus | Meaning |
|---|---|
Success | A path to the goal (or to the nearest free cell of a blocked goal) was found. |
Partial | The goal is unreachable; the path leads to the reachable cell closest to it. |
NoPath | No path exists (or the search limit was reached) and partial paths were not allowed. |
InvalidStart | The start is outside the map, there is no pathing data, or no passable cell is near the start. |
PathResult fields: requestId, terrain, status, points (world waypoints), length (horizontal, world units), searchedNodes, startAdjusted, goalAdjusted, userData, and HasPath (Success or Partial with at least one waypoint).
Many units: RTSPathfindingService
For many units, use RTSPathfindingService. It collects the requests of a frame, runs them as parallel Burst jobs in LateUpdate (after the terrain applied its edits) and delivers the results through callbacks in the next frame's Update. Add it with , or call RTSPathfindingService.GetOrCreate() in Play Mode (it creates a service object that survives scene loads). The service runs in Play Mode only; use RTSPathfinder in Edit Mode.
| Setting | Default | Description |
|---|---|---|
| Max Requests Per Frame | 64 | Path searches started per frame. Further requests wait in a queue. |
| Max Parallel Jobs | 4 | Jobs running in parallel (1 to 16). Every job needs its own search buffers (about 24 bytes per pathing cell). |
| Memory Budget MB | 256 | Upper limit for search buffer memory. Fewer parallel jobs are used on very large grids; a warning is logged when even one buffer set exceeds it. |
| Complete In Same Frame | off | Complete the jobs at the end of the frame they were scheduled in (lower latency, less parallelism). |
| Member | Description |
|---|---|
int RequestPath(RTSTerrain, Vector3 startWorld, Vector3 endWorld, PathRequestOptions, Action<PathResult> callback, List<Vector3> resultBuffer = null, object userData = null) | Queues a request and returns its id. With resultBuffer, waypoints are written into your list (cleared first), which avoids an allocation per request. |
int RequestPath(RTSTerrain, Vector3, Vector3, Action<PathResult>) | Same with the default options. |
bool Cancel(int requestId) | Cancels a queued, running, or finished but undelivered request. Its callback will not run. |
void CancelAll(), void CompleteAll() | Cancel everything, or finish everything now (callbacks run before it returns). |
PendingCount, InFlightCount | Queue and job statistics. |
static Instance, static GetOrCreate() | The first enabled service, or a new one. |
using RTSTerrainStudio;
using UnityEngine;

// Asks the service for a path and replaces the previous request when a new order arrives.
public class AsyncMover : MonoBehaviour
{
    [SerializeField] float radius = 0.5f;
    int requestId;   // 0 = no request pending

    public void OrderMove(Vector3 target)
    {
        var terrain = RTSTerrain.Main;
        var service = RTSPathfindingService.GetOrCreate(); // null outside Play Mode
        if (terrain == null || service == null) return;

        if (requestId != 0) service.Cancel(requestId);       // the old callback will not run
        requestId = service.RequestPath(terrain, transform.position, target,
            PathRequestOptions.ForUnit(radius), OnPathFound);
    }

    void OnPathFound(PathResult result)
    {
        requestId = 0;
        if (!result.HasPath) { Debug.Log("Can't reach that place."); return; }
        // result.points holds the waypoints. Copy them if you keep them.
        Debug.Log($"{result.points.Count} waypoints, {result.length:0.0} m, status {result.status}");
    }
}
Unit size: clearance
Large units must not squeeze through gaps meant for small ones. The terrain keeps a clearance map: for every walkable cell, the distance to the nearest non-walkable cell (capped at 64 cells). When a request has a unitRadius, the pathfinder only uses cells where the unit fits. The clearance map is updated incrementally after edits.
PathingQueries.GetClearance(terrain, world)returns the free radius at a position in world units (negative on non-walkable cells).ClearanceMap(fromterrain.GetPathingClearance()) offersGetClearanceCells(x, z),GetClearanceMetres(x, z)andClearanceMap.RequiredValue(unitRadius, cellSize). Near diagonal obstacle corners the value can be up to about 0.13 cells too generous; this keeps units of 0.3 to 0.5 cells radius able to use one-cell corridors they physically fit through.
Gameplay queries: PathingQueries
PathingQueries answers the questions RTS gameplay asks all the time. All positions are in world space, sizes and radii in world units.
| Method | Description |
|---|---|
bool FindNearestWalkable(RTSTerrain, Vector3 world, float maxRadius, float unitRadius, out Vector3 result) | Walkable position closest to world where a unit of unitRadius fits (spawn points, rally points). |
bool FindNearest(RTSTerrain, Vector3 world, float maxRadius, float unitRadius, PathingFlags required, out Vector3 result) | The same for any flags, e.g. DeepWater for ships. |
Vector3 SnapToBuildGrid(RTSTerrain, Vector3 world, Vector2 sizeMetres) | Snaps a building position so its footprint covers whole pathing cells (even sizes on a cell corner, odd sizes on a cell centre). The result is on the ground. |
bool IsAreaBuildable(RTSTerrain, Vector3 worldCenter, Vector2 sizeMetres) | True when every pathing cell of the footprint is Buildable. |
bool IsAreaClear(RTSTerrain, Vector3 worldCenter, Vector2 sizeMetres, PathingFlags required) | The same for any flags. False outside the map. |
bool TryGetAreaCells(RTSTerrain, Vector3 worldCenter, Vector2 sizeMetres, out RectInt cells) | Pathing cells covered by a footprint. False when the footprint is not fully inside the map. |
float GetClearance(RTSTerrain, Vector3 world) | Free radius around a position. |
bool LineOfSight(RTSTerrain, Vector3 fromWorld, Vector3 toWorld, PathingFlags required = Walkable, float unitRadius = 0) | True when a straight walk is possible (grid line of sight, no corner cutting). This is about movement, not fog of war vision. |
bool Raycast(RTSTerrain, Vector3 fromWorld, Vector3 toWorld, PathingFlags required, float unitRadius, out Vector3 lastFreeWorld) | Walks the segment and reports the last free position before an obstacle (charges, knock-backs). |
Building placement and runtime pathing changes
Classic RTS building placement takes three steps: snap the footprint to the grid, check it, and block it on the pathing map. During a match, block it on the terrain's runtime pathing layer: SetDynamicPathing derives the area again right away and raises PathingChanged, so moving units re-plan around the new building. The layer is never saved into the map, and it never marks the map as changed.
using RTSTerrainStudio;
using UnityEngine;

public static class BuildingPlacement
{
    // Tries to place a footprint of sizeMetres (X/Z) at the cursor and blocks it for walking and building.
    // Returns the covered pathing cells, so Remove can free them again.
    public static bool TryPlace(RTSTerrain terrain, Vector3 cursorWorld, Vector2 sizeMetres, out RectInt pathingCells)
    {
        pathingCells = default;
        if (terrain == null || terrain.Map == null) return false;

        // 1. Align the footprint with the pathing grid.
        Vector3 center = PathingQueries.SnapToBuildGrid(terrain, cursorWorld, sizeMetres);

        // 2. Every cell must be buildable.
        if (!PathingQueries.IsAreaBuildable(terrain, center, sizeMetres)) return false;
        if (!PathingQueries.TryGetAreaCells(terrain, center, sizeMetres, out pathingCells)) return false;

        // 3. Block the cells on the runtime pathing layer. The painted overrides of the map stay untouched,
        //    so removing the building gives back exactly the pathing of the map.
        terrain.SetDynamicPathing(pathingCells, PathingOverride.Unwalkable | PathingOverride.Unbuildable);
        return true;
    }

    // Call it when the building is destroyed.
    public static void Remove(RTSTerrain terrain, RectInt pathingCells)
    {
        if (terrain != null) terrain.ClearDynamicPathing(pathingCells);
    }
}
A gate is the same with two states: SetDynamicPathing(cells, PathingOverride.Unwalkable) while it is closed and ClearDynamicPathing(cells) while it is open. A bridge over deep water uses PathingOverride.ForceWalkable. The rules, the array overload for games with their own occupancy grid and showing planned buildings on the overlay are described in Buildings, gates and bridges: the runtime pathing layer.
Changing the map itself. Pathing that belongs to the map, such as an invisible wall or a no-build zone, is stored as manual overrides in MapData.PathingOverrides (one PathingOverride byte per pathing cell, index map.PathingIndex(x, z)). After writing them, call terrain.NotifyChanged(MapLayers.PathingOverrides, cellRect) with the rectangle in map cells (RTSSampleUtility.PathingRectToCellRect(map, pathingRect) converts it). Such a change is saved with the map and marks it as changed. The sample RTSDemoBuilding works this way: it keeps the previous override bytes and writes them back when the building is removed, see Building placement demo.
Removing trees works through the vegetation renderer: RTSVegetationRenderer.RemoveTree(id) deletes the tree from the map and notifies the terrain, so the pathing map opens the tree footprint and the fog of war drops the vision blocker automatically. See Tree harvest demo. For trees that should come back in the next match, hide them instead: see Harvesting trees without changing the map.
Advanced: pathing data in your own jobs
For custom Burst jobs (flow fields, influence maps), build a read-only view with new PathingGrid(terrain.Pathing, terrain.GetPathingClearance()). It offers IsPassable, LineOfSight, Trace and FindNearestPassable in pathing cell units, filtered by a PathingFilter (PathingFilter.ForUnit(required, allowShallowWater, unitRadius, cellSize)). Register your job handle with terrain.RegisterPathingReader(handle) so the terrain completes it before it changes pathing data.
PathingMapBuilder builds pathing maps for MapData objects that are not shown by a terrain (for example a server that loads maps without rendering): PathingMapBuilder.Build(map, pathing, settings, tileset, vegetation, decor).
Sample gameplay scripts
The Samples/Scripts folder contains a small but complete RTS game layer: an RTS camera, units that follow the terrain, selection with control groups, move orders with formations, a minimap, a HUD and two demos that change the map at runtime. They live in the assembly RTSTerrainStudio.Samples and the namespace RTSTerrainStudio.Samples.
Use them to try your maps right away, as a starting point for your own game, or as a reference for how to use the runtime API. Every script is commented and its Unity messages are protected virtual where it makes sense, so you can derive from it.
All sample components are in . Input is read through RTSInput, so the samples work with both the Input System package and the legacy Input Manager. The UI is built with UI Toolkit.
Quick start: make any map playable
- Open a scene with an RTS Terrain whose map has start locations (place them with the Marker tools).
- Choose . This creates an
RTS Demo Gameobject with theRTSDemoGamecomponent. - Press Play. The demo game creates the fog of war, the camera controller, selection, orders, minimap and HUD, spawns units at every start location (you are player 1, the others wander around) and moves the camera to your base.
- Press F1 to show or hide the controls.
Default controls
| Input | Action |
|---|---|
| W A S D / arrow keys | Pan the camera. While units are selected, S stops them and does not pan (the arrow keys always pan). |
| Screen edge, middle mouse drag | Pan the camera / grab and drag the ground. |
| Mouse wheel | Zoom (closer zoom flattens the view). |
| Q / E, Alt + right drag | Rotate the view. |
| Left click / drag | Select a unit / draw a selection box. |
| Shift + click | Add or remove units. |
| Double click, Ctrl + click | Select all units of that type on screen. |
| Esc | Cancel the current mode, then clear the selection. In an in-game editor play test, the next Esc returns to the editor. |
| Ctrl+1…9, 0 | Store a control group (Shift+number adds to it). |
| 1…9, 0 | Recall a group (press twice to centre the camera on it). |
| Right click | Move in formation (Shift queues and chains the formation). |
| S / H / P | Stop / hold position / patrol (then left click the second patrol point). |
| Minimap | Left click or drag: move the camera. Right click: move the selected units. |
| B | Place a building (pathing changes at runtime). |
| Delete | Remove the building under the cursor. |
| T | Cut down the tree under the cursor. |
| Right click a tree | Selected workers walk to it and chop it down. |
| F1 | Show or hide the help panel. |
All keys are RTSKey fields on the components (camera, selection, commands, demos, HUD), so you can rebind them in the inspector.
RTSDemoGame: the bootstrap
Turns any scene with an RTS Terrain into a small playable RTS. When the game starts it:
- ensures an
RTSFogOfWarManager(local team = Local Team, exploration reset) and the pathfinding service; - finds the camera controller, selection, commands, minimap, HUD and the building and tree demos, and creates the missing ones;
- spawns units at every start location (team = player index; player 1 is team 0) and gives enemy units an
RTSWanderAI, so you can watch them appear and vanish in the fog; - moves the camera to the local player's start location.
In-game editor: the component listens to RTSRuntimeEditorEvents.PlaytestChanged. Starting a play test in the in-game editor starts the game; ending it despawns the units, removes demo buildings, restores harvested trees (optional), disables the gameplay systems and gives the camera back. With Auto Start on and no in-game editor in the scene, the game starts right away.
Your own gameplay: the component stays idle during a play test that game code took over (play test hand-over). While a gameplay framework is registered with RTSGameplayFramework.Register, it logs one message, switches the sample systems of the scene off and starts neither with the scene nor with the play test; StartGame() from code still runs it (see RTSGameplayFramework).
| Setting | Default | Description |
|---|---|---|
| Start | ||
| Auto Start | on | Start when the scene plays and no in-game editor is present (otherwise the game starts with the editor's play test). |
| Local Team | 0 | Team of the local player (0 = player 1). Setting it from code also updates the fog of war and the selection. |
| Terrain | empty | Terrain to play on. Empty = RTSTerrain.Main. |
| Units | ||
| Unit Prefabs | empty | Unit prefabs, used in turn. Empty = procedural placeholder units. |
| Units Per Player | 8 | Units spawned for every player (1 to 60). |
| Max Players | 8 | Maximum number of players that get units. |
| Enemy Wander AI | on | Enemy units wander around. |
| Wander Radius | 30 | Wander radius of the enemy AI in metres. |
| Systems | ||
| Create Missing Systems | on | Create the camera controller, selection, commands, minimap, HUD and demos when they are missing. The unit spawner is always created. |
| Fog Of War | on | Enable the fog of war while playing. |
| Minimap | on | Show the minimap. |
| Hud | on | Show the HUD (info panel, action bar, F1 help). |
| Show Help On Start | on | Show the help panel when the game starts. |
| Building Demo | on | Enable the building placement demo (B). |
| Tree Harvest Demo | on | Enable the tree harvesting demo (T, workers). |
| Restore Map On Stop | on | Restore harvested trees when the game stops, so the edited map is unchanged after a play test. |
| References | ||
| Camera Controller, Selection Manager, Command Controller, Minimap UI, Demo HUD, Spawner, Building Placement, Tree Harvest, Fog Of War Manager | empty | Systems to use. Empty = found in the scene or created. |
API: StartGame(), StopGame(), IsRunning, AutoStart, LocalTeam, events GameStarted and GameStopped, and the properties Spawner, CameraController, SelectionManager, CommandController. Override protected virtual bool DetectInGameEditor() if you use your own in-game editor.
Building your own game? Use RTSDemoGame as a recipe rather than as a dependency: copy the order of its setup steps into your own game manager and drop what you do not need. For multiplayer with Mirror, do not add RTSDemoGame: the network manager spawns the units.
RTSCameraController
A classic RTS camera: keyboard, edge and drag panning, zoom with a pitch curve (closer zoom flattens the view), rotation, smooth ground following and map bounds. It runs in LateUpdate. RTSCameraController.Main is the first enabled controller.
| Setting | Default | Description |
|---|---|---|
| Target Camera | empty | Camera that is moved. Empty = the Camera on this GameObject, else Camera.main. |
| Terrain | empty | Terrain used for ground height and bounds. Empty = RTSTerrain.Main. |
| Keyboard Pan, Pan Forward/Back/Left/Right Key, Arrow Keys | on, W/S/A/D, on | Keyboard panning. |
| Yield Keys To Orders | on | Pan keys that are also order keys of the command controller (S = Stop) do not pan while units are selected. |
| Pan Speed / Fast Pan Multiplier | 35 / 2 | Metres per second at the default zoom (scales with the zoom distance); multiplier while Shift is held. |
| Edge Scrolling, Edge Size, Edge Speed Multiplier | on, 12 px, 1 | Pan when the mouse touches the screen edge. Edge scrolling pauses while the game window has no focus, while the pointer is outside it (in Web builds also when the mouse left the page or its iframe) and for touch screens. |
| Middle Mouse Drag | on | Hold the middle mouse button to grab and move the ground. |
| Min / Max Distance | 12 / 75 | Distance from the pivot when fully zoomed in / out (metres). |
| Zoom Step, Start Zoom | 0.08, 0.6 | Zoom change per wheel notch; initial zoom (0 = closest, 1 = farthest). |
| Distance Curve, Pitch Curve | - | Map the zoom (0 to 1) to the distance and to the pitch in degrees (about 55° at the default zoom). |
| Keyboard Rotate, Rotate Left/Right Key, Rotate Speed | on, Q/E, 100 | Keyboard rotation in degrees per second. |
| Alt Right Drag Rotate, Drag Rotate Sensitivity | on, 0.3 | Rotate with Alt + right drag. |
| Snap Back Rotation, Snap Back Delay, Default Yaw | off, 0.25, 0 | Return to the default angle when there is no rotation input (classic RTS behaviour). Yaw 0 looks along +Z (north). |
| Follow Ground Height, Height Smooth Time | on, 0.3 | Keep the pivot at ground height, smoothed so cliffs do not make the view jump. |
| Clamp To Terrain, Bounds Margin | on, 4 | Keep the pivot inside the map (negative margins allow looking past the edge). |
| Min Camera Clearance | 2 | Minimum height of the camera above the ground below it. |
| Pan / Zoom / Rotation Smooth Time | 0.08 / 0.12 / 0.08 | Smoothing in seconds (0 = instant). |
| Ignore Mouse Over UI | on | Ignore wheel, edge scroll and drag while the pointer is over UI. |
| Use Unscaled Time | on | The camera also moves while the game is paused. |
API: JumpTo(Vector3), FocusOn(Vector3), FocusOn(IReadOnlyList<RTSUnit>, bool instant = false), SetZoom(float, bool instant = false), SetYaw(float, bool instant = false), GetViewFootprint(Vector3[4]) (screen corners on the ground, used by the minimap), InitializeFromCamera(), InputEnabled and read-only Pivot, Zoom, Yaw, Pitch, Distance, IsDragging.
RTSUnit and unit helpers
A simple RTS unit: team, movement on the terrain, path following with smooth corners, local avoidance and fog of war vision. It asks its path provider for a path, follows it with a look-ahead point, slows down on arrival, keeps distance to other units, never steps onto unwalkable cells and re-plans when it gets stuck or when the pathing map changes under its path (buildings placed, trees cut, terrain edited in the in-game editor). It requires and configures an RTSFogOfWarRevealer (team, sight radius) and an RTSFogOfWarHideable (team).
| Setting | Default | Description |
|---|---|---|
| Team | 0 | Team / player index (0 = player 1). Units of the local team can be selected and commanded. |
| Use Team Color, Player Color | on, red | Take the colour from the classic player colour table whenever the team changes; used for selection circles, minimap dots and team colour renderers. |
| Unit Type | "Unit" | Type name for "double click selects all of the same type" (e.g. Footman, Worker). The tree demo uses "Worker". |
| Move Speed, Turn Speed, Acceleration | 5, 540, 25 | Metres per second, degrees per second, metres per second². |
| Radius, Height | 0.5, 1.8 | Collision radius (pathfinding clearance, avoidance, selection circle) and height (picking, selection box). |
| Align To Ground, Ground Align Speed | off, 8 | Tilt with the ground (vehicles, animals). Off keeps infantry upright. |
| Look Ahead, Arrival Distance, Slow Down Distance | 1.5, 0.15, 1.5 | Path following (metres). |
| Stuck Check Interval | 0.6 | Seconds between progress checks. A unit that makes no progress re-plans. |
| Path Request Timeout | 3 | Seconds to wait for a path before the request is sent again once; the move fails when the second one also times out. |
| Avoidance, Separation Strength, Personal Space | on, 8, 0.1 | Simple separation. Idle units step aside for moving ones. |
| Sight Radius | 14 | Fog of war sight radius in metres. |
| Selectable | on | The player can select this unit. |
| Terrain | empty | Terrain the unit walks on. Empty = the terrain under the unit (or RTSTerrain.Main). |
| Path Provider | empty | Optional component implementing IRTSUnitPathProvider. Empty = the global default (see Path providers). |
| Team Color Renderers, Team Color Mode | none, PropertyBlock | Renderers that show the player colour, through a MaterialPropertyBlock (any material) or a shared per-colour material (best batching). |
| Draw Path Gizmos | on | Draw the current path in the Scene view. |
Commands: MoveTo(Vector3, bool queue = false), Stop(), HoldPosition(), Patrol(Vector3 a, Vector3 b), Warp(Vector3, float? yaw = null), FaceTowards(Vector3), Repath(). Events: OnArrived, OnPathFailed (no path, gave up while blocked, or stopped at the closest reachable point), OnStateChanged. State: State (Idle, Moving, Patrolling, Holding), IsMoving, IsWaitingForPath, IsPathPartial, LastMoveReachedDestination, Destination, CurrentPath, QueuedDestinations, PlannedEndPosition, Velocity, Position, Yaw, IsSelected, IsVisibleToLocalTeam.
using RTSTerrainStudio;
using RTSTerrainStudio.Samples;
using UnityEngine;

// Spawns a knight for player 2 and listens to its movement events.
public class KnightSpawner : MonoBehaviour
{
    [SerializeField] Transform target;

    void Start()
    {
        var terrain = RTSTerrain.Main;
        // Nearest walkable spot where a unit of radius 0.75 m fits.
        Vector3 position = RTSUnitFactory.FindSpawnPosition(terrain, transform.position, 0.75f);
        RTSUnit knight = RTSUnitFactory.CreatePlaceholder(1, position, 180f, RTSUnitFactory.Knight);

        knight.OnArrived += unit => Debug.Log(unit.name + " arrived.");
        knight.OnPathFailed += unit => Debug.Log(unit.name + " can't reach that place.");
        if (target != null) knight.MoveTo(target.position);
    }
}
Helpers:
| Class | Purpose |
|---|---|
RTSUnitFactory | Procedural placeholder units: styles Footman, Worker, Scout, Knight and DefaultMix; CreatePlaceholder(team, position, yaw, style, parent), Spawn(prefab, team, position, yaw, parent) (adds RTSUnit to a prefab when missing), FindSpawnPosition(terrain, position, radius, searchRadius = 16). |
RTSUnitSpawner | Spawns units per player at the map's start locations (or at Custom Spawn Points, or on opposite corners). Settings: Unit Prefabs, Units Per Player (6), Mix Placeholder Types, Terrain, Use Start Locations, Custom Spawn Points, Max Players, Spacing (2 m), Start Offset (5 m, room for a town hall), Container, Spawn On Start. API: SpawnAll(), SpawnForPlayer(...), SpawnUnit(team, position, yaw, variant), DespawnAll(), TryGetStartLocation(player, out position, out yaw). |
RTSWanderAI | Makes a unit walk to random points around its home. Settings: Wander Radius (25 m), Min/Max Wait (2 / 7 s), Home Is Start Position, Home Position. |
RTSUnitRegistry | All units and a spatial hash: All, GetTeam(team), QueryRadius(...), QueryScreenRect(...), PickAtScreen(...), events UnitRegistered, UnitUnregistered, UnitTeamChanged. |
Path providers: IRTSUnitPathProvider
Units do not depend on one pathfinding solution. They ask an IRTSUnitPathProvider, chosen in this order: the unit's own Path Provider (or PathProviderOverride), else RTSUnitPathProviderRegistry.Default, else the built-in provider RTSBuiltinPathProvider (the package's Burst A*, through RTSPathfindingService in Play Mode). The A* Pathfinding Project and NavMesh integrations plug in here.
There are two kinds of providers:
- Path providers (
HandlesMovement= false) return waypoints throughRequestPath; the unit follows them itself (steering, avoidance, ground alignment). - Movement providers (
HandlesMovement= true) move the unit themselves (for example a NavMeshAgent). The unit forwards its commands throughOnUnitMoveCommandandOnUnitStop; the provider reports the outcome withunit.NotifyArrived()orunit.NotifyPathFailed(). While such a provider is responsible for a unit, the unit never writes its own transform.
The contract: call the onComplete callback exactly once, on the main thread, now or later, with the waypoints (start and end included) and true on success; on failure pass an empty list or null and false. A path to the closest reachable point with true is fine; the unit detects that it ends short. The provider that received a move keeps it until the move ends; if the provider changes or is destroyed during a move, the old one gets OnUnitStop and the order goes to the new one. A request without an answer within Path Request Timeout is retried once and then fails.
Derive from RTSUnitPathProviderComponent to make a scene component that can register itself as the default (Make Default, on by default) or be dragged into a unit's Path Provider field:
using System;
using System.Collections.Generic;
using RTSTerrainStudio;
using RTSTerrainStudio.Samples;
using UnityEngine;

// A path provider for heavy units that must never cross water (not even shallow fords).
// Turn off "Make Default" and drag it into the Path Provider field of the units that should use it.
public class NoWaterPathProvider : RTSUnitPathProviderComponent
{
    [SerializeField] int maxSearchNodes = 200000;
    readonly List<Vector3> path = new List<Vector3>(64);

    // The unit follows the waypoints itself.
    public override bool HandlesMovement => false;

    public override void RequestPath(RTSUnit unit, Vector3 from, Vector3 to, Action<List<Vector3>, bool> onComplete)
    {
        RTSTerrain terrain = unit != null ? unit.Terrain : RTSTerrain.Main;
        if (terrain == null) { onComplete(null, false); return; }

        var options = PathRequestOptions.ForUnit(unit != null ? unit.Radius : 0.5f);
        options.allowShallowWater = false;
        options.maxSearchNodes = maxSearchNodes;

        // Synchronous search; the list is reused for the next request, the unit copies what it keeps.
        PathStatus status = RTSPathfinder.FindPath(terrain, from, to, options, path);
        onComplete(path, status == PathStatus.Success || status == PathStatus.Partial);
    }
}
From code: RTSUnitPathProviderRegistry.Default = myProvider; switches all units without a provider of their own; Default = null goes back to the built-in pathfinder. RTSBuiltinPathProvider exposes Options (its unitRadius is replaced by each unit's radius) and UseAsyncService.
RTSSelectionManager
Click, box, Shift and double-click selection, control groups, hover and selection rings. Only units of the local team can be selected. RTSSelectionManager.Main is the first enabled manager.
| Setting | Default | Description |
|---|---|---|
| Target Camera | empty | Camera used for picking. Empty = Camera.main. |
| Use Fog Of War Local Team | on | Use the local team of the active fog of war manager. |
| Local Team | 0 | Team whose units can be selected (when not taken from the fog of war). |
| Drag Threshold, Double Click Time | 6 px, 0.3 s | When a click becomes a box; double click timing. |
| Max Selection | 0 | Maximum number of selected units (0 = unlimited; 12 is a common limit in classic RTS games). |
| Pick Tolerance | 6 px | Extra pick radius so small units are easy to click. |
| Keep Selection On Empty Click | on | Clicking empty ground or boxing no own units keeps the selection, as in classic RTS games. |
| Clear Selection Key | Escape | Clears the selection. |
| Control Groups, Group Double Tap Time | on, 0.35 s | Ctrl+number stores, Shift+number adds, number recalls, twice centres the camera. There are ten groups (RTSSelectionManager.GroupCount = 10) on the keys 1–9 and 0; group index i of StoreGroup, RecallGroup and GetGroup is number key i (index 0 is key 0). |
| Show Selection Circles, Show Hover, Use Team Color For Circles, Selection Color, Circle Scale, Circle Width, Box Color | - | Visuals of rings and the selection box. |
API: Selection, Count, Select(unit, additive), Deselect, ToggleSelection, SetSelection(units, additive), ClearSelection(), SelectAllOfTypeOnScreen(unit, additive), GetSelectionCenter(), StoreGroup(i), AddToGroup(i), RecallGroup(i), GetGroup(i), ClearGroups(), HoveredUnit, events SelectionChanged and GroupRecalled.
RTSCommandController and formations
Turns right clicks and order keys into orders for the selected units. RTSCommandController.Main is the first enabled controller.
| Setting | Default | Description |
|---|---|---|
| Selection, Target Camera | empty | Empty = RTSSelectionManager.Main / Camera.main. |
| Stop Key, Hold Key, Patrol Key, Cancel Key | S, H, P, Escape | Order keys. |
| Use Formation | on | Move groups in a grid formation (off = every unit walks to the clicked point). |
| Spacing Multiplier, Extra Spacing, Width To Depth | 1.15, 0.3, 1.5 | Slot distance as a multiple of the largest unit diameter, extra gap in metres, preferred columns-to-rows ratio. |
| Show Marker, Move Marker Color, Patrol Marker Color | on | Animated ring at the order target. |
API: IssueMove(Vector3 target, bool queue = false), IssueMove(IReadOnlyList<RTSUnit> units, Vector3 target, bool queue = false), IssuePatrol(Vector3), IssueStop(), IssueHold(), BeginPatrolTargeting(), CancelTargeting(), IsOrderKeyActive(RTSKey), events MoveIssued, CommandIssued, TargetingChanged.
RTSFormation.ComputeGrid(units, target, slots, spacingMultiplier, extraSpacing, widthToDepth, fromPlannedEnd) computes one slot per unit and gives each unit the slot closest to its place in the group, so paths rarely cross. It returns the facing direction. With fromPlannedEnd (used for Shift-queued orders) the formation continues from where the units will stand after their current orders.
Input coordination. RTSGameInput makes sure one click is handled by exactly one system: a mode such as building placement acquires the pointer (Acquire, Release, CanUsePointer), and a system that handled a click or key calls Consume / ConsumeKey. The samples run in a fixed order (building placement, tree harvest, commands, selection, units, camera, UI), defined by the RTSGameInput.Order… constants. Use the same mechanism in your own modes so they cooperate with the samples.
RTSMinimapUI
A UI Toolkit minimap for the running game. The map image is baked with RTSMinimapBaker and re-baked (throttled) when the map changes; the fog of war of the local team is composited on top; units are drawn as dots in their player colour (enemies only while visible); the camera view is drawn as an outline. Left click or drag moves the camera, right click orders the selected units to move there.
| Setting | Default | Description |
|---|---|---|
| Terrain, Camera Controller, Command Controller | empty | Empty = RTSTerrain.Main, RTSCameraController.Main, RTSCommandController.Main. |
| Corner | BottomLeft | Screen corner (classic RTS games use bottom left). |
| Size, Margin | 248, 16 | Frame size and distance from the screen edges in UI pixels (reference resolution 1920 × 1080). |
| Resolution | 256 | Resolution of the baked map image (longest side). |
| Rebake Delay, Min Rebake Interval | 0.35 s, 1 s | Several edits are merged into one bake. |
| Bake Options | - | Look of the baked image (ground mode, hill shading, cliffs, water, trees, decor, start locations, player colours). |
| Show Fog, Fog Refresh Interval | on, 0.1 s | Darken unexplored and fogged areas like the 3D view. |
| Show Units, Unit Dot Size, Show Camera View, Camera View Color, Overlay Rate | on, 4, on, white, 20 | Dots, camera outline and their redraw rate. |
| Left Click Moves Camera, Right Click Moves Units | on, on | Interaction. |
API: Visible, Terrain, MapTexture, BakeOptions, Rebake().
RTSDemoHUD and RTSRuntimeUI
RTSDemoHUD shows an info panel for the selection, an action bar (Stop, Hold, Patrol, Build), the frame rate, short feedback messages ("Can't reach that place.", "Can't build there.", "Can't build in unexplored land.") and the F1 help panel. Settings: Help Key (F1), Show Help On Start, Show Fps, Show Feedback Messages, Message Duration (2.5 s) and references to the selection, commands and demos. API: Visible, HelpVisible, SetMode(string), ShowMessage(string). While it is enabled, it turns on RTSInput.SetBrowserShortcutGuard, so in Web builds F1 opens the HUD help instead of the browser's help page. The guard also holds back the browser's action for the other function keys up to F10 (including F5, reload) and for Ctrl+S/O/D/A (see The in-game editor in the browser). It does nothing on other platforms.
RTSRuntimeUI is the small UI Toolkit toolkit the samples share: CreateDocument, CreatePanel, CreateLabel, CreateButton(text, tooltip, action), AttachTooltip, IsScreenPointOverUI and the sample colour palette. Use it to add your own panels with the same look.
All sample UIs share one panel (RTSRuntimeUI.PanelSettings) that scales with the screen size (1920 × 1080 reference). Like the in-game editor, it never gets smaller than RTSRuntimeUI.MinimumScale (default 0.85; in Web builds measured in CSS pixels), so the HUD, minimap and selection stay readable in small windows and browser canvases. Large screens are not affected. Set it to 0 to turn the minimum off.
RTSBuildingPlacementDemo
Shows how game code changes the pathing map at runtime. Press B: a ghost footprint follows the cursor, snapped to the pathing grid, with every cell drawn green (buildable) or red (blocked). Left click places a simple building in the team colour (hold Shift to place several). The footprint is written into the pathing overrides, the terrain rebuilds the area, and moving units re-plan around the building. A click on a blocked spot shows a red marker and a message. Right click or Esc cancels; Delete removes the building under the cursor and restores the pathing.
| Setting | Default | Description |
|---|---|---|
| Size In Cells | 2 × 2 | Footprint size in map cells (X × Z). |
| Building Height | 3 | Height of the procedural building in metres. |
| Building Prefab | empty | Optional prefab instead of the procedural building. Its pivot is placed on the ground at the footprint centre. |
| Team | -1 | Owner team. -1 = the local team of the selection manager (or fog of war). |
| Sight Radius | 10 | Sight radius of buildings (0 = no vision). Buildings also get a hideable in ghost mode. |
| Footprint Flags | Unwalkable, Unbuildable | Pathing overrides written for the footprint. |
| Push Units Out | on | Units standing on the footprint walk out of the way. |
| Require Explored | on | Only allow building on ground the local team has explored (while a fog of war runs). |
| Place Key, Cancel Key, Demolish Key | B, Escape, Delete | Keys. |
| Valid Color, Invalid Color | green, red | Colours of footprint cells. |
| Terrain, Target Camera | empty | Empty = the terrain under the cursor / Camera.main. |
API: BeginPlacement(), CancelPlacement(), IsPlacing, GetFootprintSize(terrain), CanPlaceAt(terrain, worldCenter), GetPlacementError(terrain, worldCenter) (a message for the player, or null), PlaceBuilding(terrain, worldCenter, owner), RemoveBuilding(building), RemoveAllBuildings(), Buildings, events BuildingPlaced, BuildingRemoved, PlacementModeChanged, PlacementFailed(Vector3, string). Each placed building has an RTSDemoBuilding component (Team, PathingCells, ContainsPoint, Remove()) that stores the previous overrides and restores them when it is removed or destroyed.
To turn this into real buildings, assign your prefab to Building Prefab, subscribe to BuildingPlaced to pay the cost and start construction, and call GetPlacementError to show the reason when the player cannot build.
The demo writes into the map's pathing overrides, so its buildings are part of the edited map until they are removed (the play test restores the map). In your own game, block building cells on the runtime pathing layer instead, which is never saved: see Buildings, gates and bridges.
RTSTreeHarvestDemo
Shows how gameplay removes trees. Hover a tree (it gets a yellow ring) and press T to cut it down at once. Or select workers (unit type "Worker") and right click a tree: they walk to it, turn to it, chop for a moment (a ring closes in on the trunk) and fell it. The tree is removed with RTSVegetationRenderer.RemoveTree, so the pathing opens and the fog of war drops the vision blocker. A falling animation (RTSFallingTreeEffect) plays at the old position.
| Setting | Default | Description |
|---|---|---|
| Harvest Key | T | Cuts down the tree under the cursor. |
| Workers Harvest On Right Click | on | Right clicking a tree with workers selected sends them to chop it. |
| Worker Type | "Worker" | Unit type that can harvest trees. |
| Pick Radius | 1.5 | Maximum distance between the cursor ray and a tree to pick it. |
| Chop Time, Work Distance | 1.5 s, 1.2 m | How long a worker chops, and how close it stands to the trunk. |
| Fall Duration, Fade Duration | 1.1 s, 0.5 s | Falling animation and final shrink. |
| Highlight Color, Show Chop Progress, Chop Progress Color | - | Rings below the hovered and the chopped tree. |
| Target Camera | empty | Camera used for picking. |
API: TryGetHoveredTree(out RTSVegetationRenderer, out TreeInstanceData), HarvestTree(vegetation, treeId, fallAwayFrom), OrderHarvest(workers, vegetation, tree), RestoreHarvestedTrees(), CancelAllJobs(), HarvestedCount, event TreeHarvested.
The demo removes trees from the map and puts them back with RestoreHarvestedTrees(). A game can instead hide felled trees for the match with RTSTerrain.SetTreeHidden, which leaves the map unchanged; see Harvesting trees without changing the map.
using RTSTerrainStudio;
using UnityEngine;

// Cuts the tree nearest to a point, e.g. when a catapult hits a forest.
public static class TreeCutter
{
    public static bool CutNearest(RTSTerrain terrain, Vector3 worldPoint, float maxDistance)
    {
        var vegetation = terrain != null ? terrain.GetComponent<RTSVegetationRenderer>() : null;
        if (vegetation == null) return false;

        if (!vegetation.TryFindNearestTree(worldPoint, maxDistance, out TreeInstanceData tree)) return false;
        // Removes the tree from the map and notifies the terrain:
        // pathing and fog of war blockers update automatically.
        return vegetation.RemoveTree(tree.id);
    }
}
Small helpers
| Class | Purpose |
|---|---|
RTSMoveMarker | Animated ring at an order target: RTSMoveMarker.Spawn(position, color, radius, seconds). |
RTSGroundRing | A ring that hugs the terrain (selection circles, ranges): RTSGroundRing.Create(name, color, radius, width, parent), then Place(position). |
RTSSampleMaterials, RTSSampleMeshes | Cached URP materials per colour and primitive meshes for placeholders. |
RTSSampleUtility | Terrain resolution, ground picking, XZ distances and PathingRectToCellRect(map, pathingRect). |
Demo content generator
Apart from two open-licence fonts for its interfaces, the package ships without third-party content. Instead, a generator creates all demo content procedurally inside your project: tileable ground, cliff and water textures, grass and flower sprites, low-poly trees and props, materials, prefabs, two tilesets, vegetation and decor libraries, an auto paint profile, brush shapes, three demo maps and three demo scenes. The output is deterministic (fixed seeds), so every run produces the same content.

Creating the demo content
- Make sure you are in Edit Mode and have saved your scene (Unity allows only one untitled scene; the generator asks you to save it if needed).
- Choose . A progress bar shows the steps. It takes a short while.
- When asked whether to add the demo scenes to the build settings, choose Not Now unless you want to build a player with the demos (you can add them later in ).
- The generator selects the scene
RTS Terrain Studio - Gameplay Demoin the Project window. Double-click it to open it.
The generator also runs when you click Create in the demo content section of the Welcome window (), or when you accept the offer that appears when you create an RTS Terrain in a project that has no tileset yet. It never closes or replaces the scenes you have open: demo scenes are built next to them.
The generator runs these steps (you can call each one from code):
| Step | Method | What it creates |
|---|---|---|
| Textures | CreateTextures() | Ground, cliff, water, tree and prop textures (512 px), grass and flower sprites and brush stamps (256 px). |
| Materials | CreateMaterials() | Tree and plant materials (RTS Terrain Studio/Vegetation shader, wind), prop materials (URP Lit), the template materials used by the samples, the sky material and the post processing profile. |
| Meshes and prefabs | CreateModels() | Low-poly trees, bushes, rocks and props, and their prefabs. |
| Tilesets, libraries and brushes | CreateDataAssets() | The Summer and Winter tilesets, Demo Vegetation and Demo Decor libraries (with palette icons), the Summer Auto Paint profile and brush shapes. |
| Shader references and UI settings | UpdateResources() | Keeps all package shaders and the UI Toolkit runtime panel settings in player builds. |
| Demo maps | CreateMaps() | Three .rtsmap files (see below). |
| Demo scenes | CreateScenes(bool interactive) | Three scenes (see Demo scenes). Also adds the fog of war renderer feature to your URP renderer. |
What you get
- Summer tileset (id
rts-demo-summer) with ten ground layers: Grass, Lush Grass, Dirt, Rocky Dirt, Sand, Cobblestone, Dark Forest Floor, Rock, Snow and Blight. Rock and Blight are set to Unbuildable, a good example of ground layer pathing rules. - Winter tileset (id
rts-demo-winter): the same textures with cold tints and the same layer order, so every demo map can switch between Summer and Winter. - Summer Auto Paint: lush and dirt patches on the grass, dirt and rocky dirt along cliff edges, sand on the shores, rock on steep slopes and snow on high ground.
- Demo Vegetation and Demo Decor libraries: grass, tall grass, yellow and purple flowers and ferns; pine, broadleaf and dead trees and bushes; rocks, a boulder, a ruined pillar, crates, barrels, fences, stumps and mushrooms.
- Three maps:
- Two Rivers (1v1): 128 × 128 cells, point symmetric. Two meandering rivers meet in a central lake; shallow fords let units cross.
- Four Kingdoms (4p): 192 × 192 cells, four-fold rotational symmetry, stacked plateaus and a blighted centre with ruins.
- Sandbox: 96 × 96 cells, mostly flat with one plateau and a pond, for trying the tools.
Where the files go
The generator only writes into its own folders below the package folder (Assets/RTSTerrainStudio unless you moved it; the package works in any folder):
| Folder | Contents |
|---|---|
Content/Textures | Generated textures, in Ground, Cliffs, Water, Details, Props and Brushes sub folders. |
Content/Materials, Content/Meshes, Content/Prefabs | Materials, meshes and prefabs of trees and props. |
Content/Tilesets | Summer.asset, Winter.asset and Summer Auto Paint.asset. |
Content/Libraries | Demo Vegetation.asset, Demo Decor.asset and their icons. |
Content/Brushes | Brush shapes. |
Content/Maps | Two Rivers (1v1).rtsmap, Four Kingdoms (4p).rtsmap, Sandbox.rtsmap. |
Content/Settings | Render settings (post processing profile). |
Samples/Scenes | The three demo scenes. |
Resources/RTSTerrainStudio | Shader references and UI/RTSRuntimePanelSettings.asset. |
Regenerating
Run again and confirm Regenerate. Existing demo assets are overwritten in place, so maps, scenes and prefabs that reference them keep working. Your own assets are never touched. Map files whose content did not change are not rewritten, which keeps version control quiet.
Regenerating overwrites any changes you made to the generated assets themselves (for example a tweaked demo tileset or an edited demo map). To customise demo content, duplicate the asset (Ctrl+D) or save the map under a new name first, and edit the copy.
From code (editor assembly, namespace RTSTerrainStudio.Editor):
| Member | Description |
|---|---|
RTSDemoContent.CreateAll(bool openScene) | Runs every step with a progress bar. Returns false when cancelled or when a step failed. |
RTSDemoContent.CreateAllNonInteractive() | No dialogs and no scene is opened; for automation and batch mode. Returns a short summary. |
RTSDemoContent.IsCreated | True when the main demo assets exist. |
RTSDemoContent.ContentFolder, ScenesFolder, SummerTilesetPath, TwoRiversMapPath, GameplayScenePath, … | Paths of the generated folders and assets. |
RTSDemoContent.RenderPreview(scenePath, pngPath, width, height) | Renders a preview image of a scene. |
// Editor script (place it in an Editor folder): create the demo content from a build pipeline or a CI job.
using RTSTerrainStudio.Editor;
using UnityEngine;

public static class BuildDemoContent
{
    // Run with: Unity -batchmode -executeMethod BuildDemoContent.Run -quit
    public static void Run()
    {
        if (RTSDemoContent.IsCreated) return;               // nothing to do
        Debug.Log(RTSDemoContent.CreateAllNonInteractive()); // logs where the content was written
    }
}
Demo scenes
The generator creates three scenes in Samples/Scenes. All of them contain a Sun, a Post Processing volume, an RTS Terrain (with vegetation, water, decor and environment components) and a Main Camera that turns on the depth and opaque textures it needs for water.
| Scene | Map | Contents |
|---|---|---|
RTS Terrain Studio - Gameplay Demo | Two Rivers (1v1) | RTS camera, fog of war and RTSDemoGame with Auto Start. Press Play and the game starts. |
RTS Terrain Studio - In-Game Editor Demo | Sandbox | The in-game editor. Fog of war and RTS camera stay off while you edit; units spawn when you start a play test. |
RTS Terrain Studio - Editor Playground | Four Kingdoms (4p) | No gameplay. A large map to try the Unity editor tools on. |
Gameplay Demo: things to try
- Press Play. Your units (player 1) stand on the plaza of your start location; the rest of the map is black.
- Select a few units with a box and right click across the river. Watch them pick a ford through the shallow water, in formation.
- Walk next to a cliff. Notice that units below cannot see the plateau above, and that a forest hides what is behind it. Then walk up a ramp and look down.
- Walk away from an area: it stays dimmed (explored) instead of black. Enemy units that wander there disappear when you lose sight of them.
- Press B and place a building in the path of moving units. They walk around it. Press Delete over it to remove it.
- Hover a tree and press T, or select workers and right click a tree. The gap in the forest becomes walkable and you can see through it.
- Store a group with Ctrl+1, scroll away and press 1 twice to jump back. Use the minimap to move the camera and send units.
- Exit Play Mode, select the Fog of War object and try other Line Of Sight modes, or change Local Team on RTS Demo Game to play another player.
In-Game Editor Demo: things to try
- Press Play. The in-game editor opens on the Sandbox map; the whole map is visible.
- Edit the map: raise a plateau, paint ground, plant a forest, place start locations with the marker tools.
- Click Play Test (F5).
RTSDemoGamespawns units at the start locations and switches on the fog of war and the RTS camera. Your edits are live: cliffs block sight and forests block paths. - Press Esc (after cancelling any mode and clearing the selection) or F5, or click Back to Editor (Esc or F5). The units disappear and the map is restored to its state before the play test.
Editor Playground: things to try
- Open the scene and the RTS Terrain Studio window ().
- Select the RTS Terrain and try the tools on the Four Kingdoms map: cliffs, ramps, painting, vegetation and decor.
- Press P in the Scene view to cycle the pathing overlays and see how cliffs, slopes, water, trees and the Blight ground affect walkability and buildability.
- Want to play it? Add and press Play: units spawn at the start locations of all four players.
The integrations have demo scenes of their own, created on demand: , and . They need the demo content and the matching third-party package.
The demo looks wrong or untextured? Run and apply the suggested fixes (URP asset, renderer feature, camera textures). If a demo scene is missing, run the generator again: it rebuilds missing scenes and leaves your own scenes alone.
Map Generation and Map Tools
The Map tab of the RTS Terrain Studio window (, last tab before Settings) holds the cards that work on the whole map: Map, New Map, Resize, Generator, Heightmap, Minimap, Validation and Environment. This chapter explains the procedural generator, heightmap import and export, minimap baking and the map validator. Every one of them can also be used from your own code; the examples compile against the package as it ships.
Map Generator
The generator (RTSMapGenerator) creates a complete classic RTS layout from a seed: plateaus separated by clean cliffs, ramps between them, lakes or islands, an optional border, ground paint, grass and forests, decor and player start locations. It works on the existing map and keeps its size. The same seed with the same settings and the same map size always produces the same map, so you can share a seed instead of a file.
Generating always replaces heights, cliff levels, ramps, cliff types, water and all pathing overrides (only the border is painted back, so painted overrides are cleared even with Border set to None). Ground paint, detail layers, trees, decor and start locations are replaced only when their option is on: the Paint Mode is not KeepExisting; Vegetation or Decor is Enabled, the terrain has a vegetation or decor library, and Clear Existing is on; Start Locations is Enabled (Max Players is updated when Update Max Players is on). Otherwise the existing content is kept, and with Clear Existing off new trees and decor are added to the existing ones. Regions, markers and the environment settings are never touched. The whole run is one undo step, so experimenting is safe.
Your first generated map (Unity Editor)
- If your project has no tileset and libraries yet, run once. The generator paints with the tileset and places plants and decor from the libraries of the terrain; without libraries it skips vegetation and decor.
- Select your RTS Terrain (or create one with ) and open .
- Click the Map tab and expand the Generator card.
- Choose a Style (for example Highlands) and click Apply Style Preset. This loads the noise, cliff, ramp and water values that make the style look right.
- Choose a Symmetry: Rotate2 for a fair 1v1 map, Rotate4 for 4 players on a square map.
- Open Start Locations and set Count to the number of players.
- Click Randomize Seed, then Generate and confirm the dialog.
- Read the report under the buttons: number of plateau levels, ramps, start locations, trees, decor and the time it took. Warnings (for example only 3 of 4 start locations found) are listed there and in the Console.
- Not happy? Press Ctrl+Z, click Randomize Seed and generate again. When you like the result, save the map (Save in the window header or the RTS Terrain inspector).
The other buttons of the card:
| Button | What it does |
|---|---|
| Randomize Seed | Picks a new random seed. Everything else stays as it is. |
| Apply Style Preset | Loads the noise, cliff, ramp and water values of the selected style. Seed, symmetry, border, paint, vegetation, decor and start location settings are kept. |
| Reset | Resets all generator settings to the defaults of the selected style. |
| Generate | Asks for confirmation and generates the map as one undo step named Generate Map. |
The generator settings of the window are stored in the editor preferences, so they are still there after a restart of Unity.
Generating a brand-new map (New Map Wizard)
creates a new map file. On its Terrain step choose Generate instead of Flat, pick a Preset (the six styles plus every RTSMapGeneratorPreset asset in your project, listed as Preset: name), a seed and a symmetry, and click Preview to see the minimap of the result before anything is saved. The wizard takes the number of players from its own player setting and writes it into the start locations.
Generating in the in-game editor
Players can generate maps in a shipped game, too. In the in-game editor open Map ▸ Generate... in the toolbar. The dialog offers a simplified set of options:
| Option | Maps to |
|---|---|
| Style | Applies the style preset (resets the shape options below it). |
| Seed / Random | seed |
| Symmetry | symmetry |
| Terrain: Cliffs, Plateaus, Ramps, Ramp Count, Water, Lake Coverage, Island, Border | cliffs.enabled, cliffs.plateauCount, ramps.enabled, ramps.count, water.enabled, water.lakeCoverage, water.islandMode, border.mode |
| Content: Textures, Vegetation, Forests, Decor, Decor Count, Start Locations, Players | paint.mode, vegetation.enabled, vegetation.forestCoverage, decor.enabled, decor.count, startLocations.enabled, startLocations.count |
Press Enter (or Generate) to generate and Esc to cancel. The result is one undo step (Ctrl+Z), and the dialog remembers its settings until the game is closed.
Style presets
A style (TerrainStylePreset) changes the shape of the base height field and loads matching defaults through MapGeneratorSettings.ApplyPreset.
| Style | Look | Levels / plateaus | Ramps | Lake coverage |
|---|---|---|---|---|
| Plains | Mostly flat land with a few low plateaus. A classic open melee map. | 2–3 / 2 | 3 | 0.05 |
| Hills (default) | Rolling hills (strong fine height) with some plateaus and ramps. A good all-round start. | 2–3 / 2 | 4 | 0.06 |
| Highlands | Many stacked plateaus and cliffs with ramps between them. | 2–6 / 5 | 8 | 0.04 |
| Islands | Land masses surrounded by water (island mode, deeper water, wider shores). | 2–4 / 3 | 5 | 0.38 |
| Canyon | Ridged noise turned into winding canyons between high plateaus. | 2–5 / 3 | 6 | 0.03 |
| Arena | A low central arena surrounded by a ring of high ground. | 2–4 / 3 | 6 | 0.03 |
Saving your own presets
Found settings you like? Save them as an asset: creates an RTSMapGeneratorPreset with a Description and a full set of Settings (it starts with the Hills values). The New Map Wizard lists every preset asset of the project, and your code can pass preset.settings to the generator (see Generating from code). Presets are plain assets, so they can ship with your game, for example as "2 player canyon" or "4 player islands" choices in a skirmish menu.
Symmetry: fair maps for competitive play
With symmetry the generator creates one sector of the map and copies it, so every player gets the same terrain, the same ramps, the same amount of trees and decor and an equivalent start location. Tilted decor leans the mirrored way in mirrored copies.
| Symmetry | Copies | Typical use | Needs a square map |
|---|---|---|---|
None | 1 | Campaign or free-form maps. | No |
MirrorX | 2 | Mirror left ↔ right (2 players facing each other horizontally). | No |
MirrorZ | 2 | Mirror top ↔ bottom. | No |
MirrorXZ | 4 | Mirror on both axes (4 corners). | No |
Rotate2 (default) | 2 | 180° point symmetry, the classic 1v1 layout. | No |
Rotate4 | 4 | 90° rotational symmetry, the classic 4-player layout. | Yes (falls back to Rotate2) |
MirrorDiagonal | 2 | Mirror across the diagonal (x ↔ z). | Yes (falls back to MirrorX) |
Rotate2). Otherwise the generator warns that the layout cannot be fair. MapGenerationReport.symmetryUsed tells you which symmetry was really used.Generator settings reference (MapGeneratorSettings)
The generator card shows all fields of MapGeneratorSettings, grouped into foldouts. The Default column shows the values of new MapGeneratorSettings(), which equal the Hills style; the Noise, Cliffs, Ramps and Water groups change with the selected style. Values outside the valid range are clamped by Validate() before generating.
General
| Setting | Default | Description |
|---|---|---|
Seed (seed) | 12345 | Random seed. The same seed and settings always produce the same map. |
Style (style) | Hills | Shape of the terrain. Click Apply Style Preset (or call ApplyPreset) to load matching defaults. |
Symmetry (symmetry) | Rotate2 | Generates one sector and copies it so the map is fair (see Symmetry). |
Noise (noise, GeneratorNoiseSettings)
| Setting | Default | Description |
|---|---|---|
| Scale | 85 m | Size of the large terrain features in metres. Larger values give bigger plateaus. |
| Octaves | 4 | Number of noise layers (1–8). More octaves add smaller details to the outlines. |
| Persistence | 0.5 | Amplitude multiplier per octave (0.5 = each octave is half as strong). |
| Lacunarity | 2 | Frequency multiplier per octave. |
| Ridged Amount | 0 | Blend towards ridged noise (sharp crests and canyons). Canyon uses 1. |
| Warp | 0.4 | Domain warp strength. Bends outlines into more natural, flowing shapes. |
| Contrast | 1 | Higher values push more area to the lowest and highest plateaus. |
| Smoothing | 2 | Blur passes before the field is turned into cliff levels (removes tiny noisy features). |
| Fine Height Amplitude | 1.6 m | Amplitude of the fine height noise (hills on top of the plateaus). |
| Fine Height Scale | 22 m | Feature size of the fine height noise. |
| Fine Height Octaves | 3 | Number of octaves of the fine height noise. |
| Cliff Edge Fade | 4 cells | Distance over which the fine height fades out towards cliff edges, so cliff tops stay clean. |
Cliffs (cliffs, GeneratorCliffSettings)
| Setting | Default | Description |
|---|---|---|
| Enabled | On | Generate cliff levels. When off, the whole map uses Min Level and only fine heights vary. |
| Min Level | 2 | Cliff level of the lowest plateau (0–15). Level 2 leaves room to dig lakes below it. |
| Max Level | 3 | Cliff level of the highest plateau. |
| Plateau Count | 2 | Number of distinct plateau levels between Min Level and Max Level. |
| Hysteresis | 0.04 | Band around each level threshold (fraction of the height range). Vertices inside it take the level of their neighbours, which keeps cliff lines smooth. |
| Min Feature Width | 8 cells | Smallest width of every plateau, terrace, valley and lake. Narrower parts (thin terraces between two cliffs, ridges, trenches, tiny plateaus) join the neighbouring level, and every plateau keeps a margin of about three quarters of this width to the cliff below it. Lakes may be a quarter narrower. The presets use 6–10. |
| Cleanup Passes | 2 | Passes that remove isolated vertices and spikes. |
| Cliff Type | 0 | Cliff type (tileset cliff layer 0–3) written to all vertices. |
Ramps (ramps, GeneratorRampSettings)
| Setting | Default | Description |
|---|---|---|
| Enabled | On | Places ramps between adjacent plateaus. |
| Count | 4 | Ramps in the generated sector (symmetry copies add more). |
| Width | 3 cells | Width of a ramp along the cliff. |
| Length | 2 cells | Length of a ramp per cliff level, across the cliff. 2 gives a gentle slope. |
| Ensure Connectivity | On | Adds extra ramps where needed so every plateau can be reached from every other plateau. |
| Min Spacing | 12 cells | Minimum distance between two ramps. Overlapping ramps are skipped. |
| Min Plateau Size | 40 | Plateaus with fewer vertices are ignored by the connectivity pass. |
Water (water, GeneratorWaterSettings)
| Setting | Default | Description |
|---|---|---|
| Enabled | On | Generates lakes or sea and their water surfaces. |
| Sea Level Offset | −0.25 | Water surface in cliff levels relative to the lowest plateau (−0.9 to 2). Negative values keep the lowest plateau dry; positive values flood it. |
| Lake Coverage | 0.06 | Fraction of the map (the lowest areas) turned into lakes or sea (0–0.7). |
| Max Depth | 2.5 m | Deepest point of lakes below the water surface. |
| Shore Width | 4 cells | Width of the sloped shore from the shoreline to full depth. |
| Island Mode | Off | Pushes the terrain down towards the map edges so the map becomes one or more islands. Island maps always get at least 15 % sea (the report warns when the coverage was raised). |
| Border Falloff | 0.25 | Island mode: width of the falloff towards the edge, as a fraction of the map size. |
Border (border, GeneratorBorderSettings)
| Setting | Default | Description |
|---|---|---|
| Mode | None | None: no special border. Unwalkable: paints unwalkable and unbuildable pathing overrides along the edge. HighCliffs: raises a ring of high cliffs along the edge (also unwalkable). |
| Width | 2 cells | Border width. |
| Cliff Level | 0 | Cliff level of the HighCliffs border. 0 = automatic (two levels above the highest plateau). |
Paint (paint, GeneratorPaintSettings)
| Setting | Default | Description |
|---|---|---|
| Mode | AutoPaint | KeepExisting: leaves the ground paint untouched. FillBaseLayer: fills the whole map with Base Layer. AutoPaint: paints by height, slope, cliff level and water with an Auto Paint profile. |
| Profile | None | An RTSAutoPaintProfile (). Empty = built-in default rules matched to the tileset layer names. |
| Base Layer | 0 | Ground layer used by FillBaseLayer. |
Vegetation (vegetation, GeneratorVegetationSettings)
| Setting | Default | Description |
|---|---|---|
| Enabled | On | Generates detail layers and forests (needs a vegetation library on the terrain). |
| Use Whole Library When Empty | On | When the lists below are empty, every prototype of the vegetation library is used. |
| Clear Existing | On | Removes existing detail layers and trees before generating. |
| Details | empty | Detail (grass) layers to generate, see the next table. |
| Tree Prototype Ids | empty | Ids of the tree prototypes used for forests. |
| Forest Coverage | 0.22 | Fraction of the suitable ground covered by forests. |
| Forest Noise Scale | 55 m | Feature size of the forest noise. |
| Tree Spacing | 2.6 m | Distance between trees. |
| Tree Density | 0.85 | Probability that a free spot inside a forest gets a tree (lower values make forests sparse). |
| Max Tree Slope | 26° | No trees on steeper slopes. |
| Start Location Clearance | 14 m | Keeps this distance around start locations free of trees and details. |
Each entry of Details (GeneratorDetailEntry):
| Setting | Default | Description |
|---|---|---|
| Prototype Id | "" | Id of the detail prototype in the vegetation library. |
| Density | 0.6 | Density inside covered areas (1 = maximum density of the prototype). |
| Coverage | 0.55 | Fraction of the suitable ground that is covered. |
| Noise Scale | 28 m | Feature size of the coverage noise. |
| Max Slope | 32° | No details on steeper slopes. |
Decor (decor, GeneratorDecorSettings)
| Setting | Default | Description |
|---|---|---|
| Enabled | On | Scatters decor (needs a decor library on the terrain). |
| Use Whole Library When Empty | On | When the list below is empty, every prototype of the decor library is used. |
| Clear Existing | On | Removes existing decor before generating. |
| Prototype Ids | empty | Ids of the decor prototypes to scatter. |
| Count | 60 | Decor objects in the generated sector (symmetry copies add more). |
| Min Spacing | 3 m | Minimum distance between decor objects (the prototype's own spacing is used when larger). |
| Max Slope | 30° | No decor on steeper slopes. |
| Start Location Clearance | 12 m | Keeps this distance around start locations free of decor. |
Generated decor follows the settings of each decor prototype: random yaw and yaw step, scale range, tints, variants, align to normal and maximum random tilt.
Start Locations (startLocations, GeneratorStartLocationSettings)
| Setting | Default | Description |
|---|---|---|
| Enabled | On | Places start locations. When off, the existing start locations are kept. |
| Count | 2 | Number of start locations (1–16). |
| Flat Radius | 5 cells | Radius that must be flat around a start location (one level, no cliffs, ramps or water). |
| Edge Margin | 8 cells | Minimum distance to the map edge. |
| Update Max Players | On | Writes Count into the map's Max Players (MapInfo.maxPlayers). |
Generating from code
Three entry points cover every situation:
| Method | Use it for |
|---|---|
RTSMapGenerator.Generate(RTSTerrain, MapGeneratorSettings, RTSToolContext ctx = null) | Game code. Generates into the terrain's map, refreshes the terrain and logs warnings. Undoable only when you pass the ctx of an RTSEditSession.RunOperation call. |
RTSMapGenerator.Generate(RTSEditSession, MapGeneratorSettings) | Editor tools and in-game editor extensions: one undo step named Generate Map. |
RTSMapGenerator.GenerateInto(MapData, settings, tileset, vegetation, decor) | Generating into a MapData that is not shown (previews, batch generation, tests). No notification and no undo. Returns a MapGenerationReport. |
using RTSTerrainStudio;
using UnityEngine;

// Generating maps from game code, e.g. for a "Random map" button in a skirmish menu.
public class GeneratorExample : MonoBehaviour
{
    [SerializeField] RTSTerrain terrain;
    [SerializeField] RTSMapGeneratorPreset preset;   // optional: settings saved as an asset

    // Generates a random 4-player layout into the current map (the map size is kept). No undo.
    public void GenerateRandomMap(int seed)
    {
        // Start from a saved preset or from a style preset, then change what you need.
        MapGeneratorSettings settings = preset != null
            ? preset.settings.Clone()                                  // never modify the asset itself
            : MapGeneratorSettings.CreatePreset(TerrainStylePreset.Highlands);
        settings.seed = seed;                       // same seed + settings + map size = same map
        settings.symmetry = SymmetryMode.Rotate4;   // needs a square map, otherwise Rotate2 is used
        settings.startLocations.count = 4;          // a multiple of the symmetry copies is fairest
        settings.water.lakeCoverage = 0.1f;
        settings.Validate();                        // clamps every value into its valid range

        RTSMapGenerator.Generate(terrain, settings);   // generates, refreshes the terrain, logs warnings
    }

    // Generates a map in memory without showing it (previews, batch generation, tests).
    public static MapData GenerateOffscreen(RTSTerrain template, int seed)
    {
        MapCreationSettings creation = MapCreationSettings.Default;   // 128 x 128 cells of 2 m
        creation.width = 192;
        creation.height = 192;
        MapData map = MapData.Create(creation);

        MapGeneratorSettings settings = MapGeneratorSettings.CreatePreset(TerrainStylePreset.Islands);
        settings.seed = seed;
        // Pass the tileset and libraries so painting, vegetation and decor can be generated.
        MapGenerationReport report = RTSMapGenerator.GenerateInto(map, settings,
            template.Tileset, template.VegetationLibrary, template.DecorLibrary);
        foreach (string warning in report.warnings) Debug.LogWarning(warning);
        Debug.Log(report);   // plateaus, ramps, start locations, trees, decor and time

        // You own the map: Dispose() it, or give it to a terrain with terrain.SetMap(map).
        return map;
    }
}
MapGenerationReport contains symmetryUsed, plateauLevels, ramps, startLocations, detailLayers, trees, decor, milliseconds and the list warnings; ToString() gives a one-line summary. RTSMapGenerator.GeneratedLayers lists every MapLayers flag the generator writes, which is what you pass to RunOperation when you wrap GenerateInto yourself.
Heightmap Import and Export
The Heightmap card of the Map tab imports and exports the terrain height as 16-bit PNG or 16-bit RAW. Use it to bring in terrain from World Machine, Gaea, Photoshop or a real-world elevation source, or to send the map to such a tool and back.
How heightmaps map to the terrain
- A heightmap covers the vertex grid: a map of 256 × 256 cells has 257 × 257 vertices, so a perfect heightmap is 257 × 257 pixels. Images of any other size are resampled bilinearly.
- Pixel values are mapped as
height = offset + value / 65535 × scale. 8-bit images are used as well; they just have fewer steps. - The default Height Scale covers all 16 cliff levels:
16 × Cliff Level Height(32 m for the default 2 m levels).HeightmapIO.DefaultHeightScale(map)returns it. - Row 0 of a RAW file and the bottom row of a PNG correspond to Z = 0 (the first row of vertices). If your map appears mirrored, enable Flip Vertically.
- Every import is one undo step named Import Heightmap.
Importing
- Open the Map tab and expand the Heightmap card.
- Pick the import Mode (table below). For a typical external heightmap use Cliff Levels And Fine Heights; to add hills on top of existing plateaus use Fine Heights Only.
- Leave Height Scale at 0 (automatic) unless you know the metres your image represents.
- Click Import PNG… (PNG, JPG or EXR; 8 or 16 bit grayscale, the red channel is used) or Import RAW… (
.raw/.r16, 16 bit). - Check the result. Press Ctrl+Z to undo and try another mode or scale.
| Import mode | Writes | Description |
|---|---|---|
| Fine Heights Only | Heights | Only the fine height (fine = value × scale + offset). Cliff levels are kept and their height is added on top, so the image adds hills to the existing plateaus. |
| Cliff Levels And Fine Heights | Heights, Cliff Levels | The image is the absolute ground height. It is split into cliff levels (rounded to the nearest level, isolated vertices cleaned up) and fine heights, so the ground height matches the image exactly. Best for terraced heightmaps; smooth slopes that cross a level become small cliffs. |
| Absolute Heights Keep Levels | Heights | The image is the absolute ground height, but the existing cliff levels are kept (fine = height − level × level height). Use it to re-import a Ground Height export that you edited in an external tool without changing the cliffs. |
| Import setting | Default | Description |
|---|---|---|
| Mode | see above | How the image is turned into levels and heights. |
| Height Scale | 0 (automatic) | Metres represented by the full 16-bit range. 0 = 16 × level height. |
| Height Offset | 0 | Metres added to every imported height. |
| Flip Vertically | Off | Flips the image along Z (use it when the map appears mirrored). |
| RAW Width / RAW Height | 0 | Samples per row and number of rows of RAW files. 0 = guess from the file size (square files only). |
| RAW Little Endian | On | Byte order of RAW files. Windows and most tools write little endian. |
Exporting
| Export setting / button | Default | Description |
|---|---|---|
| Source | Ground Height | Ground Height: cliff levels plus fine height (absolute). Fine Heights: only the fine height on top of the levels. |
| Height Scale | 0 (automatic) | Metres represented by 65535. |
| Height Offset | 0 | Height that is written as 0. |
| RAW Little Endian | On | Byte order of exported RAW files. |
| Export PNG… | 16-bit grayscale PNG. | |
| Export RAW… | 16-bit RAW file. | |
| Export Splat PNG… | An image of the ground paint (dominant layer colours) for documentation or external tools. |
Round trip: export with Ground Height, edit the image externally, re-import with Absolute Heights Keep Levels and the same scale and offset.
Heightmaps from code
HeightmapIO offers ImportPng, ImportRaw16 and ImportHeights (normalised float[] or NativeArray<float> values, for example from your own noise) for terrains, ApplyHeights for a bare MapData, ExportPng16, ExportRaw16 and ExportSplatPng (modes DominantLayerColor and SplatWeights), plus TryGuessRawSize and GetImportLayers(mode) for undo recording. Every exporter has a byte[] overload and a file path overload.
using RTSTerrainStudio;
using UnityEngine;

// Heightmap import and export from code.
public static class HeightmapExample
{
    public static bool Import(RTSTerrain terrain, string pngPath)
    {
        // Imports need a height scale > 0. DefaultHeightScale = 16 cliff levels (all levels + headroom).
        float scale = HeightmapIO.DefaultHeightScale(terrain.Map);
        var options = new HeightmapImportOptions { heightOffset = 0f, flipZ = false };

        // The image is resampled to the vertex grid (cells + 1 per side) and the terrain is refreshed.
        // Pass an RTSToolContext (inside RTSEditSession.RunOperation) as the 5th argument to make it undoable.
        return HeightmapIO.ImportPng(terrain, pngPath, HeightmapImportMode.CliffLevelsAndFineHeights, scale,
            null, options);
    }

    public static bool Export(RTSTerrain terrain, string pngPath)
    {
        // 16-bit grayscale PNG of the absolute ground height. Scale 0 = DefaultHeightScale.
        return HeightmapIO.ExportPng16(terrain.Map, pngPath, 0f, 0f, HeightmapExportSource.GroundHeight);
    }
}heightScale you pass as it is. Always pass a value greater than 0, for example HeightmapIO.DefaultHeightScale(map). For exports, 0 means automatic.Minimap Baking
RTSMinimapBaker renders a top-down image of the map: ground colours, hill shading, cliffs, water by depth, trees, decor, start locations and regions. The same baker is used everywhere in the package:
- the Minimap card of the Map tab (preview and PNG export),
- the preview of
.rtsmapassets in the Project window and inspector, and the preview of the New Map Wizard, - the map browser of the in-game editor (a small preview image is saved next to every map, controlled by Write Preview Images on
RTSRuntimeEditor), - the
RTSMinimapUIsample (in-game minimap with fog of war, unit dots, camera outline, click to move the camera and right click to move units). It re-bakes automatically, throttled, when the map changes.
Baking in the editor
- Open the Map tab and expand the Minimap card.
- Choose a Size (128, 256, 512 or 1024 px for the longer side; non-square maps keep their aspect ratio).
- Adjust the Bake Options if you like (table below).
- Click Bake Preview to see the result in the card, or Save PNG… to write it to a file, for example for a loading screen or a map selection menu.
Bake options (MinimapBakeOptions)
| Setting | Default | Description |
|---|---|---|
| Ground Mode | BlendedLayers | BlendedLayers mixes the colours of all painted layers; DominantLayer uses the strongest layer per pixel (crisper, in the classic RTS style). Layer colours come from the tileset (its minimap colour, or the average colour of the layer texture). |
| Level Brightness | 0.05 | Brightness change per cliff level relative to level 2 (higher plateaus look lighter). |
| Hill Shading / Strength | On / 1 | Darkens slopes that face away from the light. |
| Light Direction | (−0.55, 0.75, 0.45) | Direction towards the light in map-local space (x = east, y = up, z = north). |
| Use Map Sun Direction | Off | Use the sun direction of the map's environment instead of Light Direction. |
| Draw Cliffs / Cliff Color / Cliff Opacity | On / black / 0.8 | Colours cliff cells. Black = use the tileset's cliff colour. |
| Draw Water | On | Water coloured by depth (tileset water profile). |
| Draw Trees / Tree Color / Tree Dot Size | On / dark green / 0.75 px | Trees as dots (values below 1 draw single pixels). |
| Draw Decor / Decor Color / Decor Dot Size | Off / brown / 0.75 px | Decor objects as dots. |
| Draw Start Locations / Start Location Size | On / 4 px | Player coloured markers. |
| Scale Markers | On | Scales marker sizes with the texture size (reference size 256). |
| Player Colors | 16 classic RTS player colours | Colour per player index. Missing entries use MinimapBakeOptions.DefaultPlayerColors. |
| Draw Regions | Off | Draws region outlines in their region colour. |
Minimaps from code
RTSMinimapBaker.Bake(terrain, size, options) returns a new readable sRGB Texture2D (you destroy it). Update(existing, terrain, size, options) re-bakes into an existing texture and only creates a new one when the old one cannot be reused. BakePng(terrain, size) returns PNG bytes directly, and the MapData overloads bake maps that are not shown.
using RTSTerrainStudio;
using UnityEngine;
using UnityEngine.UIElements;

// Keeps a minimap image up to date in a UI Toolkit Image named "minimap".
public class MinimapExample : MonoBehaviour
{
    [SerializeField] RTSTerrain terrain;
    [SerializeField] UIDocument document;
    [SerializeField] int size = 256;      // longer side in pixels
    Texture2D minimap;

    void OnEnable()
    {
        if (terrain == null) return;
        terrain.MapLoaded += OnMapUpdated;
        terrain.ChangesProcessed += OnChangesProcessed;
        if (terrain.Map != null) Refresh();
    }

    void OnDisable()
    {
        if (terrain == null) return;
        terrain.MapLoaded -= OnMapUpdated;
        terrain.ChangesProcessed -= OnChangesProcessed;
    }

    void OnMapUpdated(RTSTerrain t) => Refresh();
    // Called after every processed edit. While someone paints, throttle this (the RTSMinimapUI sample
    // waits a moment after the last change and limits the bakes per second).
    void OnChangesProcessed(RTSTerrain t, System.Collections.Generic.IReadOnlyList<DirtyRegion> regions) => Refresh();

    void Refresh()
    {
        var options = new MinimapBakeOptions { drawDecor = true, hillShadingStrength = 1.2f };
        // Update reuses the texture when it can. When it returns a new texture, destroy the old one.
        Texture2D result = RTSMinimapBaker.Update(minimap, terrain, size, options);
        if (minimap != null && result != minimap) Destroy(minimap);
        minimap = result;
        Image target = document != null ? document.rootVisualElement?.Q<Image>("minimap") : null;
        if (target != null) target.image = minimap;
    }

    void OnDestroy()
    {
        if (minimap != null) Destroy(minimap);
    }
}
Map Validation
The map validator (MapValidator) checks a map for problems that are easy to miss: missing textures, unreachable start locations, broken object references and performance limits. Run it before you ship a map or publish it to players.
- Open the Map tab and expand the Validation card.
- Click Validate Map. The summary shows the number of errors, warnings and infos, or No problems found.
- Click an issue to show its position in the Scene View (issues that belong to a place, such as a start location).
- Fix the problems and validate again.
What is checked
| Area | Check | Severity |
|---|---|---|
| Tileset | No tileset assigned (the terrain renders with neutral fallback colours) | Warning |
| The tileset has no ground layers | Warning | |
| The map stores no tileset id (set automatically when saved with a tileset) | Info | |
| The map was made for another tileset than the one assigned | Warning | |
| Geometry | Vertices with invalid heights (NaN or infinity) | Error |
| Cliff cells use a cliff type the tileset does not define | Warning | |
| The map has cliffs but the tileset has no cliff layers | Warning | |
| Ground paint | Splat texels whose weights do not sum to 255 (corrupted paint) | Warning |
| A ground layer is painted that the tileset does not provide | Warning | |
| A painted ground layer has no albedo texture | Info | |
| Start locations | The map has no start locations | Error |
| Fewer start locations than Max Players | Warning | |
| A player has more than one start location | Warning | |
| A start location lies outside the map | Error | |
| A start location lies on a cliff edge | Warning | |
| A start location is covered by deep water / is in shallow water | Error / Info | |
| Two start locations are very close (closer than Min Start Distance Cells) | Warning | |
| A start location is not walkable | Error | |
| Reachability | A player cannot walk to another player (flood fill over the pathing map, starting on the start location's own cliff level) | Error |
| A large part of the map edge is walkable (consider an unwalkable border) | Info | |
| Trees, decor, details | Trees, decor or detail layers exist but no vegetation / decor library is assigned | Warning |
| Objects reference a prototype index that is not in the map's palette | Error | |
| Objects or detail layers use a prototype that is missing in the library | Warning | |
| A prototype has no prefab (its objects are invisible) | Warning | |
| Objects outside the map, duplicate instance ids, or an instance id counter lower than existing ids | Warning | |
| Regions | A region has no area; several regions share a name (game code that looks regions up by name may pick the wrong one) | Info |
| Performance | Too many trees, decor objects or detail layers | Warning |
| Too many trees or decor objects in GameObject spawn mode | Warning | |
| The map is too large for the target platform: splat textures above 2048 texels per side or too much memory for a web page (Web), splat textures above 4096 texels per side (mobile); see Memory limits and warnings | Error | |
| The map needs more than Memory Warning MB (1 GB) while it is edited | Warning | |
| Large map (more than Large Map Size cells per side): the memory estimate and longer build times. Only shown when there is no memory warning or error. | Info |
Thresholds (MapValidationSettings)
| Setting | Default | Description |
|---|---|---|
maxTrees | 20000 | Tree count above which a performance warning is shown. |
maxGameObjectTrees | 1500 | Trees in GameObject spawn mode above which a warning is shown. |
maxDecor | 6000 | Decor count above which a warning is shown. |
maxGameObjectDecor | 2000 | Decor in GameObject spawn mode above which a warning is shown. |
maxDetailLayers | 8 | Detail layers above which a warning is shown. |
largeMapSize | 512 | Maps larger than this (cells per side) get an info with their memory estimate and longer build times, unless the memory check already reports a warning or an error. |
memoryWarningMB | 1024 | Estimated memory while editing, in megabytes (map data, splat textures with their CPU copy and one whole-map undo step), above which a warning is shown. |
targetPlatform | Auto | Platform whose limits the memory check uses: Desktop, Mobile or WebGL. Auto uses the active build target in the Unity editor and the running device in a player. |
minStartDistanceCells | 12 | Start locations closer than this produce a warning. |
walkableEdgeFraction | 0.1 | Fraction of walkable cells on the outer ring above which the walkable edge info is shown. |
checkReachability | true | Checks that all start locations can reach each other. |
Validating from code
MapValidator.Validate(terrain) returns a List<MapIssue>. Each MapIssue has a Severity (Info, Warning, Error), a Message, an optional WorldPosition and the affected Layers. Overloads accept MapValidationSettings or a bare MapData with tileset, libraries and pathing map.
using RTSTerrainStudio;
using UnityEngine;

// Checks a map before it is published (for example in a "Publish map" button of your game).
public static class ValidationExample
{
    public static bool CanPublish(RTSTerrain terrain)
    {
        // Optional thresholds; null uses the defaults.
        var settings = new MapValidationSettings { maxTrees = 10000, checkReachability = true };
        var issues = MapValidator.Validate(terrain, settings);

        foreach (MapIssue issue in issues)
        {
            // WorldPosition is set for issues that belong to a place on the map (e.g. a start location).
            string where = issue.WorldPosition.HasValue ? " at " + issue.WorldPosition.Value : "";
            switch (issue.Severity)
            {
                case MapIssueSeverity.Error: Debug.LogError(issue.Message + where, terrain); break;
                case MapIssueSeverity.Warning: Debug.LogWarning(issue.Message + where, terrain); break;
                default: Debug.Log(issue.Message + where, terrain); break;
            }
        }
        return MapValidator.Count(issues, MapIssueSeverity.Error) == 0;
    }
}
Integrations
RTS Terrain Studio works on its own: it has a built-in Burst pathfinder, its own fog of war and sample gameplay. Three optional integrations connect it to popular packages. They are part of the package (folder Integrations) and switch themselves on when the package they need is installed.
| Integration | Needs | What you get | Demo scene menu |
|---|---|---|---|
| Mirror | Mirror 96 or newer | Online play on any map: map streaming to clients, server-authoritative units, per-team fog of war, anti-maphack interest management. | |
| A* Pathfinding Project | A* Pathfinding Project Pro 5.4.4 or newer, below 6.0 | Grid graphs generated from the pathing map with incremental updates, units moving with AIPath and RVO local avoidance. | |
| Unity NavMesh | AI Navigation (com.unity.ai.navigation) 2.0 or newer | A NavMesh built from the terrain chunks and the pathing map, kept up to date while the map is edited, units on NavMesh paths or NavMeshAgents. |
The Welcome window () shows the state of each integration: Active (compiled and ready), Installed (the dependency was found but the integration is not compiled, usually a version mismatch) or Not installed.
How the optional assemblies work
Each integration lives in its own assembly definitions. Unity compiles an assembly only when all of its define constraints are met. The symbols come from two places:
- Version defines (
versionDefinesin the.asmdef): the assembly defines a symbol for itself when a package with a matching version is installed. A* and NavMesh use this, so they react to installing or removing the package automatically. - Scripting define symbols of the Player Settings: Mirror is usually imported as an Asset Store folder, not as a package, so its assembly uses the
MIRRORsymbol that Mirror itself adds to the Player Settings.
| Assembly | Version define | Define constraints |
|---|---|---|
RTSTerrainStudio.Integrations.Mirror and .Mirror.Editor | none | MIRROR |
RTSTerrainStudio.Integrations.Mirror.DefineCleanup.Editor | none | none (always compiled; removes stale Mirror symbols, see Removing integrations) |
RTSTerrainStudio.Integrations.AStar and .AStar.Editor | com.arongranberg.astar in [5.4.4,6.0.0) → RTS_ASTAR | RTS_ASTAR, !RTS_ASTAR_DISABLED |
RTSTerrainStudio.Integrations.NavMesh and .NavMesh.Editor | com.unity.ai.navigation 2.0.0 or newer → RTS_AI_NAVIGATION | RTS_AI_NAVIGATION |
The result: without the dependency the integration is simply skipped, nothing breaks, and units use the built-in pathfinder. No manual define juggling is needed for A* and NavMesh.
The other direction works the same way: code that integrates RTS Terrain Studio into another package or framework puts RTS_TERRAIN_STUDIO into the define constraints of its assembly definition. The package adds this symbol and RTS_TERRAIN_STUDIO_1_0_OR_NEWER to the Player Settings itself (see Define symbols).
RTSUnit) asks an IRTSUnitPathProvider for its paths. The built-in provider is used by default; the A* and NavMesh providers register themselves as RTSUnitPathProviderRegistry.Default when Make Default is on, or you assign a provider to the Path Provider field of single units. Your own pathfinding solution can plug in the same way by implementing IRTSUnitPathProvider.RTSTerrainStudio.Samples (for RTSUnit and the selection and command controllers). Keep the Samples/Scripts folder while you use an integration.Mirror Multiplayer
Play RTS Terrain Studio maps online with Mirror (version 96 or newer):
- Map streaming: the server sends its map to every client that joins, so players can join games on maps they do not have, including maps made with the in-game editor. Downloaded maps are cached, so the next game on the same map starts right away.
- Server-authoritative units: pathfinding and movement run only on the server. Clients send orders, and the server checks that the units belong to the player.
- Per-team fog of war on every client.
- Anti-maphack interest management: units hidden by the fog of war are never sent to enemy clients.
Quick start: the demo scene
- Import Mirror (Asset Store or GitHub). Mirror adds the
MIRRORscripting define symbol, and the integration compiles. - Run (once per project).
- Run . It creates, in
Integrations/Mirror/Demo: the sceneRTS Mirror Demo.unity, the prefabsPrefabs/RTS Network Unit.prefab(a placeholder capsule withRTSUnit,RTSNetworkUnit,NetworkIdentityandNetworkTransformReliable) andPrefabs/RTS Network Player.prefab, the unit materials and, when the project has no map with at least two start locations, a generated 4-player mapRTS Mirror Demo Map.rtsmap. - When asked, let the builder add the fog of war renderer feature and put the scene first in the build scene list.
- Press Play and click Host (Server + Client) in the Mirror HUD. You play team 1 (red) and your units spawn at your start location.
- Start a second instance (see below), click Client and keep the address
localhost. The client downloads the map (a progress bar is shown), joins as team 2 (blue) and gets its own units. Enemy units appear only when your units can see them.
Testing host and client
| Method | How |
|---|---|
| Player build (most reliable) | . Make sure RTS Mirror Demo is the first scene, then build. Start the build twice, or the build and the editor. One clicks Host, the other Client. |
| ParrelSync (free, GitHub) | , create a clone and open it in a new editor. Press Play in both: the original clicks Host, the clone Client. The clone shares the Assets folder, so run the demo builder only in the original. |
Multiplayer Play Mode (com.unity.multiplayer.playmode) | . Enable a virtual player and press Play. Click Host in the main editor and Client in the virtual player. |
| Over a network | Enter the host's IP address in the client's address field. KCP uses UDP port 7777; open it in the host's firewall. |
| Dedicated server | Build with a Dedicated Server build profile. The network manager uses Headless Start Mode = Auto Start Server, so the server starts by itself. Clients connect with Client. |
Each machine keeps downloaded maps in Application.persistentDataPath/MapCache. Use or to test a fresh download. The editor and a Windows player of the same project share this folder.
RTSNetworkMapSync, or change the map on the host before hosting (for example with the in-game editor).Adding multiplayer to your own scene
| Component | Put it on | Purpose |
|---|---|---|
RTSNetworkManager | Network manager object | Assigns teams, waits until the client has the map, then spawns the player and its starting units at its start location. Despawns units when a player leaves. |
RTSNetworkMapSync | Same object (added automatically) | Streams the map to the clients in chunks, with a checksum, a cache and progress events. |
RTSFogOfWarInterestManagement | Same object | Mirror interest management: each client only receives units its team can see. |
RTSNetworkFogOfWar | Same object | Configures the RTSFogOfWarManager: the server computes all teams, a client only its own team. |
RTSNetworkStatusUI | Same object (optional) | Download progress bar and "You are Player N" (IMGUI). |
RTSNetworkPlayer | Player prefab | Team SyncVar. Sets up the local player (fog team, selection, camera) and sends orders as commands. |
RTSNetworkUnit | Unit prefabs | Team SyncVar. Movement runs only on the server; clients only show the unit. |
RTSNetworkCommandRelay | Added automatically on clients | Sends the orders of the sample RTSCommandController to the server. |
- Build a normal RTS Terrain Studio scene: an
RTSTerrainwith a map that has start locations, anRTSFogOfWarManager, anRTSCameraController, anRTSSelectionManagerand anRTSCommandController. Do not addRTSDemoGame: the network manager spawns the units instead. - Create an empty object and add
KcpTransport,RTSNetworkManager(it addsRTSNetworkMapSync),RTSFogOfWarInterestManagement,RTSNetworkFogOfWarand, if you want,NetworkManagerHUD. Assign the transport to the manager's Transport field. - Create a player prefab with
NetworkIdentityandRTSNetworkPlayerand assign it to Player Prefab. - Create a unit prefab with
NetworkIdentity,RTSUnit,RTSNetworkUnitandNetworkTransformReliable(Sync Direction Server To Client, Sync Scale off). Assign it to Unit Prefab; it is added to the spawnable prefabs automatically. Every other networked prefab you spawn must be in Registered Spawnable Prefabs. - Set Units Per Player (default 5) and, if you want, Max Players Override (0 = as many players as the map has start locations).
- Put AI or other logic components of unit prefabs (for example
RTSWanderAIor your own AI scripts) into Server Only Behaviours ofRTSNetworkUnit, so clients do not run them.
| Setting | Default | Description |
|---|---|---|
| RTSNetworkManager | ||
| Terrain | empty | Terrain the game is played on. Empty = RTSTerrain.Main. |
| Unit Prefab | empty | Starting unit of every player (needs NetworkIdentity, RTSUnit and RTSNetworkUnit). |
| Units Per Player | 5 | Number of starting units (0–64). |
| Max Players Override | 0 | Fewer players than the map has slots (0 = all start locations). |
| Unit Spacing | 2 m | Distance between the starting units. |
| Spawn Offset | 4 m | Distance of the first row of starting units from the start location, towards the map centre. |
| Despawn Units On Disconnect | On | Destroy the units of a player who leaves. |
| Reserve Team Of Kept Units | On | When the units stay: keep the team slot reserved while any of them lives. |
| Reject Disconnect Delay | 0.5 s | Seconds between the rejection message and the disconnect, so the message arrives. |
| RTSNetworkUnit | ||
| Server Only Behaviours | empty | Behaviours that clients disable, because the server runs the unit's logic. |
| RTSNetworkPlayer | ||
| Jump Camera To Start | On | Move the RTS camera to the start location when the game starts. |
| Create Command Relay | On | Pure clients: add an RTSNetworkCommandRelay when the scene has none, so the sample command controller sends its orders to the server. |
| Max Units Per Command, Max Commands Per Second | 256, 20 | Server validation of orders (see Server-authoritative units). |
| Formation (Server) | - | Formation settings used by the server; keep them in step with RTSCommandController. |
Joining a game and map streaming
client connects
  server: team = first free player slot of the map (rejected when the map is full)
  server -> client: map header (name, size, CRC-32)
  client: same map already loaded, or a cached copy that loads?  yes -> "no data needed"
                                                                 no  -> download the chunks
  client: check the CRC-32 -> RTSMapSerializer.Deserialize(bytes, Strict + memory limit)
          -> terrain.SetMap(map) -> store it in the cache -> "map ready"
  client: NetworkClient.Ready() + AddPlayer()
  server: spawns the RTSNetworkPlayer and the starting units (owned by the connection)
The server ignores Ready and AddPlayer from a client until that client has reported the right map checksum, so a client never receives world objects for a map it does not have. In host mode the local client uses the server's terrain and joins immediately.
- The payload is the
.rtsmapfile (already deflate-compressed). A 128 × 128 map with vegetation is usually a few hundred KB. - Received maps are untrusted data. Clients load every downloaded or cached map with
RTSMapReadOptions.Strictand the Max Map Memory MB limit, so a broken or hostile map is refused with a clear error instead of being repaired. The first downloaded bytes already contain the size of the map, so a map above the limit is refused before the rest is downloaded, with the message the map (W x H cells) needs about X MB of memory, more than the Y MB this client accepts (Max Map Memory MB). The server logs a warning when its own map needs more than its limit, because clients with the same settings cannot join. - A downloaded map is stored in the cache only after it was applied. A cached copy is loaded before the client answers the server. If it cannot be loaded (for example a damaged file, or a map above the memory limit), it is removed, a warning is logged and the map is downloaded right away in the same join. A cached copy must therefore load within Transfer Timeout.
- When the server's map is unchanged since it was loaded from its asset or file, the original file bytes are sent. They are identical in every session, so the client cache works across sessions. An edited or generated map is serialized when needed.
- The server only accepts the acknowledgement of the oldest unconfirmed chunk, so a modified client cannot pull the whole map at once.
- Scene changes (
ServerChangeSceneor Mirror's online scene) send the map of the new scene to every player again; clients join the new scene only after they have that map.
RTSNetworkMapSync setting | Default | Description |
|---|---|---|
| Terrain | empty | Terrain whose map is sent (server) and replaced (client). Empty = RTSTerrain.Main. |
| Chunk Size | 16 KB | Bytes per chunk message, lowered automatically to fit the transport's maximum message size. |
| Chunks In Flight | 8 | Unconfirmed chunks on the way to a client. Higher values download faster with a high ping; lower values keep more bandwidth for the game. |
| Transfer Timeout | 30 s | Seconds without progress after which a transfer fails. |
| Load Timeout | 120 s | Server: time a client may need after the download to load its scene and apply the map. Clients send keep-alive messages while they wait. |
| Disconnect On Failure | On | Server: disconnect clients whose transfer failed (they cannot play without the map). |
| Max Map Size MB | 64 | Client: largest map file the client accepts (protects against broken or hostile servers). |
| Max Map Memory MB | 0 (automatic) | Client: largest memory a received map may need once it is loaded (RTSMapMemory.EstimateDataBytes: heights, splat maps, pathing and detail layers). 0 = automatic: 4096 MB, 512 MB in Web builds. Checked from the first chunk, before the rest downloads. |
| Reuse Loaded Map | On | Skip the download when the client already shows exactly the server's map. |
| Use Cache / Max Cached Maps | On / 20 | Keep downloaded maps in Application.persistentDataPath/MapCache (least recently played removed first, 0 = unlimited). A download is cached only after it loaded; a cached copy that cannot be loaded is removed and downloaded again. |
| Log Transfers | On | Log the start and end of every transfer. |
Events for loading screens: ClientHeaderReceived, ClientProgressChanged(float), ClientMapReady, ClientTransferFailed(string); on the server ServerClientReady and ServerClientFailed. SendMapToAll() sends a changed map (for example after a map vote in a lobby) to every connected client again.
Fog of war and anti-maphack
The server computes the fog of war of every team. Every Rebuild Interval seconds RTSFogOfWarInterestManagement checks every unit with RTSNetworkUnit:
- Own and allied units (teams that share vision through
RTSFogOfWarManager.SetAlliance) are always sent. - Enemy units are sent only while the fog of war shows them to the client's team. Linger Time keeps a unit a moment longer after it leaves vision, so units at the edge of vision do not flicker.
- Objects without
RTSNetworkUnit(players, managers) are always sent. The server logs a warning once for the first such object that has a renderer, because every client then sees it, also inside the fog of war. Give buildings and other objects that enemies must not seeRTSUnitandRTSNetworkUnit; ignore the warning for objects every player may see, such as projectiles. - While no fog of war runs on the server (no
RTSFogOfWarManager, a disabled one, one that is not the active manager, or one without a grid), enemy units are not sent. Show All Without Fog sends every unit instead.
A hidden enemy is despawned on the client and none of its movement is sent, so a modified client cannot reveal it. On clients, RTSFogOfWarHideable also hides enemies that are inside the network range but not visible yet.
Why Show All Without Fog is off. RTSFogOfWarHideable also hides enemies that a broken setup sends by mistake. A game that sends every unit therefore looks correct in testing, while a modified client can show all of them. With the setting off, a missing fog of war is noticed at once, because no enemy ever appears. The setting is off by default. A game without fog of war does not need this component at all: without interest management, Mirror sends every unit to every client.
The server warns once per session about setups that send units to clients that should not see them, or hide them from everybody:
| Warning | When |
|---|---|
| No RTSFogOfWarInterestManagement is active (…) | At server start, when the scene has a fog of war and network units, but Mirror uses no active RTSFogOfWarInterestManagement. Every client then receives every unit. |
| No fog of war runs on the server (…), but two or more teams are connected. | When the fog of war has not run for 2 seconds while units exist and two or more teams are connected. It names the reason (no manager, a disabled manager, not the active manager, no grid) and the effect. |
| '…' has a NetworkIdentity but no RTSNetworkUnit … | For the first networked object with a renderer that the fog of war does not filter. Player objects are skipped. |
Listen server: when a player hosts the game (Host = server and client), the game of the host holds the state of every unit, and the host's fog of war only hides enemies visually. The anti-maphack protects the remote clients. For competitive games, use a dedicated server.
| Setting | Default | Description |
|---|---|---|
| Fog Of War | empty | Server-side fog of war. Empty = RTSFogOfWarManager.Active. |
| Rebuild Interval | 0.2 s | Seconds between visibility checks. Keep it at 0.1–0.3 s: every time a unit becomes visible the client receives a full spawn message. |
| Linger Time | 0.5 s | Seconds a unit stays observed after it left a team's vision. |
| Share With Allies | On | Teams that share vision always see each other's units. |
| Show All Without Fog | Off | On: while no fog of war runs on the server, every connection receives every unit, and a modified client can show the enemies. Off: enemy units are not sent until the fog of war runs. |
| Spectators See All | Off | Connections without a team (spectators) see every unit. |
RTSNetworkFogOfWar has Compute All Teams On Server (on, required by the interest management), a server update interval (0 = keep the manager's value; lower values make units appear sooner) and Disable Reveal All Online (on). On the server, one visibility check is a single fog grid lookup per unit, so checking thousands of units takes well under a millisecond of CPU time; the server's fog cost grows with the number of teams, 2–8 teams are cheap. Bandwidth is a different limit, see Network model and scale.
Network model and scale
The integration uses state synchronization with interest management: the server runs the whole game, and every client receives the position and rotation of the units it may see, through one NetworkTransformReliable per unit. It is not a deterministic lockstep simulation, in which every client runs the complete game and only the orders are sent. This is a deliberate choice:
- Server authority: a client cannot move, create or teleport units. It can only send orders, and the server checks them.
- Anti-maphack: with lockstep, every client must know the whole game state, including every hidden enemy. Here a client never receives units its team cannot see.
- No determinism needed: lockstep needs a bit-identical simulation on every machine (fixed-point math, deterministic pathfinding). Unity's floating-point math and Burst do not guarantee that across platforms and processors. State synchronization works with the normal pathfinder, physics and your own code, and players can join a running game.
The price is bandwidth. It grows with the units that move and are visible to a client:
server upload ≈ moving units × clients that see them × send rate × about 15 bytes- Units that stand still cost almost nothing, because Only Sync On Change sends nothing for them.
- A moving unit costs about 13–16 bytes per update and observer: about 0.8–1 KB/s at Mirror's default send rate of 60 Hz, half of that at 30 Hz.
- Example: 200 moving units seen by 4 clients at 60 Hz need about 0.7 MB/s (5–6 Mbit/s) of upload from the server, more than many home connections can give a hosted game. At 30 Hz it is half.
- Each time an enemy becomes visible, its client receives a spawn message (about 60–80 bytes) and creates the unit's object. Linger Time and the rebuild interval keep this low at the edge of vision.
Guideline: the integration is comfortable with about 100–150 units moving at the same time per match, with 2–4 players and a send rate of 30 Hz. More works when the upload of the server allows it, for example on a dedicated server. Games with armies of many hundreds of units per player usually use lockstep or send unit states in batches of their own; that is a different architecture, which this integration does not provide.
These numbers are estimates from Mirror's message format, not measurements of your game. Add Mirror's NetworkStatistics component to the network manager object to see the real traffic.
Tuning
| Setting | Where | Default | Suggestion for RTS games |
|---|---|---|---|
| Send Rate | RTSNetworkManager (Mirror's network manager settings) | 60 Hz | 20–30 Hz. Halving the rate halves the unit traffic. Units still move smoothly, because the network transform interpolates between updates; lower rates add a little delay. |
| Sync Interval | NetworkTransformReliable of the unit prefab (Sync Settings) | 0 (every send) | 0.05–0.1 s, so units update every 2–3 sends at 30 Hz. |
| Position Precision | NetworkTransformReliable | 0.01 (1 cm) | 0.02–0.05. Coarser positions need fewer bytes per update, and a few centimetres are invisible from an RTS camera. |
| Only Sync On Change, Compress Rotation | NetworkTransformReliable | On | Keep both on. |
| Rebuild Interval | RTSFogOfWarInterestManagement | 0.2 s | 0.1–0.3 s (see Fog of war and anti-maphack). |
The demo scene keeps Mirror's defaults. Measure your game with the number of units and players you expect before you tune it.
Restricting who can join
Without further setup, anybody who knows the address of the server can connect, and every connection takes a free player slot until it leaves. There is no lobby or kick button. For games beyond your own network, add one of Mirror's authenticators to the network manager object:
BasicAuthenticatorchecks a user name and a password: set Server Username and Server Password for the server, and the same values as Username and Password for the clients. Assign the component to the Authenticator field of the network manager.TimeoutAuthenticatordisconnects connections that do not authenticate in time. Add it as well, assign theBasicAuthenticator(or your own authenticator) to its Authenticator field, and assign theTimeoutAuthenticatorto the network manager instead.
RTSNetworkManager gives a connection its player slot only after it has authenticated, so a rejected connection never takes a slot or starts a map download. BasicAuthenticator sends the password unencrypted, which is fine for private games but no protection for public servers. There, use your own NetworkAuthenticator (accounts, tickets from a matchmaking service) or a lobby, and remove idle or unwanted players with RTSNetworkManager.RejectConnection(conn, reason).
Scripting with Mirror
using RTSTerrainStudio.Integrations.Mirror;
using RTSTerrainStudio.Samples;
using UnityEngine;

// Needs Mirror (96 or newer). Sends orders of the local player to the server and shows the map download.
public class MirrorExample : MonoBehaviour
{
    [SerializeField] RTSNetworkMapSync mapSync;   // on the network manager object

    void OnEnable()
    {
        if (mapSync == null) return;
        mapSync.ClientProgressChanged += OnProgress;          // 0-1 while the map downloads
        mapSync.ClientMapReady += OnMapReady;                 // the map is applied to the terrain
        mapSync.ClientTransferFailed += OnTransferFailed;
    }

    void OnDisable()
    {
        if (mapSync == null) return;
        mapSync.ClientProgressChanged -= OnProgress;
        mapSync.ClientMapReady -= OnMapReady;
        mapSync.ClientTransferFailed -= OnTransferFailed;
    }

    void OnProgress(float progress) => Debug.Log($"Downloading map: {progress:P0}");
    void OnMapReady() => Debug.Log("Map ready");
    void OnTransferFailed(string reason) => Debug.LogWarning("Map download failed: " + reason);

    // For your own UI (e.g. a "Move here" button): the server validates the order (ownership,
    // target, unit count, rate limit) before the units move.
    public void SendSelectedTo(Vector3 target, bool queue)
    {
        RTSNetworkPlayer player = RTSNetworkPlayer.Local;
        RTSSelectionManager selection = RTSSelectionManager.Main;
        if (player == null || selection == null) return;
        player.RequestMove(selection.Selection, target, queue);
    }

    // Host only: after changing the map (map vote, in-game editor), send it to every client again.
    public void ResendMap()
    {
        if (mapSync != null) mapSync.SendMapToAll();
    }
}| Member | Description |
|---|---|
RTSNetworkManager (RTSNetworkManager.Instance) | |
ServerPlayerJoined(conn, team), ServerConnectionRejected(conn) | Server: a connection got a team (before the map transfer), or was rejected because all slots are taken. |
ServerPlayerSpawned(conn, player), ServerUnitSpawned(conn, unit) | Server: the player object was spawned (after its map was ready); a unit was spawned, also by SpawnUnit. Use them to give players their starting objects. |
ServerPlayerLeft(conn, team) | Server: a connection left, raised before its objects are destroyed. |
ClientJoinedGame, ClientDisconnected, ClientRejected(reason) | Client: joined after loading the map; the connection ended; the server refused this client. |
RTSNetworkUnit SpawnUnit(owner, team, position, yaw, prefab = null) | Server: spawns a unit (moved to the nearest walkable spot). owner null = no owner, for example neutral creeps or buildings. The prefab must be a registered spawnable prefab with RTSNetworkUnit. |
GetUnits(conn), TryGetTeam(conn, out team), IsTeamReserved(team) | Server: the units of a connection, its team, and whether units of a player who left still hold a team slot. |
RejectConnection(conn, reason) | Server: sends the reason to the client and disconnects it after Reject Disconnect Delay. |
| RTSNetworkMapSync | |
MaxMapMemoryMB, MaxMapMemoryBytes | Client: the Max Map Memory MB setting, and the limit in bytes it stands for (the automatic value when the setting is 0). |
protected virtual RTSMapReadOptions CreateClientReadOptions() | Client: the rules every received or cached map is loaded with (RTSMapReadOptions.Strict with MaxMapMemoryBytes). Override it in a derived class to change the limits. |
| RTSNetworkUnit and RTSNetworkPlayer | |
static RTSNetworkUnit.Spawned, Despawned, All | Raised on every machine when a network unit was spawned (after its team was applied) or despawned; all units known on this machine. |
static RTSNetworkPlayer.LocalPlayerStarted, LocalPlayerStopped, Local | The local player object appeared or went away; the current local player. |
using Mirror;
using RTSTerrainStudio.Integrations.Mirror;
using UnityEngine;

// Server: gives every player an extra starting object (for example a town hall) next to its start location.
// Put it on the network manager object.
public class StartingObjectsExample : MonoBehaviour
{
    [SerializeField] GameObject townHallPrefab;   // NetworkIdentity + RTSUnit + RTSNetworkUnit, in Registered Spawnable Prefabs

    RTSNetworkManager manager;

    void Awake() => manager = GetComponent<RTSNetworkManager>();

    void OnEnable()
    {
        if (manager != null) manager.ServerPlayerSpawned += OnPlayerSpawned;
    }

    void OnDisable()
    {
        if (manager != null) manager.ServerPlayerSpawned -= OnPlayerSpawned;
    }

    void OnPlayerSpawned(NetworkConnectionToClient conn, RTSNetworkPlayer player)
    {
        if (player == null || townHallPrefab == null) return;
        // Start location of the player's team (a fallback position when the map has none).
        RTSNetworkUtility.GetStartLocation(manager.Terrain, player.Team, manager.MaxPlayers, out Vector3 start, out float yaw);
        // Owned by the connection, so the player can select and order it.
        manager.SpawnUnit(conn, player.Team, start, yaw, townHallPrefab);
    }
}
Limitations and troubleshooting
- Map edits during a game (in-game editor on the host) are not streamed live. Call
RTSNetworkMapSync.SendMapToAll()to resend the map. RTSBuildingPlacementDemoandRTSTreeHarvestDemorun locally and are not networked.RTSDemoGameis a single-player bootstrapper and does not belong in a network scene.- On clients
RTSUnit.Statestays Idle. UseRTSUnit.Velocity(for example for walk animations) or add your own SyncVar. - Alliances are set on the server's fog of war. Clients do not receive them; call
SetAllianceon the clients too if allied vision should be visible there. - Additive scene loads keep the current map. Server and clients must use the same tileset and libraries (the same project content).
- The checksum in the ready message of a client confirms the transfer. It does not prove which map a modified client shows. The server simulates on its own map, so such a client only harms itself.
- The server sends its map file as it is. A map from another tool that only the lenient reader accepts is refused by every client; open it in the Unity editor and save it again before hosting.
| Problem | Solution |
|---|---|
| "The server's fog of war computes only its local team" | Add RTSNetworkFogOfWar to the network manager, or enable Compute All Teams on the server's fog manager. |
| Client never leaves "Connecting..." | The server is not reachable (address, firewall, UDP port 7777), or the server scene has no RTSNetworkManager. |
| "Could not join the game: The game is full" | The map has fewer free slots than players. Add start locations, raise the map's Max Players, or check Max Players Override. Slots of players who left stay reserved while their units live. |
| Compile errors about missing Mirror types after removing Mirror | The MIRROR define symbol is still set. See Removing integrations. |
| Units do not move on the client | The unit prefab needs NetworkTransformReliable, and the scene needs an RTSCommandController. |
| Enemy units are always visible | RTSFogOfWarInterestManagement must be on an active object, and the fog manager must run on the server. Check the server log for the warnings below. |
| Enemy units never appear | No fog of war runs on the server, and Show All Without Fog is off. The server log names the reason. |
| "No RTSFogOfWarInterestManagement is active" | Add RTSFogOfWarInterestManagement to the network manager object. Without it, every client receives every unit. |
| "No fog of war runs on the server" | The message names the reason: add an RTSFogOfWarManager to the scene of the server (also on a dedicated server), enable it, keep only one enabled manager, and make sure its terrain has a map. |
| "… has a NetworkIdentity but no RTSNetworkUnit" | Every client receives this object, also inside the fog of war. Add RTSUnit and RTSNetworkUnit to objects that enemies must not see; ignore the warning for objects every player may see. |
| "The map … needs about … of memory" | The map of the server needs more memory than the client accepts. Raise Max Map Memory MB on RTSNetworkMapSync, or use a smaller map or lower resolutions. Web clients accept at most 512 MB by default. |
| "The cached copy of map … could not be loaded" | Nothing to do: the broken copy was removed and the map is downloaded again. |
| The map downloads every time | The server sends a map that was edited or generated after loading. Save it to its asset or file before hosting. |
A* Pathfinding Project
This integration converts the terrain pathing map into A* grid graphs, keeps them up to date while you edit the map (in the editor and in game), and lets the sample units move with A*, either along A* paths with their own steering or with A*'s AIPath and RVO local avoidance.
TraversalConstraint (new in 5.4) and RVO local avoidance (RVOController, RVOSimulator), which only the Pro version contains. The free version uses the same package name, so Unity cannot tell them apart: with the free version add RTS_ASTAR_DISABLED to (or delete the integration folder).Quick start: the demo scene
- Install A* Pathfinding Project Pro 5.4 or newer.
- Run once.
- Run . The scene is saved as
Integrations/AStarPathfinding/Demo/RTS AStar Demo.unity. When the demo content has no map,RTS AStar Demo Map.rtsmap(plateaus, ramps, lakes) is generated next to it. - Press Play. Select units with the left mouse button and right-click to move them. Knights use the graph RTS Large, all other units RTS Ground.
- Select the A* Pathfinding object and switch the Mode of the A* Path Provider between Agent Movement and Path Only to compare both ways of moving.
Adding A* to your own scene
Select your RTS Terrain and run . It adds a GameObject A* Pathfinding with:
| Component | Purpose |
|---|---|
AstarPath | A*'s main component. Scan on Startup is switched off (the graph builder scans), path logging is reduced to errors. |
RTSAstarGraphBuilder (A* Graph Builder) | Creates the grid graphs from the pathing map and updates them on every map edit. |
RVOSimulator | Local avoidance for agents with an RVOController. |
RTSAstarPathProvider (A* Path Provider) | Makes all units use A* (registered as RTSUnitPathProviderRegistry.Default). |
Manual setup works the same way: add these components to any GameObject () and assign the terrain to the graph builder, or put the builder on the terrain GameObject, where it finds the terrain by itself. Switch off Scan On Startup of AstarPath.
How the graphs are built
- Exact layout. One node per pathing cell, centred on the map and rotated with the terrain's Y rotation. Moving or rotating the terrain rebuilds the graphs (in edit mode once the terrain has stood still for 0.2 seconds).
- No physics needed. A*'s collision and height testing is off. Node heights come from the terrain surface (the same as
RTSTerrain.GetHeight); walkability, tags and penalties come from the pathing flags. The data is computed by Burst jobs. - Tags (changeable in the builder): 0 ground, 1 shallow water, 2 deep water, 3 cliff edge. Use them in the Seeker's Tags settings to forbid or penalise kinds of ground per unit.
- Graph profiles. One A* grid graph per profile (for example one per unit size). Each profile has a graph name, a Traversal (Land, Shallow Water, Deep Water), a Unit Radius (nodes closer to an obstacle become unwalkable, so large units never clip), penalties per kind of ground (1000 ≈ one extra metre per node), Use Water Surface Height for naval graphs and a maximum climb. Units choose the smallest graph that fits their radius.
- Naval and amphibious units. Set the profile's Traversal to Deep Water (boats) or Land | Shallow Water | Deep Water and enable Use Water Surface Height. Give boats an
RTSAstarUnitSetupwith Required Traversal = Deep Water. From code, the factoriesRTSAstarGraphProfile.Ground()("RTS Ground", radius 0.5 m, Land | Shallow Water),Naval()("RTS Naval", radius 1 m, Deep Water, water surface height) andAmphibious()("RTS Amphibious", radius 0.75 m, all ground kinds, water surface height) create ready-made profiles. A new profile defaults to Land | Shallow Water, a shallow water penalty of 600 and a cliff edge penalty of 200. - Updates. A new map, a moved terrain or changed settings rebuild everything. Every map edit (
RTSTerrain.PathingChanged) rewrites only the affected nodes, their clearance margin and their connections in anAstarPath.AddWorkItemcall. - Huge maps. A* limits grid graphs to 1024 nodes per axis (8192 with the
ASTAR_LARGER_GRIDSoptimization define). Larger pathing maps use several pathing cells per node automatically; Cells Per Node does the same on purpose for faster graphs. - Build In Edit Mode shows the graphs as A* gizmos while you edit the map.
RTSAstarGraphBuilder member | Description |
|---|---|
| Cells Per Node (setting, default 1) | Pathing cells per graph node along each axis. 1 = exact match with the pathing map; raised automatically on huge maps (EffectiveCellsPerNode). |
| Log Rebuilds (setting, default off) | Write a console line for every full rebuild. |
Profiles, Tags | The graph profiles and tag numbers. Call RequestRebuild() after changing them from code. |
RequestRebuild() | Schedules a full rebuild for the next update (cheap to call repeatedly). |
bool RebuildNow() | Rebuilds all graphs now. Returns false when there is no active AstarPath or no map. |
UpdateRegion(RectInt pathingRect) | Rewrites the nodes of a pathing cell rectangle. Called automatically from RTSTerrain.PathingChanged; call it yourself after changing PathingMap.Flags without that event. |
ProcessPendingChanges() | Applies pending updates right away (for paths requested in the same frame as a map edit). |
GetGraph(index), GetGraph(name), GetProfileIndex(name) | The A* GridGraph of a profile. |
FindProfileFor(radius, traversal), FindGraphFor(radius, traversal) | The smallest profile (or graph) that fits a unit; -1 / null when no profile allows the traversal. |
GetStats(index) | RTSAstarGraphStats: size, node size, walkable nodes, rebuild and update times, isBuilt. |
IsBuilt, IsProfileBuilt(index), bool TryGetProblem(out string problem) | Whether the graphs hold the current map; why they cannot be built (no AstarPath, no terrain, no map). |
GraphsRebuilt, GraphsUpdated | Events after a full rebuild and after an incremental update (with the pathing rectangle). |
static FindFor(terrain), static All | The builder of a terrain; all enabled builders. |
Provider modes and RVO
Mode (RTSAstarMovementMode) | Behaviour |
|---|---|
| Agent Movement (default) | HandlesMovement = true. Move orders set the destination of the unit's AIPath and start a search; Stop and Hold clear the path, holding units lock their RVOController. Arrival and failure are reported back to the unit, so queued orders (Shift), patrols and unit events behave as with the built-in pathfinder. RVO local avoidance keeps moving units apart. |
| Path Only | HandlesMovement = false. A* only computes the waypoints (through the unit's Seeker, so modifiers such as the Funnel Modifier apply); the unit follows them with its own steering and separation. Units without a Funnel Modifier get their paths straightened (Smooth Paths). |
| Provider setting | Default | Description |
|---|---|---|
| Mode | Agent Movement | See above. |
| Graph Builder | empty | Builder whose graphs are used. Empty = the builder of the unit's terrain. |
| Auto Configure Units | On | Adds and configures RTSAstarUnitSetup on every unit: a Seeker, a FunnelModifier, an RTSAstarAIPath (an AIPath that stands on the terrain surface without physics raycasts) and an RVOController, with speed, turn rate, acceleration, radius and height copied from the RTSUnit. |
| Fallback To Builtin | On | Use the built-in pathfinder while no A* graph is available (in edit mode and before the first scan). |
| Smooth Paths | On | Path Only: straighten paths of units without a Funnel Modifier; shortcuts stay on allowed tags and never cross more expensive nodes. |
| Stuck Time | 1.5 s | Agent Movement: seconds an agent may stand still during a move before it repaths once and then gives up. |
Add RTSAstarUnitSetup to a unit prefab yourself to choose a graph by name, or to switch off local avoidance or path smoothing per unit type. The RTSAstarAIPath inspector shows A*'s usual movement settings plus a section RTS Terrain (Follow Terrain Height, Stay On Water Surface, Terrain).
using RTSTerrainStudio.Integrations.AStar;
using RTSTerrainStudio.Samples;
using UnityEngine;

// Needs the A* Pathfinding Project Pro 5.4+. Put it into an assembly that references
// RTSTerrainStudio.Integrations.AStar (or into Assembly-CSharp, which references it automatically).
public class AstarExample : MonoBehaviour
{
    [SerializeField] RTSUnit unit;

    void Start()
    {
        // Configure one unit by hand (Seeker, FunnelModifier, RTSAstarAIPath and RVOController).
        RTSAstarUnitSetup setup = RTSAstarUnitSetup.Configure(unit, agentMovement: true);
        setup.Agent.maxSpeed *= 1.5f;

        // The graph that fits this unit's radius.
        RTSAstarGraphBuilder builder = RTSAstarGraphBuilder.FindFor(unit.Terrain);
        if (builder != null)
            Debug.Log("Unit uses graph " + builder.FindGraphFor(unit.Radius)?.name);
    }

    // After changing the pathing map from code in the middle of a frame, push the change to A* now
    // instead of waiting for the next update.
    public static void FlushGraphs(RTSUnit anyUnit)
    {
        RTSAstarGraphBuilder.FindFor(anyUnit.Terrain)?.ProcessPendingChanges();
    }
}
Limitations
- A*'s grid graph rules (
GridGraph.rules) have no effect: the builder writes walkability, tags, penalties and positions itself after each scan. Use the builder's tags and penalties instead. - Terrains rotated around X or Z are not supported (grid graphs are horizontal planes).
- A painted Unwalkable pathing override blocks ground units only. Ships are blocked by obstacles and cliffs; shape naval routes with doodads or deep water borders. Naval units need the Agent Movement mode.
- Graph profiles removed from the builder leave their graph in the
AstarPathcomponent; delete it there if you no longer need it. - A* searches paths in play mode only. In edit mode, path requests fall back to the built-in pathfinder.
Removing integrations
You never have to remove an integration: without its dependency it is not compiled. Remove one when you uninstall the dependency or want a smaller project. In every case, delete the integration's Demo folder first if you created a demo scene: its scenes and prefabs use the integration's components and would show missing scripts.
Removing A* Pathfinding Project or AI Navigation
- Delete
Integrations/AStarPathfinding/Demo(orIntegrations/UnityNavMesh/Demo) if it exists. - Remove the components of the integration from your own scenes and prefabs (graph builder, path provider, unit setup / NavMesh builder, NavMesh path provider).
- Uninstall the package (A* Pathfinding Project, or AI Navigation in the Package Manager). The version define disappears with the package, and the integration assemblies are skipped automatically.
- If you added
RTS_ASTAR_DISABLEDfor the free A* version, you can remove it from the Scripting Define Symbols again.
Removing Mirror
Mirror adds the scripting define symbols MIRROR, MIRROR_89_OR_NEWER, MIRROR_90_OR_NEWER, MIRROR_93_OR_NEWER and MIRROR_96_OR_NEWER to the Player Settings, and deleting Mirror does not remove them. While MIRROR is still defined, Unity keeps compiling the integration against Mirror assemblies that no longer exist, and the compile errors block every script in the project.
- Delete
Integrations/Mirror/Demofirst. - Delete the
Mirrorfolder inside the Unity editor (Project window). The small editor assemblyRTSTerrainStudio.Integrations.Mirror.DefineCleanup.Editornotices the deletion, removes Mirror's symbols from every build target and logs what it removed. It also runs whenever the editor starts without Mirror. does the same by hand. - Check of every platform you build for: no
MIRRORorMIRROR_..._OR_NEWERentry may be left. Remove leftovers by hand, for example when Mirror was deleted while the editor was closed and the editor started in Safe Mode. Mirror's Edgegap plugin also addsEDGEGAP_PLUGIN_SERVERS; it is harmless, but you can remove it too.
The integration scripts can stay in the project: they are not compiled until Mirror is installed again.
Deleting integration folders
Each integration is self-contained. Deleting Integrations/Mirror, Integrations/AStarPathfinding or Integrations/UnityNavMesh (in the Project window) removes it completely; nothing else in the package refers to these folders. The whole Integrations folder can be deleted as well.
Integrations/Mirror while Mirror stays installed and later remove Mirror too, remove the Mirror define symbols by hand (the automatic cleanup lives in that folder).Scripting Guide
Everything you can do in the editor windows you can also do from C#. This chapter shows how to query the terrain, change the map from code (with and without undo), write your own tools, react to events and save and load maps at runtime. Every example below compiles against the package as shipped; copy it into your project and adapt it. The extension points for a complete game (your own data in maps, runtime pathing, hidden trees, an external fog of war, editor tabs and the play test hand-over) follow in the next chapter, Building a game on RTS Terrain Studio.
Assemblies, namespaces and coordinates
| Assembly | Namespace | Contains |
|---|---|---|
RTSTerrainStudio.Runtime | RTSTerrainStudio | Terrain, map data, tools, brushes, vegetation, water, decor, fog of war, pathing, generator, serializer, in-game editor. |
RTSTerrainStudio.Samples | RTSTerrainStudio.Samples | RTS camera, units, selection, commands, minimap UI, demo game. |
RTSTerrainStudio.Editor | RTSTerrainStudio.Editor | Editor window, Scene View tools, inspectors, importers, setup windows, RTSEditorContext. |
RTSTerrainStudio.Integrations.* | RTSTerrainStudio.Integrations.Mirror / .AStar / .NavMesh | Optional integrations. |
RTSTerrainStudio.Defines.Editor | RTSTerrainStudio.Defines | The scripting define symbols RTS_TERRAIN_STUDIO and RTS_TERRAIN_STUDIO_1_0_OR_NEWER (see Define symbols). Not referenced automatically. |
Scripts without an assembly definition (Assembly-CSharp, and Assembly-CSharp-Editor for scripts in Editor folders) reference these assemblies automatically. If your code has its own .asmdef, add RTSTerrainStudio.Runtime (and RTSTerrainStudio.Samples or RTSTerrainStudio.Editor when you use them) to its references, plus Unity.Mathematics and Unity.Collections when you use types such as float3 or NativeArray.
The map in three grids
- Cells: the map is
Width × Heightcells ofCellSizemetres (default 2 m). Rectangles passed toNotifyChangedare in cells. - Vertices: the cell corners,
(Width + 1) × (Height + 1); indexz * VertexCountX + x(MapData.VertexIndex(x, z)). Heights, cliff levels, flags, cliff types and water live here. Vertex (x, z) sits at(x * CellSize, z * CellSize). - Texels: raster layers with N texels per cell: splat (
SplatResolution), details (DetailResolution) and pathing (PathingResolution). Texel (x, z) has its centre at(x + 0.5, z + 0.5) * CellSize / N.
Map-local space starts at the first vertex: X/Z in metres from 0 to MapData.WorldSize, Y up. Only the terrain's position and Y rotation are used (scale is ignored). Convert with WorldToLocal, LocalToWorld, WorldToLocalDirection, LocalToWorldDirection, WorldToCell, CellCenterToWorld and VertexToWorld. The ground height of a vertex is CliffLevels[i] × CliffLevelHeight + Heights[i]. Rotations are degrees, clockwise seen from above (0 = +Z, 90 = +X), like Unity's Y rotation.
Querying the terrain
The query API of RTSTerrain follows exactly the surface you see, including the rounded cliff contours, and needs no colliders. It works in edit mode and at runtime.
| Member | Returns |
|---|---|
RTSTerrain.Main, RTSTerrain.All | The first enabled terrain / all enabled terrains. |
RTSTerrain.FindAt(Vector3 world) | The terrain whose area contains the position, or null. |
RTSTerrain.RaycastAll(Ray, out RTSTerrainHit, maxDistance) | The closest hit on any terrain. |
Raycast(Ray, out RTSTerrainHit, maxDistance) | Analytic ray cast against this terrain. RTSTerrainHit has point, normal, distance, localPoint, cell and terrain. |
GetHeight(world), SnapToGround(world) | World Y of the ground / the position moved onto the ground. |
GetNormal(world) | World space surface normal. |
GetCliffLevel(world) | Cliff level 0–15 at the position. |
IsWater(world, out depth), TryGetWaterHeight(world, out waterY) | Whether the position is under water, its depth and the world Y of the surface. |
GetPathing(world), IsWalkable(world), IsBuildable(world) | PathingFlags (Walkable, Buildable, Flyable, ShallowWater, DeepWater, Cliff, Blocked, Steep). None outside the map or before pathing is built. |
Contains(world), WorldBounds | Whether the position lies inside the map area / the world bounds. |
GetGeometry() | A Burst-friendly MapGeometryView (map-local SampleHeight, SampleNormal, SampleCliffLevel, SampleWater, Raycast …) for your own jobs. |
RTSPathfinder.FindPath(terrain, from, to, options, list) | A path from the built-in Burst pathfinder (PathStatus: Success, Partial, NoPath, InvalidStart). |
using System.Collections.Generic;
using RTSTerrainStudio;
using UnityEngine;

// Logs what is under the mouse cursor when you left-click: height, cliff level, water and pathing.
// Works with any number of RTS terrains in the scene and needs no colliders.
public class TerrainQueryExample : MonoBehaviour
{
    [SerializeField] Camera viewCamera;

    void Update()
    {
        // RTSInput works with the Input System and with the legacy Input Manager.
        if (!RTSInput.GetMouseButtonDown(0)) return;

        Camera cam = viewCamera != null ? viewCamera : Camera.main;
        if (cam == null) return;
        Ray ray = cam.ScreenPointToRay(RTSInput.PointerPosition);

        // Analytic ray cast against every enabled RTS terrain (closest hit wins).
        if (!RTSTerrain.RaycastAll(ray, out RTSTerrainHit hit)) return;

        RTSTerrain terrain = hit.terrain;
        Vector3 p = hit.point;

        float groundY = terrain.GetHeight(p);           // world Y of the ground
        Vector3 normal = terrain.GetNormal(p);          // world space surface normal
        int level = terrain.GetCliffLevel(p);           // 0-15
        bool walkable = terrain.IsWalkable(p);          // ground units can walk here
        bool buildable = terrain.IsBuildable(p);        // buildings can be placed here
        PathingFlags flags = terrain.GetPathing(p);     // all pathing flags of the cell

        string water = "dry";
        if (terrain.IsWater(p, out float depth) && terrain.TryGetWaterHeight(p, out float waterY))
            water = $"water, depth {depth:0.00} m, surface at y = {waterY:0.00}";

        Debug.Log($"Cell {hit.cell} on '{terrain.name}': ground y = {groundY:0.00}, level {level}, " +
                  $"slope {Vector3.Angle(normal, Vector3.up):0} deg, {water}, " +
                  $"walkable {walkable}, buildable {buildable}, flags {flags}");
    }

    // Keeps an object standing on the ground of whatever terrain is below it.
    public static void PlaceOnGround(Transform t)
    {
        RTSTerrain terrain = RTSTerrain.FindAt(t.position);
        if (terrain != null) t.position = terrain.SnapToGround(t.position);
    }

    // Asks the built-in Burst pathfinder for a path (main thread, no third-party package needed).
    public static bool TryFindPath(RTSTerrain terrain, Vector3 from, Vector3 to, List<Vector3> waypoints)
    {
        // ForUnit sets the clearance for a unit of this radius (large units avoid narrow gaps).
        PathRequestOptions options = PathRequestOptions.ForUnit(0.5f);
        PathStatus status = RTSPathfinder.FindPath(terrain, from, to, options, waypoints);
        // Partial: the goal is unreachable, the path ends at the closest reachable cell.
        return status == PathStatus.Success || status == PathStatus.Partial;
    }
}RTSTerrain.RaycastAll over Physics.Raycast: it is exact, works without colliders and in edit mode. Colliders (Collider Mode in the terrain settings) are still useful for physics objects and for ray casts that must also hit other objects.Editing the map from code
All map content lives in terrain.Map, a MapData. Changing it always follows the same three steps:
- Change the data in
terrain.Map(on the main thread). - Call
terrain.NotifyChanged(layers, cellRect)with the changedMapLayersand the changed rectangle in cells, orNotifyChangedAll(layers)after a change of the whole map. - That's it. In its next
LateUpdate(in edit mode: the next editor update) the terrain rebuilds only the dirty chunks, splat textures, water, vegetation, decor and the pathing map. Callterrain.ProcessPendingChanges()when you need the results in the same frame (it is cheap to call often).
Data (MapData) | Grid / type | MapLayers flag |
|---|---|---|
Heights | vertices, float fine height in metres on top of the level | Heights |
CliffLevels | vertices, byte 0–15 | CliffLevels |
VertexFlags | vertices, VertexFlags (Ramp, Water, User0, User1) | VertexFlags |
CliffTypes | vertices, byte 0–3 | CliffTypes |
WaterHeights | vertices, water surface in map-local metres (used where the Water flag is set) | Water |
SplatMaps[0..3] | splat texels, 4 × RGBA32; layer i is map i/4, channel i%4; weights sum to 255 | Splat |
DetailLayers | detail texels, one byte density per layer (DetailLayer.prototypeId, density) | Details |
Trees, Decor | lists of TreeInstanceData / DecorInstanceData with palette indices into TreePrototypeIds / DecorPrototypeIds | Trees, Decor |
PathingOverrides | pathing texels, painted overrides | PathingOverrides |
Regions, StartLocations, Markers | lists | Regions, StartLocations, Markers |
Info, Environment | map info and lighting | Info, Environment |
HeaderFields | custom key/value texts of the file header | Info |
GetExtension<T>(), UnknownSections | your own data (map extensions) and the kept sections of other games and tools | Extensions |
TerrainToolUtility.ClampFineHeight); keep every splat texel at a sum of exactly 255 (use SplatRaster and SplatMath); allocate instance ids for new trees and decor with map.AllocateInstanceId() and prototype indices with GetOrAddTreePrototype / GetOrAddDecorPrototype. Never keep references to MapData or its arrays across a map load or resize: SetMap, LoadFromFile and ResizeMap replace the whole object and dispose the old one.Runtime deformation and painting: craters and blight
A typical gameplay use: an explosion digs a crater, and an undead building spreads "blight" ground around itself. Pathing, vegetation and decor heights follow automatically.
using RTSTerrainStudio;
using UnityEngine;

// Runtime terrain changes from gameplay code: explosion craters and spreading "blight".
// Both edit MapData directly and then call NotifyChanged. The terrain rebuilds only the
// touched chunks (and the pathing map) in its next LateUpdate.
public static class TerrainEffects
{
    // Digs a bowl-shaped crater into the fine height around a world position.
    public static void Crater(RTSTerrain terrain, Vector3 worldPosition, float radius, float depth)
    {
        MapData map = terrain != null ? terrain.Map : null;
        if (map == null || radius <= 0f) return;

        // Work in map-local space: X/Z in metres from the first vertex.
        Vector3 local = terrain.WorldToLocal(worldPosition);

        // Vertex rectangle covered by the crater (vertices sit at x * CellSize, z * CellSize).
        int x0 = Mathf.Max(0, Mathf.FloorToInt((local.x - radius) / map.CellSize));
        int z0 = Mathf.Max(0, Mathf.FloorToInt((local.z - radius) / map.CellSize));
        int x1 = Mathf.Min(map.Width, Mathf.CeilToInt((local.x + radius) / map.CellSize));
        int z1 = Mathf.Min(map.Height, Mathf.CeilToInt((local.z + radius) / map.CellSize));
        if (x1 < x0 || z1 < z0) return; // completely outside the map

        for (int z = z0; z <= z1; z++)
        for (int x = x0; x <= x1; x++)
        {
            float dx = x * map.CellSize - local.x;
            float dz = z * map.CellSize - local.z;
            float t = Mathf.Sqrt(dx * dx + dz * dz) / radius;
            if (t >= 1f) continue;

            // Smooth bowl: deepest in the centre, zero at the rim.
            float falloff = 1f - t * t;
            int i = map.VertexIndex(x, z);
            // Heights is the fine height on top of the cliff level. Clamp it to the allowed range.
            map.Heights[i] = TerrainToolUtility.ClampFineHeight(map, map.Heights[i] - depth * falloff * falloff);
        }

        // Tell the terrain which cells changed. Meshes, colliders, water, vegetation, decor and
        // pathing follow automatically.
        var vertexRect = new RectInt(x0, z0, x1 - x0 + 1, z1 - z0 + 1);
        terrain.NotifyChanged(MapLayers.Heights, BrushUtility.VertexRectToCellRect(map, vertexRect));
    }

    // Paints a ground layer (for example a "blight" texture) around a position with a soft edge.
    // amount is the coverage reached in the centre (0-1).
    public static void PaintLayer(RTSTerrain terrain, Vector3 worldPosition, float radius, int layer, float amount = 1f)
    {
        MapData map = terrain != null ? terrain.Map : null;
        if (map == null || radius <= 0f) return;
        layer = Mathf.Clamp(layer, 0, MapData.MaxGroundLayers - 1);

        Vector3 local = terrain.WorldToLocal(worldPosition);
        int res = map.SplatResolution;            // splat texels per cell
        float texel = map.CellSize / res;         // texel size in metres

        // Texel rectangle (texel centres sit at (x + 0.5) * texel).
        int x0 = Mathf.Max(0, Mathf.FloorToInt((local.x - radius) / texel));
        int z0 = Mathf.Max(0, Mathf.FloorToInt((local.z - radius) / texel));
        int x1 = Mathf.Min(map.SplatWidth - 1, Mathf.CeilToInt((local.x + radius) / texel));
        int z1 = Mathf.Min(map.SplatHeight - 1, Mathf.CeilToInt((local.z + radius) / texel));
        if (x1 < x0 || z1 < z0) return;

        // SplatRaster gives read/write access to all 16 layer weights of a texel.
        var splat = new SplatRaster(map);
        for (int z = z0; z <= z1; z++)
        for (int x = x0; x <= x1; x++)
        {
            float dx = (x + 0.5f) * texel - local.x;
            float dz = (z + 0.5f) * texel - local.z;
            float t = Mathf.Sqrt(dx * dx + dz * dz) / radius;
            if (t >= 1f) continue;

            int index = splat.Index(x, z);
            SplatTexel weights = splat.Read(index);
            int target = Mathf.RoundToInt(Mathf.Clamp01(amount * (1f - t)) * SplatMath.Total);
            if (weights[layer] >= target) continue; // never remove blight that is already there

            // Sets the layer weight and rescales the other layers, so the texel still sums to 255.
            SplatMath.SetLayerWeight(ref weights, layer, target, 0);
            splat.Write(index, weights);
        }

        var texelRect = new RectInt(x0, z0, x1 - x0 + 1, z1 - z0 + 1);
        terrain.NotifyChanged(MapLayers.Splat, BrushUtility.TexelRectToCellRect(map, texelRect, res));
    }
}TerrainEffects.Crater(RTSTerrain.FindAt(hitPoint), hitPoint, 4f, 1.5f); or TerrainEffects.PaintLayer(terrain, building.position, 12f, blightLayer);. For effects that touch thousands of vertices every frame, move the loop into a Burst job like the built-in tools do.Undoable edits: RTSEditSession.RunOperation
Direct edits have no undo, which is right for gameplay. For editor tools and map-editing features use an RTSEditSession: RunOperation(name, layers, action) records the listed layers of the whole map, runs your action and turns everything into one undo step. In the Unity editor use the shared session RTSEditorContext.Session; its steps are part of Unity's undo, so Ctrl+Z / Ctrl+Y work as usual.
// Put this file into a folder named "Editor".
using RTSTerrainStudio;
using RTSTerrainStudio.Editor;
using UnityEditor;
using UnityEngine;

// Editor menu command that raises a plateau in the middle of the edited map.
// It runs through the shared edit session, so Ctrl+Z / Ctrl+Y undo and redo it in one step.
public static class PlateauMenu
{
    [MenuItem("Tools/My Game/Raise Centre Plateau")]
    static void RaiseCentrePlateau()
    {
        RTSTerrain terrain = RTSEditorContext.Terrain;   // the terrain selected in the RTS Terrain Studio window
        if (terrain == null || terrain.Map == null) return;

        // The shared session of the window and the Scene View. It always edits RTSEditorContext.Terrain.
        RTSEditSession session = RTSEditorContext.Session;

        // RunOperation records the listed layers of the whole map BEFORE the operation runs,
        // so inside it you only change data and notify the terrain.
        session.RunOperation("Raise Centre Plateau", MapLayers.CliffLevels | MapLayers.Heights, ctx =>
        {
            MapData map = ctx.Map;
            int size = Mathf.Min(map.Width, map.Height) / 4;          // plateau size in cells
            var vertexRect = new RectInt(map.Width / 2 - size / 2, map.Height / 2 - size / 2, size + 1, size + 1);

            for (int z = vertexRect.yMin; z < vertexRect.yMax; z++)
            for (int x = vertexRect.xMin; x < vertexRect.xMax; x++)
            {
                int i = map.VertexIndex(x, z);
                // Cliff levels are bytes 0-15. Ground height = level * CliffLevelHeight + fine height.
                map.CliffLevels[i] = (byte)Mathf.Min(MapData.MaxCliffLevel, map.CliffLevels[i] + 1);
                map.Heights[i] = 0f;                                   // flat top
            }

            ctx.MarkChanged(MapLayers.CliffLevels | MapLayers.Heights,
                BrushUtility.VertexRectToCellRect(map, vertexRect));
        });
    }
}
In a running game use the session of the in-game editor (RTSRuntimeEditor.Session), so your operation shares its undo history, or create your own session:
using RTSTerrainStudio;
using UnityEngine;

// Undoable edits in a running game: use the session of the in-game editor, or your own session.
public class RuntimeUndoExample : MonoBehaviour
{
    RTSEditSession ownSession;

    public void FloodLowGround(RTSTerrain terrain, float waterLocalY)
    {
        // Prefer the in-game editor's session, so the edit shares its undo history (Ctrl+Z in the editor UI).
        var ingameEditor = FindFirstObjectByType<RTSRuntimeEditor>();
        RTSEditSession session = ingameEditor != null ? ingameEditor.Session : null;
        if (session == null)
        {
            // Without the in-game editor: a plain session works as well (call Dispose when done).
            if (ownSession == null) ownSession = new RTSEditSession();
            ownSession.Terrain = terrain;
            session = ownSession;
        }

        session.RunOperation("Flood Low Ground", MapLayers.Water | MapLayers.VertexFlags, ctx =>
        {
            MapData map = ctx.Map;
            const byte waterFlag = (byte)VertexFlags.Water;
            for (int i = 0; i < map.VertexCount; i++)
            {
                // Ground height of a vertex = cliff level * level height + fine height.
                float ground = map.CliffLevels[i] * map.CliffLevelHeight + map.Heights[i];
                if (ground >= waterLocalY) continue;
                // A vertex is wet when it has the Water flag; WaterHeights holds its surface height.
                map.VertexFlags[i] = (byte)(map.VertexFlags[i] | waterFlag);
                map.WaterHeights[i] = waterLocalY;
            }
            // Water changes only need the Water layer: terrain meshes are not rebuilt.
            ctx.Terrain.NotifyChangedAll(MapLayers.Water);
        });
    }

    public void UndoLast()
    {
        ownSession?.Undo();
    }

    void OnDestroy()
    {
        ownSession?.Dispose();
    }
}RunOperation; you call ctx.Record and ctx.MarkChanged for each dab (see the next section). RunOperation records whole layers, so prefer specific layers over MapLayers.All on large maps. To change one map extension as an undo step, session.EditExtension<T>(name, edit) is shorter.Large maps: the undo step of RunOperation holds a copy of the recorded layers before and after the operation, about twice their size. When it would need more memory than the undo history may use (session.UndoStack.MaxMemoryBytes), RunOperation(name, layers, action) asks first through ConfirmRunWithoutUndo. Without a handler, the Unity editor shows a Run Without Undo dialog, and player builds run the operation without undo and log a warning. Running without undo clears the history (see Limits and memory).
| Member | Description |
|---|---|
session.EstimateOperationUndoBytes(layers), session.FitsUndoBudget(layers) | The estimated size of the undo step for these layers on the current map, and whether it fits the budget. Check them before you show your own question, for example in a game UI with asynchronous dialogs. |
session.ConfirmRunWithoutUndo | A delegate (operationName, stepBytes, budgetBytes) => bool. Return true to run without undo, false to cancel the operation. |
session.RunOperation(name, layers, action, recordUndo) | Runs without asking. With recordUndo false the change is not recorded and the history is cleared. |
MapEditRecord.IsDiscarded | True when a record keeps no undo data: it runs without undo, or its copies outgrew the budget. Ending it clears the history instead of adding a step. |
// Decide yourself instead of showing the default dialog, for example in your own game UI.
session.ConfirmRunWithoutUndo = (operationName, stepBytes, budgetBytes) =>
{
    Debug.LogWarning($"{operationName} needs {stepBytes / (1024 * 1024)} MB of undo memory, " +
                     $"the limit is {budgetBytes / (1024 * 1024)} MB. It runs without undo.");
    return true;   // false cancels the operation
};
Writing a custom tool
Tools are plain C# classes that derive from RTSTool. The package finds every non-abstract tool with a public parameterless constructor by reflection (RTSToolRegistry), so your tool appears automatically in its category tab of the RTS Terrain Studio window and of the in-game editor, with a settings UI built from its [ToolSetting] fields, the brush panel, symmetry, undo/redo, the projected brush cursor and the status bar. In the editor its settings are remembered between sessions.
- Create a C# file anywhere in your project (not in an
Editorfolder, so the tool also exists in builds for the in-game editor). - Derive from
RTSTooland overrideId(unique, for example"height.crater") andDisplayName. Choose the tab: overrideCategoryfor a built-in tab, or give the tool a category of its own with[ToolCategory("mygame.units", "Units")](see Tool categories). - Add public fields with
[ToolSetting("Label", ...)]for the options the user can change. - Override
ApplyDab: compute brush weights withBrushUtility.ComputeWeights, callctx.Record(layers, cells)before changing data, change the data, callctx.MarkChanged(layers, cells)after. - Return to Unity. After the script compiles, the tool is in its tab.
- If you ship the tool in a build with a Managed Stripping Level above Minimal, mark the class with
[UnityEngine.Scripting.Preserve], so code stripping keeps it (see Code stripping and custom tools).
using RTSTerrainStudio;
using UnityEngine;

// A custom tool: every click digs a crater and paints scorched ground into it.
// No registration is needed. The class is found by reflection and appears in the Height tab
// of the RTS Terrain Studio window and of the in-game editor, with a UI for every [ToolSetting].
public sealed class CraterTool : RTSTool
{
    // Unique id. The part before the dot also picks a fallback icon ("height" = height tools).
    public override string Id => "height.crater";
    public override string DisplayName => "Crater";
    public override ToolCategory Category => ToolCategory.Height;
    public override string Description => "Digs a crater with a scorched floor at the click position.";
    public override string Hint => "Click: dig a crater | Shift+click: raise a mound";
    public override int Order => 100;                                   // after the built-in height tools
    public override ToolInputMode InputMode => ToolInputMode.Click;     // one dab per click
    public override bool UsesBrush => true;                             // keep the brush size / shape panel
    public override MapLayers ModifiedLayers => MapLayers.Heights | MapLayers.Splat;
    public override Color PreviewColor => new Color(1f, 0.45f, 0.1f, 1f);

    // Public fields with [ToolSetting] get a slider, toggle or palette automatically.
    [ToolSetting("Depth", Min = 0.1f, Max = 6f, Order = 0, Tooltip = "Depth of the crater centre in metres.")]
    public float depth = 1.5f;

    [ToolSetting("Paint Floor", Order = 1, Tooltip = "Paint a ground layer into the crater.")]
    public bool paintFloor = true;

    [ToolSetting("Floor Layer", Kind = ToolSettingKind.GroundLayer, Order = 2, Tooltip = "Ground layer of the crater floor.")]
    public int floorLayer = 0;

    public override void ApplyDab(RTSToolContext ctx, in BrushDab dab)
    {
        MapData map = ctx.Map;

        // 1. Brush weights (0-1) for every vertex under the brush. Shape, hardness, falloff and
        //    rotation are already applied; strength is not (use dab.strength). Dispose the result.
        using BrushWeights w = BrushUtility.ComputeWeights(map, dab, ctx.BrushMask, BrushGrid.Vertices, 1);
        if (w.IsEmpty) return;
        // Cells touched by the dab (covers both the vertex and the splat texel grid).
        RectInt cells = BrushUtility.GetCellRect(map, dab);

        // 2. Record for undo BEFORE changing anything. Record every layer you are going to write.
        MapLayers layers = paintFloor ? MapLayers.Heights | MapLayers.Splat : MapLayers.Heights;
        ctx.Record(layers, cells);

        // 3. Change the data. Shift (dab.invert) raises a mound instead.
        float delta = depth * dab.strength * (dab.invert ? 1f : -1f);
        for (int z = w.rect.yMin; z < w.rect.yMax; z++)
        for (int x = w.rect.xMin; x < w.rect.xMax; x++)
        {
            float weight = w[x, z];
            if (weight <= 0f) continue;
            int i = map.VertexIndex(x, z);
            map.Heights[i] = TerrainToolUtility.ClampFineHeight(map, map.Heights[i] + delta * weight);
        }

        if (paintFloor && !dab.invert)
        {
            // The splat maps use their own texel grid: compute weights for it as well.
            int res = map.SplatResolution;
            using BrushWeights sw = BrushUtility.ComputeWeights(map, dab, ctx.BrushMask, BrushGrid.Texels, res);
            var splat = new SplatRaster(map);
            int layer = Mathf.Clamp(floorLayer, 0, MapData.MaxGroundLayers - 1);
            for (int z = sw.rect.yMin; z < sw.rect.yMax; z++)
            for (int x = sw.rect.xMin; x < sw.rect.xMax; x++)
            {
                int target = Mathf.RoundToInt(sw[x, z] * SplatMath.Total);
                int index = splat.Index(x, z);
                SplatTexel t = splat.Read(index);
                if (t[layer] >= target) continue;
                SplatMath.SetLayerWeight(ref t, layer, target, 0);
                splat.Write(index, t);
            }
        }

        // 4. Notify the terrain AFTER the change (the same rectangle you recorded).
        ctx.MarkChanged(layers, cells);
    }
}
What you can override
| Member | Default | Description |
|---|---|---|
Id, DisplayName | required | Unique id and UI name. |
Category | Custom | Built-in tab (Height, Cliffs, Paint, Vegetation, Decor, Water, Pathing, Markers). A [ToolCategory] with a built-in id sets it as well. |
CategoryId | the [ToolCategory] id, else the id of Category | The tab the editors show the tool in; any custom id creates a tab of its own (see Tool categories). |
Description, Hint | "" | Tooltip and help text; usage hint in the status bar. |
IconName | Id | Icon name. Unknown names fall back to the icon of the id's group prefix (height., paint. …), then to a generic wrench. Custom drawings can be added with RTSIcons.RegisterIcon. |
Order | 0 | Position inside the category. |
InputMode | Brush | Brush: dabs along the pointer path (brush spacing). Click: one dab per press. Drag: OnDragBegin / OnDragUpdate / OnDragEnd (rectangles, lines). |
UsesBrush | true for Brush | Shows the brush panel (size, shape, strength …). |
RepeatRate | 0 | Dabs per second while the button is held without moving (for continuous raise or lower). |
ModifiedLayers | None | Informational: overlays and the status bar. |
PreviewColor | light blue | Colour of the projected brush cursor. |
Snap | None | Snap the brush centre to vertices (cliff tools) or cell centres. |
SupportsPick + OnPick | false | Ctrl+click picks a value (a height, a layer) instead of painting. |
OnActivated, OnDeactivated, OnSettingChanged | Lifecycle callbacks. | |
OnStrokeBegin, OnStrokeEnd, OnStrokeCancelled | Called around a stroke; a cancelled stroke (Esc) is reverted afterwards. | |
DrawGizmos(ctx, gizmos, hasHover, hoverLocal) | Extra previews through IToolGizmos; implemented with Handles in the editor and GL lines in game. | |
GetStatus(ctx, hoverLocal) | null | Status bar text, for example "Level 3 → 4". |
[ToolSetting] accepts Min/Max (slider range), Order, Tooltip and Kind. Auto chooses the editor from the field type (float/int slider, bool toggle, enum popup, Color, string). Special kinds: GroundLayer and CliffType (tileset palettes with thumbnails), CliffLevel, DetailPrototype / DetailPrototypeList, TreePrototype / TreePrototypeList, DecorPrototype / DecorPrototypeList (library palettes), Player (0–15) and Hidden.
Hidden settings are not shown by the generic settings UIs. One exception: in the Unity Editor window, a Hidden field whose type is a UnityEngine.Object (an asset reference such as AutoPaintTool.profile) is still shown as an object field, because the generic UIs cannot otherwise show asset references. The in-game editor does not show it. A hidden setting is still saved with the other tool settings.
Good to know
- Symmetry is automatic.
ApplyDabis called once for every symmetry copy;dab.symmetrytells you which copy it is (with its yaw offset and whether it is mirrored).dab.rotationis already transformed. - The dab (
BrushDab) containslocalPosition,worldPosition,radius,strength,rotation,invert(Shift held),isFirstDabanddabIndex. - Brush weights:
BrushGrid.Verticeswith resolution 1 for vertex layers,BrushGrid.Texelswithmap.SplatResolution,DetailResolutionorPathingResolutionfor rasters. Convert rectangles withBrushUtility.VertexRectToCellRect,TexelRectToCellRectorGetCellRect(map, dab). Always dispose the weights. - Random values must be the same for every symmetry copy of a dab.
ctx.Randomis reseeded at every stroke and advances with each call, so a copy that calls it gets a different value than the original. Draw random values only whendab.symmetry.index == 0, cache them for thatdab.dabIndex, and reuse them for the other copies, mirrored or rotated withSymmetricScatter.TransformOffsetandSymmetryPoint.TransformYaw. The publicSymmetricScatterclass (GetCandidates,GetSingleSeed) does this for you. - Hard selection: for classic RTS-style all-or-nothing edits, derive from
CliffTool,WaterTargetToolorPathingTool(they provide the category, cursor colour and status text;WaterTargetToolalso adds the Water Height settings and Ctrl+click picking), or callTerrainToolUtility.BeginHardVertexSelection(ctx, dab, layers, out weights, out forcedIndex, out cells). Vertices with a weight of at leastTerrainToolUtility.HardSelectionThreshold(0.5), plus the vertex under the brush centre (forcedIndex), are affected, and undo is recorded only for that area. Disposeweightsalso when the method returns false. - Performance: the built-in tools run their loops in Burst jobs (see
RaiseLowerToolandPaintLayerToolinRuntime/Tools). Plain loops are fine for small brushes. - A class marked
[HideTool]is not registered at all: it is missing from both editors and fromsession.Tools, soSetActiveTool,RTSEditorContext.ActivateToolandFindTooldo not find it. To use such a tool (for example a debug tool) from code, assign an instance directly:session.ActiveTool = new MyDebugTool();. In the Unity Editor, also setRTSEditorContext.EditingEnabled = true. - The registry only searches the package's runtime assembly and the assemblies that reference it, directly or through another such assembly. A tool always derives from
RTSTool, so its assembly references the runtime assembly anyway (scripts without an assembly definition are inAssembly-CSharp, which references it automatically). It skips assemblies whose names start withSystem,Unity.,UnityEngine,UnityEditor,Mono.,mscorlib,netstandardornunit. Do not give your own assembly such a name. - Code stripping: tools are created through reflection, so a build with a Managed Stripping Level above Minimal cannot see that they are used. The package's
Runtime/link.xmlkeeps the built-in tools; mark your own with[UnityEngine.Scripting.Preserve]or list them in alink.xmlof your project (see Code stripping and custom tools). - Activate a tool from code with
session.SetActiveTool("height.crater")or, in the editor,RTSEditorContext.ActivateTool("height.crater").
Driving the session from code
The brush, the symmetry and the strokes of both editors go through an RTSEditSession. You can use the same API to build your own front-end, for example a custom painting UI, a tutorial that paints for the player, or a level script.
| Member | Description |
|---|---|
BrushSettings Brush | The shared brush: shape, customShape, radius, strength, hardness, useFalloffCurve, falloffCurve, rotation, randomRotation, spacing, jitter. Call Brush.MarkDirty() after changing the keys of falloffCurve from code: the baked brush mask notices changes to shape, hardness, useFalloffCurve and customShape, but not to curve keys. |
SymmetrySettings Symmetry | mode (SymmetryMode) and center (normalized, 0.5/0.5 = map centre). GetPoints(localPos, mapWorldSize, mergeDistance, results) returns the original point and its copies. |
ScaleRadius(factor), AddStrength(delta) | What the [ ] and - = shortcuts do, clamped to the valid ranges. |
bool InvertModifier | Same as holding Shift: lower instead of raise, erase instead of paint. |
BeginStroke(worldPoint), UpdateStroke(worldPoint, deltaTime), EndStroke(), CancelStroke() | A stroke from press to release. Call UpdateStroke every frame while the button is held (also when the pointer does not move, so repeating tools keep working). EndStroke pushes one undo step; CancelStroke reverts the stroke. |
Pick(worldPoint) | The Ctrl+click pick of the active tool. |
FindTool(id), FindTool<T>(), GetTools(category), GetTools(categoryId), SetActiveTool(id), ActiveTool | Find and activate tools. GetTools(categoryId) takes the id of a built-in or custom category. |
EditExtension<T>(name, edit), RecordExtension<T>() | Change a map extension as one undo step, or record it inside a running stroke or operation before you change it. |
ActiveToolChanged, StrokeEnded, UndoRedoPerformed, SelectionChanged | Events for your UI: the active tool changed, a stroke was finished (not raised for cancelled strokes), undo or redo ran, the decor selection changed. |
using RTSTerrainStudio;
using UnityEngine;

// Paints with the built-in tools from your own code, for example from a custom UI.
// Call PressAt / DragTo / Release with world positions on the terrain (for example from terrain.Raycast).
public class SessionDriverExample : MonoBehaviour
{
    public RTSTerrain terrain;
    RTSEditSession session;

    void OnEnable()
    {
        // In a scene with the in-game editor you can use RTSRuntimeEditor.Session instead.
        session = new RTSEditSession();
        session.Terrain = terrain;

        // Brush and symmetry are shared by every tool of this session.
        session.Brush.radius = 8f;
        session.Brush.strength = 0.6f;
        session.Symmetry.mode = SymmetryMode.Rotate2;          // 1v1 point symmetry
        session.Symmetry.center = new Vector2(0.5f, 0.5f);     // map centre

        session.SetActiveTool("height.raise");
        session.StrokeEnded += () => Debug.Log("Stroke finished (one undo step)");
    }

    void OnDisable()
    {
        session?.Dispose();
        session = null;
    }

    public void PressAt(Vector3 worldPoint, bool lower)
    {
        session.InvertModifier = lower;      // like holding Shift
        session.BeginStroke(worldPoint);
    }

    // Call every frame while the button is held.
    public void DragTo(Vector3 worldPoint) => session.UpdateStroke(worldPoint, Time.deltaTime);

    public void Release() => session.EndStroke();

    public void Abort() => session.CancelStroke(); // reverts the running stroke

    public void UseLinearFalloff()
    {
        session.Brush.useFalloffCurve = true;
        session.Brush.falloffCurve = AnimationCurve.Linear(0f, 1f, 1f, 0f);
        // Curve keys are not detected automatically: rebuild the baked brush mask.
        session.Brush.MarkDirty();
    }
}
Events
| Event | Signature | Raised |
|---|---|---|
MapLoaded | Action<RTSTerrain> | After a new map was assigned (load, new map, resize, rebuild). Rebuild everything you derive from the map. |
MapUnloading | Action<RTSTerrain> | Before the current map is replaced or disposed. Drop references to it here. |
MapChanged | Action<RTSTerrain, MapChangeEventArgs> | Immediately when NotifyChanged / NotifyChangedAll is called, before meshes are rebuilt. MapChangeEventArgs has Layers, CellRect and IsFullRefresh. Raised often during strokes: keep handlers cheap. |
ChangesProcessed | Action<RTSTerrain, IReadOnlyList<DirtyRegion>> | After pending changes were processed: meshes, textures and pathing are up to date. Each DirtyRegion has layers and cellRect. |
PathingChanged | Action<RTSTerrain, RectInt> | After the pathing map was (partially) rebuilt; the rectangle is in pathing cells. Survives map reloads (unlike PathingMap.Changed). |
TilesetChanged | Action<RTSTerrain> | The tileset reference or its content changed. |
LibrariesChanged | Action<RTSTerrain> | A vegetation or decor library reference or its content changed. |
RTSTerrain.TerrainEnabled / TerrainDisabled | static Action<RTSTerrain> | A terrain was enabled or disabled (registry changes). |
HiddenTreesChanged | Action<RTSTerrain, IReadOnlyList<TreeInstanceData>, bool> | Trees were hidden or shown for gameplay (see Hidden trees). The pathing map is already up to date. |
RTSRuntimeEditorEvents.PlaytestChanged | static Action<bool> | The in-game editor started or stopped a play test. Spawn and clean up your gameplay objects here; the map is restored afterwards. |
RTSRuntimeEditorEvents.PlaytestRequested | static Func<RTSTerrain, MapData, bool> | A play test is about to start; return true to run it as your own match (see Play test hand-over). |
RTSRuntimeEditorEvents.PlaytestEndRequested | static Action | Game code called EndPlaytest(). The in-game editor ends its play test. |
RTSRuntimeEditorEvents.MapOpened | static Action<RTSTerrain> | The in-game editor opened a map. |
RTSToolRegistry.CategoriesChanged | static Action | A tool category was registered or removed. The editors rebuild their tabs. |
RTSEditSession: ActiveToolChanged, TerrainChanged, StrokeEnded, UndoRedoPerformed, SelectionChanged | Editing state of a session (editor or in-game editor). |
using System.Collections.Generic;
using RTSTerrainStudio;
using UnityEngine;

// Listens to all important terrain events. Put it on the RTS Terrain GameObject (or assign the terrain).
public class TerrainEventsExample : MonoBehaviour
{
    [SerializeField] RTSTerrain terrain;

    void OnEnable()
    {
        if (terrain == null) terrain = GetComponent<RTSTerrain>();
        if (terrain == null) return;
        terrain.MapLoaded += OnMapLoaded;               // new map assigned (load, new map, resize)
        terrain.MapChanged += OnMapChanged;             // immediately when NotifyChanged is called
        terrain.ChangesProcessed += OnChangesProcessed; // after meshes, textures and pathing are up to date
        terrain.PathingChanged += OnPathingChanged;     // after the pathing map was rebuilt
        terrain.TilesetChanged += OnTilesetChanged;     // tileset reference or content changed

        // The map may already be loaded before this component was enabled.
        if (terrain.Map != null) OnMapLoaded(terrain);
    }

    void OnDisable()
    {
        // Always unsubscribe: terrains survive scene changes in the editor and domain reloads.
        if (terrain == null) return;
        terrain.MapLoaded -= OnMapLoaded;
        terrain.MapChanged -= OnMapChanged;
        terrain.ChangesProcessed -= OnChangesProcessed;
        terrain.PathingChanged -= OnPathingChanged;
        terrain.TilesetChanged -= OnTilesetChanged;
    }

    void OnMapLoaded(RTSTerrain t)
    {
        // Rebuild everything your game derives from the map, e.g. spawn points from start locations.
        Debug.Log($"Map '{t.Map.Info.name}' loaded: {t.Map.Width} x {t.Map.Height} cells, " +
                  $"{t.Map.StartLocations.Count} start locations.");
    }

    void OnMapChanged(RTSTerrain t, MapChangeEventArgs e)
    {
        // Raised often during brush strokes: keep it cheap. Check which layers changed.
        if ((e.Layers & (MapLayers.Trees | MapLayers.Decor)) != 0)
            Debug.Log($"Objects changed in cells {e.CellRect} (full refresh: {e.IsFullRefresh})");
    }

    void OnChangesProcessed(RTSTerrain t, IReadOnlyList<DirtyRegion> regions)
    {
        // Meshes are rebuilt now, so GetHeight and Raycast return the new surface.
        foreach (DirtyRegion r in regions)
            if ((r.layers & MapLayers.Geometry) != 0)
                Debug.Log($"Ground changed in cells {r.cellRect}");
    }

    void OnPathingChanged(RTSTerrain t, RectInt pathingRect)
    {
        // The rectangle is in pathing cells (Map.PathingResolution per map cell). Re-plan paths here.
        Debug.Log($"Pathing changed in {pathingRect}");
    }

    void OnTilesetChanged(RTSTerrain t)
    {
        Debug.Log("Tileset is now " + (t.Tileset != null ? t.Tileset.name : "none"));
    }
}
Runtime save and load, custom file sections
Maps are .rtsmap files. The same format is used by the Unity editor (imported as RTSMapAsset), the in-game editor and the Mirror map streaming, so a map made by a player opens unchanged in Unity and vice versa.
| Member | Description |
|---|---|
terrain.SaveToFile(path) / terrain.LoadFromFile(path) | Save and load at runtime. Both set CurrentFilePath; saving clears HasUnsavedChanges. |
terrain.MapAsset, terrain.LoadFromAsset() | Use a map that was imported into the project (campaign maps, built-in skirmish maps). |
terrain.SetMap(MapData) | Show any MapData. The terrain takes ownership and disposes the previous map. |
RTSMapSerializer.Serialize(map) / Deserialize(bytes), Deserialize(bytes, options) | Maps as bytes (network, cloud saves, mod downloads). The caller owns a deserialized map. Pass RTSMapReadOptions.Strict for maps from other people (see Safety limits and read options). |
RTSMapSerializer.SaveToFile, LoadFromFile, Write(map, stream), Read(stream) | File and stream access without a terrain. LoadFromFile and Read also take an RTSMapReadOptions. |
RTSMapSerializer.TryReadHeaderFromFile(path, out header) | Reads only the small header (name, author, description, size, cell size, max players, tileset id, modification time and your custom header fields) for map browsers. |
RTSMapSerializer.TryValidate(bytes, options, out header, out error) | Checks whether a map would load with these options, without keeping it, for example before a lobby accepts a map from a player (see Checking maps before you use them). |
RTSMapSerializer.TryReadDimensions(bytes, out dimensions), TryReadDimensionsFromFile | Reads the size and the resolutions (RTSMapDimensions) from the first bytes of a map without loading it, for example to check its memory with RTSMapMemory or MapMemoryCheck first. |
RTSMapSerializer.DefaultMapsFolder, FileExtension | The Maps folder in StorageRoot (used by the in-game editor unless its Maps Folder is set) and ".rtsmap". |
RTSMapSerializer.StorageRoot | The folder for files kept between sessions: Application.persistentDataPath. In Web builds it is a folder named after the company and product name in the storage of the browser, because persistentDataPath changes with the page address there. |
RTSWebFileSystem.Flush(), DownloadFile(...), IsSupported | Web builds: write changed files to the browser storage so they survive a reload, and let the browser download a file. RTSMapSerializer.SaveToFile and terrain.SaveToFile flush for you; call Flush() after your own System.IO writes and deletes. The methods do nothing on other platforms. See Scripting API for Web builds. |
using System.Collections.Generic;
using System.IO;
using RTSTerrainStudio;
using UnityEngine;

// Saving, listing and loading maps at runtime (for example for your own map browser or a save game).
public static class MapFilesExample
{
    // The folder the in-game editor uses too: Maps in RTSMapSerializer.StorageRoot.
    static string Folder => RTSMapSerializer.DefaultMapsFolder;

    public static void Save(RTSTerrain terrain, string fileName)
    {
        // SaveToFile creates the folder when needed and remembers the path in terrain.CurrentFilePath.
        terrain.SaveToFile(Path.Combine(Folder, fileName + RTSMapSerializer.FileExtension));
    }

    public static void Load(RTSTerrain terrain, string fileName)
    {
        string path = Path.Combine(Folder, fileName + RTSMapSerializer.FileExtension);
        if (File.Exists(path)) terrain.LoadFromFile(path); // raises MapLoaded
    }

    // Lists all maps with their header (name, size, players) without loading the whole file.
    public static List<RTSMapHeader> ListMaps()
    {
        var result = new List<RTSMapHeader>();
        if (!Directory.Exists(Folder)) return result;
        foreach (string path in Directory.GetFiles(Folder, "*" + RTSMapSerializer.FileExtension))
            if (RTSMapSerializer.TryReadHeaderFromFile(path, out RTSMapHeader header))
                result.Add(header);
        return result;
    }

    // Maps can also travel as bytes (network, cloud save, mod download).
    public static byte[] ToBytes(RTSTerrain terrain) => RTSMapSerializer.Serialize(terrain.Map);

    public static void FromBytes(RTSTerrain terrain, byte[] bytes)
    {
        // The terrain takes ownership of the new MapData and disposes the previous map.
        terrain.SetMap(RTSMapSerializer.Deserialize(bytes));
    }

    // Loads a .rtsmap that was imported into the project (an RTSMapAsset), e.g. for a campaign.
    public static void LoadAsset(RTSTerrain terrain, RTSMapAsset asset)
    {
        // Assigning a different asset loads it immediately (when the terrain is enabled).
        // Assigning the same asset again does nothing, so reload it explicitly.
        if (terrain.MapAsset == asset) terrain.LoadFromAsset();
        else terrain.MapAsset = asset;
    }
}
File layout and custom sections
"RTSM"            4 bytes magic
int32             format version (RTSMapSerializer.CurrentVersion = 1)
int32 + bytes     uncompressed header (RTSMapHeader, custom header fields appended)
deflate stream    sections: [int32 tag][int32 length][payload] ...
                  (built-in sections first, then the map extensions, the CustomSectionWriter
                  sections and the kept sections of other games and tools)
                  int32 0  end marker
Readers skip unknown sections, so you can store your own data in a map file (triggers, starting resources, quest data) and other tools and games still read the map. The package keeps such sections and writes them back when it saves the map. The simplest way to add your own data is a map extension: a class derived from MapDataExtension that the map saves, copies, resizes and records for undo (see Your own data in the map). For raw sections, register the hooks RTSMapSerializer.CustomSectionWriter and CustomSectionReader (see Custom sections). Use tags that start with 'X' (RTSMapSerializer.MakeTag("XGMD")) so they never collide with built-in sections. Tag 0 is reserved: it marks the end of the sections.
Every system must use its own unique 'X…' tag. If two systems write the same tag with different payloads, one of them reads a payload it does not understand. For example, the StartingGold extension in Map extensions uses XGLD, so the example below uses XGMD.
using System.IO;
using RTSTerrainStudio;
using UnityEngine.Scripting;

// Stores your own game data (here: starting gold and a victory text) inside the .rtsmap file.
// Other tools and games keep the section unchanged when they save the map.
[Preserve]
public sealed class MapGameData : MapDataExtension
{
    static readonly int Tag = RTSMapSerializer.MakeTag("XGMD");
    // Version 2 of this class added the victory text at the end, so maps saved with version 1 still load.
    const int Version = 2;

    public int startingGold = 500;
    public string victoryText = "";

    public override int SectionTag => Tag;

    public override void Write(BinaryWriter writer)
    {
        writer.Write(Version);
        writer.Write(startingGold);
        writer.Write(victoryText ?? "");
    }

    public override void Read(BinaryReader reader, int payloadLength)
    {
        int version = reader.ReadInt32();
        startingGold = reader.ReadInt32();
        // ReadString checks the length of the text against the rest of the payload.
        if (version >= 2) victoryText = ReadString(reader);
    }
}

// Game code:   int gold = terrain.Map.GetExtension<MapGameData>().startingGold;
// Editor code: session.EditExtension<MapGameData>("Victory Text", data => data.victoryText = "Hold the temple!");MapData object, and Clone() and Resize copy it into the new map. Loading another map, and undo or redo of a step that changed it, replace the instance, so ask the map for it again instead of keeping it in a field.Building a game on RTS Terrain Studio
RTS Terrain Studio gives you the maps, both editors and the classic RTS systems. Your game adds what makes it a game: units, buildings, resources, factions, AI and rules. This chapter shows the extension points for this. They let your code store data in maps, change pathing and trees during a match, drive the fog of war, add tabs and commands to both editors and run your own match in the play test, all without changing the package source.
Every extension point is opt-in: nothing in this chapter changes how the package behaves until your code uses it. All types are in the RTSTerrainStudio namespace (assembly RTSTerrainStudio.Runtime), except the Unity editor window and Scene View types in RTSTerrainStudio.Editor and the define symbol helper in RTSTerrainStudio.Defines.
Which extension point do I need?
| I want to… | Use | See |
|---|---|---|
| Store game data in a map: units placed before the match, player slots, neutral camps, triggers, rules | A class derived from MapDataExtension | Map extensions |
| Show the game mode or the required game in a map browser or lobby without loading the maps | MapData.HeaderFields, RTSMapHeader.GetCustomField | Header fields |
| Check a map from another player before I store or pass it on | RTSMapSerializer.TryValidate | Checking maps |
| Block the cells under buildings, open and close gates, build bridges during a match | RTSTerrain.SetDynamicPathing | Runtime pathing layer |
| Make sure every machine of a lockstep game has the same pathing | PathingMap.ComputeChecksum | Checksums |
| Fell, burn or harvest trees during a match and bring them back for the next one | RTSTerrain.SetTreeHidden | Hidden trees |
| Show the visibility that my simulation or my server computes | RTSFogOfWarManager.ExternalVisibilitySource | External fog of war |
| Add my own tool tabs, panels, menu commands and window tabs to the editors | ToolCategoryAttribute, RegisterPanel, RegisterMenuItem, RegisterTab | Editor extensions |
| Run my real match when the player presses Play Test in the in-game editor | RTSRuntimeEditorEvents.PlaytestRequested | Play test hand-over |
| Keep the sample gameplay out of the way of my own gameplay | RTSGameplayFramework.Register | Gameplay framework |
| Compile code only when RTS Terrain Studio is in the project | RTS_TERRAIN_STUDIO and the version symbols | Define symbols |
Your own data in the map: map extensions
A finished RTS map carries more than terrain: the units that stand on it when the match starts, the player slots and teams, neutral camps, triggers and the starting resources. Store such data as a map extension, a class derived from MapDataExtension. The map holds it like its own layers, the .rtsmap file saves it as a section of its own, and both editors can change it with undo.
- Nothing to register. The map finds your class by its type the first time you ask for it.
- It travels with the map: saving, loading,
Clone(), resizing and undo all include it. - It survives other projects. A tool or game that does not know your class keeps your section unchanged and writes it back when it saves the map.
A first extension
The smallest useful extension stores one value. It writes a version number first, so a later version of your class can still read maps saved with this one:
using System.IO;
using RTSTerrainStudio;
using UnityEngine.Scripting;

/// <summary>The gold every player starts with on this map. Saved inside the .rtsmap file.</summary>
[Preserve]   // keeps the constructor in builds with managed code stripping
public sealed class StartingGold : MapDataExtension
{
    // Four characters starting with 'X', so the tag never collides with the sections of the package.
    static readonly int Tag = RTSMapSerializer.MakeTag("XGLD");
    const int Version = 1;

    public int amount = 500;

    public override int SectionTag => Tag;

    public override void Write(BinaryWriter writer)
    {
        writer.Write(Version);
        writer.Write(amount);
    }

    public override void Read(BinaryReader reader, int payloadLength)
    {
        int version = reader.ReadInt32();
        if (version >= 1) amount = reader.ReadInt32();
    }
}
Game code reads it with terrain.Map.GetExtension<StartingGold>().amount. A map that has no such section yet gets a new instance with the default values, which is then saved with the map.
Example: units placed on the map
This extension holds a list of units with positions. It checks the data it reads, because maps from other people can contain anything, and it moves its units when the map is resized:
using System.Collections.Generic;
using System.IO;
using RTSTerrainStudio;
using Unity.Mathematics;
using UnityEngine.Scripting;

/// <summary>Units that the map places before the match starts.</summary>
[Preserve]
public sealed class PlacedUnits : MapDataExtension
{
    static readonly int Tag = RTSMapSerializer.MakeTag("XUNT");
    const int Version = 1;

    public struct Unit
    {
        public int player;          // 0 = player 1, like StartLocation.player
        public string type;         // your own id of the unit type, for example "footman"
        public float3 position;     // map-local, like trees and start locations
        public float yaw;           // degrees, clockwise seen from above
    }

    public readonly List<Unit> units = new List<Unit>();

    public override int SectionTag => Tag;

    public override void Write(BinaryWriter writer)
    {
        writer.Write(Version);
        writer.Write(units.Count);
        foreach (Unit unit in units)
        {
            writer.Write(unit.player);
            writer.Write(unit.type ?? "");
            writer.Write(unit.position.x);
            writer.Write(unit.position.y);
            writer.Write(unit.position.z);
            writer.Write(unit.yaw);
        }
    }

    public override void Read(BinaryReader reader, int payloadLength)
    {
        int version = reader.ReadInt32();
        if (version < 1 || version > Version)
            throw new InvalidDataException("Unknown version " + version + " of the placed units.");

        // ReadCount checks the count against the rest of the payload: a unit takes at least
        // 21 bytes (player, an empty text and four floats), so a damaged file cannot ask for millions.
        int count = ReadCount(reader, 21);
        units.Clear();
        for (int i = 0; i < count; i++)
        {
            var unit = new Unit { player = reader.ReadInt32(), type = ReadString(reader) };
            unit.position = new float3(reader.ReadSingle(), reader.ReadSingle(), reader.ReadSingle());
            unit.yaw = reader.ReadSingle();
            units.Add(unit);
        }
    }

    // The map grew or shrank: move the units with the old content, drop the ones that end up outside.
    public override void OnResize(MapResizeInfo resize)
    {
        for (int i = units.Count - 1; i >= 0; i--)
        {
            Unit unit = units[i];
            if (resize.TryMoveLocal(ref unit.position)) units[i] = unit;
            else units.RemoveAt(i);
        }
    }
}
At match start, the game spawns what the map designer placed. TryGetExtension only looks and never adds an extension to the map:
MapData map = terrain.Map;
if (map.TryGetExtension(out PlacedUnits placed))
{
    foreach (PlacedUnits.Unit unit in placed.units)
    {
        Vector3 position = terrain.SnapToGround(terrain.LocalToWorld(unit.position));
        SpawnUnit(unit.type, unit.player, position, unit.yaw);   // your own spawn code
    }
}
Member (on MapData) | Description |
|---|---|
T GetExtension<T>() | The extension of type T. A loaded map reads it from its section the first time. A map without one gets a new instance with default values, which is saved with the map from then on. |
bool TryGetExtension<T>(out T extension) | The extension when the map has one (attached, or stored in a section of the loaded file). Never adds one. Use it for display and for game code that only reads. |
void SetExtension<T>(T extension) | Attaches an instance and replaces the extension of the same type and its stored section. The map owns the instance from then on. An instance that belongs to another map throws InvalidOperationException: attach extension.Clone() instead. |
bool RemoveExtension<T>() | Removes the extension and its stored section, so the data is not saved. False when the map had neither. |
IReadOnlyList<MapDataExtension> Extensions | The attached extensions in the order they are saved. |
void CopyCustomDataFrom(MapData source) | Replaces the extensions, the stored sections and the header fields with copies of those of another map. Clone() and Resize do this already. |
MapLayers.Extensions | The change flag of all extensions and stored sections, for NotifyChanged, MapChanged and undo. It changes nothing that RTS Terrain Studio draws or derives. MapLayers.All includes it. |
Rules for an extension class
- A public parameterless constructor, and keep it cheap. The package creates instances through reflection: to learn the tag of a type, and for undo, resizing and
Clone(). Mark the class with[UnityEngine.Scripting.Preserve]so builds with managed code stripping keep the constructor (see Code stripping and custom tools). - One tag per class.
SectionTagreturns the same tag for every instance. Build it withRTSMapSerializer.MakeTag("XUNT")from four printable ASCII characters, starting withX.RTSMapSerializer.IsReservedTag(tag)is true for 0 and the built-in tags, which an extension cannot use;RTSMapSerializer.GetTagName(tag)turns a tag back into its four characters. Two extension types with the same tag on one map throwInvalidOperationException. Readreads exactly whatWritewrites. Write a version number first, add new fields at the end of your payload and keep reading the layouts your game wrote before.- Check what you read. Use
ReadCount(reader, minElementBytes)for list counts andReadString(reader)for texts: they check that the data fits into the rest of the payload before memory is reserved. ThrowInvalidDataExceptionfor values that make no sense. Reading past the end of the payload is reported the same way. - Native memory: implement
IDisposable. The map disposes the extension together with itself and when the extension is removed or replaced (SetExtension,RemoveExtension, undo and redo). Clone()returns a deep copy that is not attached to any map. The default writes the instance withWriteand reads the copy withRead; override it for large data.
A damaged section is never hidden. When Read rejects a section, GetExtension and TryGetExtension throw InvalidDataException with a message that names the section and your class. The map keeps the section unchanged, so saving the map does not lose it.
When your code runs
Loading a map does not run your code. Every section that the package does not know is kept as raw bytes in MapData.UnknownSections. The first GetExtension or TryGetExtension call for your type reads its section with Read, attaches the extension and removes the section from that list. So a map loads quickly even with large extensions, and a map that contains data of a game you do not have keeps that data.
| Operation | Extensions and kept sections |
|---|---|
| Saving | The built-in sections are written first, then every attached extension (Write), then the sections of CustomSectionWriter, then the kept sections. A kept section is left out when the same save writes a section with its tag. |
| Loading | Every unknown section is kept. Nothing is read until your code asks for it. |
MapData.Clone() | Copies the extensions (with their Clone()), the kept sections and the header fields. |
Resize (MapData.Resize, RTSTerrain.ResizeMap, the Resize dialogs) | Copies everything and calls OnResize on every extension, also on extension types of your project whose sections were not read yet. Sections of games and tools that are not part of the project are copied unchanged, so positions inside them do not move. |
| Undo and redo | Extensions are recorded as the bytes their Write produces. Undo and redo replace the extensions that the step changed with new instances and notify MapLayers.Extensions; the terrain is not rebuilt. |
Dispose() | Disposes every extension that implements IDisposable. |
Do not keep an extension instance for long. Loading another map, and undo or redo of a step that changed the extension, replace it with a new instance. Call GetExtension or TryGetExtension when you need the data, and refresh your own objects when the terrain reports MapLayers.Extensions in MapChanged or loads a map (MapLoaded).
Resizing: MapResizeInfo
OnResize(MapResizeInfo resize) runs on the copy of the extension that belongs to the resized map. The default does nothing, which suits data without positions. MapResizeInfo describes the resize the same way the map moves its trees, decor and start locations:
| Member | Description |
|---|---|
OldWidth, OldHeight, NewWidth, NewHeight, CellSize | The size in cells before and after, and the world size of one cell (it does not change). |
int2 OffsetCells, float3 LocalOffset | How far the old content moves, in cells and in map-local metres. A positive offset moves it towards +X / +Z. |
RectInt OldCellBounds, RectInt NewCellBounds, float2 NewWorldSize | All cells before and after, and the world size of the resized map. |
bool TryMoveLocal(ref float3 localPosition) | Moves a map-local position by the offset. False when it lies outside the resized map; the map removes trees, decor and start locations in that case. |
bool TryMoveCell(ref int2 cell) | Moves a cell by the offset. False when it lies outside the resized map. |
Changing an extension with undo
Game code simply changes the fields of an extension; there is no undo during a match. In the editors, go through the edit session, so the change is one undo step and the map is marked as changed:
- From a button, a field or a menu command:
session.EditExtension<T>(name, edit)records the extension, callseditwith it (created with default values when the map has none) and notifiesMapLayers.Extensions, all as one undo step calledname. The overloadEditExtension<T>(name, cellRect, edit)notifies only a rectangle of cells, for example the area of a placed unit. A stroke in progress is ended first. - In a stroke of your own tool: call
ctx.Session.RecordExtension<T>()(orRecordExtension<T>(cellRect)) before you change the extension, andctx.MarkChanged(MapLayers.Extensions, cells)after it. The whole stroke is one undo step; undo also removes an extension the stroke added. See the Place Unit tool. - In
RunOperation: includeMapLayers.Extensionsin the recorded layers. It records every extension and every kept section of the map.
Use RTSEditorContext.Session in the Unity editor, where the step is part of Unity's undo, and RTSRuntimeEditor.Session in the in-game editor:
// One undo step named "Clear Placed Units"; Ctrl+Z brings the units back.
RTSEditorContext.Session.EditExtension<PlacedUnits>("Clear Placed Units", placed => placed.units.Clear());
Whole-map steps that record MapLayers.All write every extension once at their start and once at their end, so large extensions make such steps larger. None of the built-in operations record MapLayers.All.
Data of other games and tools
MapData.UnknownSections lists the sections of the loaded file that neither the package nor an extension has read, as RTSMapSection values: Tag, TagName (the four characters), Payload (read-only bytes, because copies of a map share them) and Length. They are written back unchanged when the map is saved, so a map can pass through your project without losing what another game stored in it. To drop such data on purpose, call map.RemoveUnknownSections(tag) or map.ClearUnknownSections().
The low-level section hooks
RTSMapSerializer.CustomSectionWriter and CustomSectionReader read and write raw sections yourself (see Custom sections). A map extension is the simpler choice for new code: it travels with clones, resizes and undo by itself. If you use the hooks, note how they work together with the kept sections:
- A section passed to
CustomSectionReaderis kept inUnknownSectionsas well, and written back on save unless your writer writes a section with the same tag in that save. - If your writer leaves a section out on purpose, for example because the data was deleted, the kept copy would come back. Call
map.RemoveUnknownSections(tag)in your reader, or always write the section.
Header fields for map browsers and lobbies
A lobby or a map browser shows many maps at once, so it reads only the small, uncompressed header of each file (name, author, size, players; see The .rtsmap file format). Your game can add short key/value texts to that header: the game mode, the game or mod a map needs, the recommended teams or the version of your rules.
// Editor or game code: store fields in the map. They are written with the next save.
MapData map = terrain.Map;
map.SetHeaderField("mygame.mode", "capture-the-flag");
map.SetHeaderField("mygame.teams", "2v2");
terrain.NotifyChanged(MapLayers.Info, map.CellBounds);   // marks the map as changed

// Map browser: read the fields from the header only, without loading the map.
if (RTSMapSerializer.TryReadHeaderFromFile(path, out RTSMapHeader header))
{
    string mode = header.GetCustomField("mygame.mode", "melee");
    Debug.Log($"{header.name}: {mode}, {header.maxPlayers} players");
}| Member | Description |
|---|---|
MapData.HeaderFields | The fields of the map, a List<MapProperty> (key, value). A loaded map holds every field of its file. |
GetHeaderField(key, fallback = null), SetHeaderField(key, value), RemoveHeaderField(key) | Read, add or change, and remove a field. Keys are compared case-sensitively; an empty key throws ArgumentException, and a null value is saved as an empty text. |
RTSMapHeader.customFields, RTSMapHeader.GetCustomField(key, fallback = null) | The fields as read by TryReadHeader and TryReadHeaderFromFile. Empty for maps without fields. Map assets keep the same header (RTSMapAsset.Header). |
RTSMapSerializer.CustomHeaderWriter | Action<MapData, Action<string, string>>: adds fields that are computed while a map is saved, for example the number of placed units. Call the given action with a key and a value for every field. A field with the key of a field of the map replaces it in the file; the map itself is not changed. Combine handlers with += and remove them with -=. |
- Prefix your keys with the name of your game (
mygame.mode), so they never collide with the fields of another tool. - Keep the fields short. Map browsers read the header of every file in a folder.
- Write your keys every time. Loading puts every field of the file into
HeaderFields, including the fields thatCustomHeaderWriterwrote. A key your hook leaves out in a later save therefore keeps its old value. Write a value such as"0"instead, or remove the field fromHeaderFields. Clone()andResizecopy the fields, and undo records them withMapLayers.Info.- The fields are stored behind the fixed header fields, inside the header length. A reader that knows only the fixed fields skips them, and a map without fields has exactly the plain header.
Checking maps before you use them
RTSMapSerializer.TryValidate(bytes, options, out header, out error) tells you whether Deserialize would accept a map with the same options, without keeping it: the map is read completely and released again. Use it with RTSMapReadOptions.Strict before you store or pass on a map from other people, for example in a lobby that accepts uploads. It takes as long, and for a moment as much memory, as loading the map.
// A lobby receives a map from a player before the match starts.
public static bool AcceptUploadedMap(byte[] bytes, out string reason)
{
    RTSMapReadOptions options = RTSMapReadOptions.Strict;   // a new object, safe to change
    options.MaxMapMemoryBytes = 256L * 1024 * 1024;

    if (!RTSMapSerializer.TryValidate(bytes, options, out RTSMapHeader header, out reason))
        return false;                                       // reason names the problem
    if (header.GetCustomField("mygame.mode") == null)
    {
        reason = "This map was not made for this game.";
        return false;
    }
    return true;
}
header holds the header of the file when it could be read, also when the rest is rejected. TryValidate never calls CustomSectionReader and does not read extension sections, because it runs no game code: check your own data when your game reads it.
Buildings, gates and bridges: the runtime pathing layer
During a match, buildings go up and come down, gates open and close and bridges are built. Every terrain has a runtime pathing layer for this kind of gameplay state. It works like the overrides you paint with the Pathing tools, but it belongs to the running game: it is never written into the map, never saved, and it never marks the map as changed.
using RTSTerrainStudio;
using UnityEngine;

/// <summary>Blocks the pathing cells under a building while it stands.</summary>
public class BuildingFootprint : MonoBehaviour
{
    [SerializeField] Vector2 sizeMetres = new Vector2(4f, 4f);

    RTSTerrain terrain;
    RectInt cells;
    bool blocking;

    // Call it once the building is placed, for example at a position from PathingQueries.SnapToBuildGrid.
    public bool Block()
    {
        if (blocking) return true;
        terrain = RTSTerrain.FindAt(transform.position);
        if (terrain == null) return false;
        if (!PathingQueries.IsAreaBuildable(terrain, transform.position, sizeMetres)) return false;
        if (!PathingQueries.TryGetAreaCells(terrain, transform.position, sizeMetres, out cells)) return false;

        // Ground units can neither walk nor build here. The pathing map is updated right away,
        // and units that listen to PathingChanged re-plan around the building.
        terrain.SetDynamicPathing(cells, PathingOverride.Unwalkable | PathingOverride.Unbuildable);
        blocking = true;
        return true;
    }

    void OnDestroy()
    {
        // The building is gone: the cells follow the map and its painted overrides again.
        if (blocking && terrain != null) terrain.ClearDynamicPathing(cells);
    }
}
Member (on RTSTerrain) | Description |
|---|---|
void SetDynamicPathing(RectInt pathingCells, PathingOverride effect) | Gives every pathing cell of the rectangle the same runtime override and replaces the runtime overrides they had. PathingOverride.None removes them. |
void SetDynamicPathing(RectInt pathingCells, NativeArray<byte> overrides) | One PathingOverride byte per cell, row by row (index = (z − yMin) × width + (x − xMin)). The values are copied. Throws ArgumentException when the array is not allocated or smaller than the rectangle. Use it when your game keeps its own occupancy grid. |
void ClearDynamicPathing(RectInt pathingCells), void ClearDynamicPathing() | Removes the runtime overrides of a rectangle, or all of them (which also releases the memory of the layer). |
PathingOverride GetDynamicPathing(int x, int z), bool HasDynamicPathing | The runtime override of a cell (None outside the map), and whether any cell has one. |
- The same rules as painted overrides:
Unwalkablealso removesBuildable, andForceWalkableandForceBuildableadd their flag. A bridge over deep water isForceWalkable. - It wins over the map. The layer is applied last, after the painted overrides (see the order of the rules).
- A call replaces the values of the cells. There is no counting: when two of your systems use the same cells, combine their values yourself and pass the result with the array overload.
- Immediate. Only the rectangle is derived again, before the call returns, and
PathingChangedis raised once. The pathfinder, the clearance map,PathingQueries, pathing overlays and the A* and NavMesh integrations follow it. A call that changes nothing raises no event. - Lifetime. The layer stays when the pathing map is rebuilt after edits, settings changes or
RebuildAll, and is cleared when another map is shown (load, new map, resize). Calls do nothing while the terrain has no pathing map. - Pathing cells. Rectangles are in pathing cells (
Map.PathingResolutionper map cell); parts outside the map are ignored.PathingQueries.TryGetAreaCellsturns a world footprint into such a rectangle.
Painting into MapData.PathingOverrides changes the map itself: the change is saved and can be undone. That is right for map design and is what the Pathing tools do. For buildings and other state of one match, use the runtime layer. The sample building placement demo writes into the map overrides and restores them when the building is removed.
Showing planned buildings on the overlay
PathingOverlayController.ExtraBlocked draws cells of your own grid as blocked, for example the planned buildings of a build mode, without changing the terrain's pathing. It is a mask with one byte per pathing cell (index z * Width + x); cells with a value other than 0 look as if Walkable and Buildable were removed. The Flyability and Water views do not change, and pathfinding and queries do not see the mask.
PathingMap pathing = terrain.Pathing;
var mask = new NativeArray<byte>(pathing.Width * pathing.Height, Allocator.Persistent);
overlay.ExtraBlocked = mask;                  // redraws the whole texture

mask[pathing.Index(x, z)] = 1;                // a planned building
overlay.Refresh(new RectInt(x, z, 1, 1));     // redraws only the changed cells

overlay.ExtraBlocked = default;               // always before the mask is disposed
mask.Dispose();
The controller neither copies nor disposes the mask. Allocate it with Allocator.Persistent, because a job reads it, and complete your own jobs that write it before the pathing changes or you call Refresh. A mask whose length does not match the pathing map (another map is shown) is ignored. For one-off textures, PathingOverlay.CreateOrUpdate and PathingOverlay.UpdateRegion take the same mask as an extra argument.
Deterministic pathing and checksums
A lockstep game simulates the match on every machine, so every machine must agree on where units can walk. The pathing map has a fixed byte layout and a checksum for this.
The byte layout
Every byte of PathingMap.Flags holds the PathingFlags of one pathing cell (index z * Width + x). The bytes of MapData.PathingOverrides and of the runtime pathing layer hold PathingOverride values. The bit values are fixed and part of the public API, so you can copy the bytes into your own grids or send them over the network:
PathingFlags | Value | PathingOverride | Value |
|---|---|---|---|
Walkable | 1 | Unwalkable | 1 |
Buildable | 2 | Unbuildable | 2 |
Flyable | 4 | Unflyable | 4 |
ShallowWater | 8 | ForceWalkable | 8 |
DeepWater | 16 | ForceBuildable | 16 |
Cliff | 32 | ||
Blocked | 64 | ||
Steep | 128 |
Checksums
terrain.Pathing.ComputeChecksum()returns the CRC-32 ofFlags, the standard IEEE variant used by zip, PNG andSystem.IO.Hashing.Crc32. Only the bytes are hashed, so compareWidthandHeightseparately.PathingMap.ComputeChecksum(NativeArray<byte> bytes)is the same function for any byte array, for exampleFlagsWithoutTreesor flags received from another machine. Arrays of every allocator work; complete jobs that write the array first.- Both return 0 for an empty, disposed or unallocated array. The checksum runs as a Burst job and is cheap even for large maps.
What is deterministic
- The same inputs always give the same bytes with the same compiled code. The inputs are the map, the pathing settings, the tileset, the libraries, the hidden trees and the runtime pathing layer.
- The incremental rebuilds after edits produce exactly the bytes of a full rebuild.
- Painted overrides and the runtime pathing layer are applied per cell with integer math.
Identical bytes on different machines are not guaranteed. Slopes, water depth, cliff margins, the ground layer lookup and the tree and decor footprints use single precision floating point math. It can round differently between Burst compiled and managed code (for example with Burst compilation turned off, or in the Unity editor while Burst still compiles), between CPU architectures and instruction sets (x64, ARM64, fused multiply-add) and between the math libraries of the platforms. Only cells within a rounding error of a threshold can differ, so differences are rare, but a lockstep game must not rely on their absence.
What to do in a lockstep game: compare the checksums of all machines when the map is loaded (and after every pathing change your simulation makes), and let the host send its flags to machines with a different result. Run your simulation on a copy of the bytes, so every machine uses exactly the same grid:
// Every machine, after the map is loaded and before the first tick:
PathingMap pathing = terrain.Pathing;
uint checksum = pathing.ComputeChecksum();
ReportToHost(checksum, pathing.Width, pathing.Height);     // your network code

// Host: a machine reported another checksum, so it gets the host's bytes.
byte[] hostFlags = pathing.Flags.ToArray();
SendFlags(peer, hostFlags); // your network codeFog of war from your own simulation
In a deterministic lockstep simulation, on an authoritative server or in a replay, your game already knows which team sees which cell. Give that visibility to the fog of war manager as an external visibility source. The manager then skips its own revealer pass and only shows the data and answers queries: the fog texture, fading, blur, the renderer feature, the shader fallback, the minimap composite, the hideables and every visibility query work as usual.
using RTSTerrainStudio;
using UnityEngine;

/// <summary>Shows the visibility that the game simulation computes, instead of the revealers.</summary>
public class SimulationFog : MonoBehaviour
{
    FogOfWarVisibilityBuffer buffer;

    void OnEnable()
    {
        RTSTerrain terrain = RTSTerrain.Main;
        RTSFogOfWarManager fog = RTSFogOfWarManager.Active;
        if (terrain == null || terrain.Map == null || fog == null) return;

        // One cell per map cell. The manager maps it onto its own, finer fog grid.
        buffer = new FogOfWarVisibilityBuffer(terrain.Map.Width, terrain.Map.Height);
        fog.ExternalVisibilitySource = buffer;
    }

    void OnDisable()
    {
        // Remove the source before its memory is released.
        RTSFogOfWarManager fog = RTSFogOfWarManager.Active;
        if (fog != null && fog.ExternalVisibilitySource == buffer) fog.ExternalVisibilitySource = null;
        buffer?.Dispose();
        buffer = null;
    }

    // Call it after every simulation tick: per cell, the teams that see it (bit t = team t),
    // exactly Width * Height values, row by row.
    public void Publish(uint[] teamsPerCell)
    {
        if (buffer == null) return;
        buffer.VisibleMask.CopyFrom(teamsPerCell);
        buffer.MarkChanged();                 // shown in the manager's next LateUpdate
    }

    // Or cell by cell. NativeArray is a struct: write through a local copy.
    public void SetCell(int x, int z, uint teams)
    {
        var visible = buffer.VisibleMask;
        visible[buffer.IndexOf(x, z)] = teams;
    }
}
The data
- The grid covers the whole map, from the map origin corner (map-local X/Z = 0) to the opposite corner, row by row (index
z * Width + x). Every value is a team mask: bit t = team t. - Any resolution works. Each fog cell takes the value of the source cell that contains its centre, and grids of the same size are copied 1:1. So the simulation does not depend on the fog resolution, which may be lower on huge maps.
- The
ExploredMaskis optional. Without it, the manager remembers explored cells itself, as it does for revealers.
FogOfWarVisibilityBuffer owns its masks. A simulation that already has its own native arrays implements IFogOfWarVisibilitySource instead and needs no copy:
| Member | Description |
|---|---|
IFogOfWarVisibilitySource | |
int Width, int Height | Cells along the map's X and Z axes. 0 means no data yet: the fog keeps its current state. |
int Version | Changes whenever the masks change; the manager copies the masks only when the value differs from the one it copied last. |
NativeArray<uint> VisibleMask | Per cell, the teams that see it now. At least Width × Height entries; a default (not created) array means no data yet. |
NativeArray<uint> ExploredMask | Per cell, the teams that have explored it, same layout. A default array lets the manager remember exploration itself. |
FogOfWarVisibilityBuffer (implements the interface and IDisposable) | |
FogOfWarVisibilityBuffer(int width, int height, bool withExploredMask = false) | Allocates cleared masks. Throws ArgumentOutOfRangeException for sizes of 0 or less. |
IndexOf(x, z), MarkChanged(), Clear() | Index of a cell; tell the manager that the masks changed; clear both masks (and mark them changed). |
Resize(width, height) | Reallocates cleared masks of a new size and keeps the choice of an explored mask, also after Dispose. |
HasExploredMask, IsCreated, Dispose() | Whether the buffer provides exploration and still owns its memory. Dispose may be called twice; afterwards the buffer reports no data. |
RTSFogOfWarManager | |
IFogOfWarVisibilitySource ExternalVisibilitySource | The source, or null to compute the visibility from the revealers (the default). |
bool HasExternalVisibilitySource, bool IsExternalVisibilityPending | Whether a source is used, and whether its data has not been applied yet (no data, or a version or grid that is not shown yet). |
How the manager uses the source
| Setting or feature | While a source is set |
|---|---|
Revealers, RevealArea, Line Of Sight, Update Interval | Not used. ActiveRevealerCount is 0. RevealArea calls are ignored; reveals made before the source was set keep their timers and return when it is removed. |
| Local Team, Reveal All, the look settings, hideables, queries, minimap | Work as usual on the source's data. IsTeamComputed is true for every team, so Compute All Teams is not needed. |
Vision sharing (SetAlliance, SetSharedVision, SetSharedVisionMask) | Applied on top of both masks: a team that receives another team's vision also receives its exploration from the source, including areas explored before the alliance. Sharing still decides which hideables are friendly, so set alliances on the manager as well. If the source already includes allied vision, the same alliances on the manager change nothing. |
Exploration with an ExploredMask | The source's exploration replaces the manager's on every update. Start Explored, ExploreAll and ExploreAllTeams are added on top. ResetExploration clears only these additions, so reset the exploration in your source as well. |
Exploration without an ExploredMask | The manager remembers explored cells, and ResetExploration works as with revealers. Visible cells always count as explored. |
GetCellLevel, IsCellBlocked | The cliff and blocker rasters stay up to date after map edits. |
- When the data is shown. In every
LateUpdatethe manager comparesVersionwith the version it applied last and copies the masks when it changed. It also applies them again afterRequestUpdate,ForceUpdate, setting changes and every new fog grid (map load, resize, resolution change). The manager'sVersionand itsUpdatedevent advance once per applied source version. - Jobs and memory. The masks are read by a job that completes at once, so they must not use
Allocator.Temp, and your jobs that write them must be completed before the manager'sLateUpdate. - Edit mode preview.
LateUpdateruns only when the editor updates the scene; callForceUpdate()after changing the data from editor code. - Lifetime. The source is not saved with the scene: assign it from code, and set the property to null before the source's data is released. A destroyed Unity object used as a source counts as null. Until the source has data, the fog keeps its previous state. Masks shorter than
Width × Heightlog one warning per assigned source and keep the previous state as well. Setting null switches back to the revealers on the next update and keeps the explored areas.
The manager's inspector shows where the visibility comes from in the Visibility statistic (Revealers, External or External (waiting)), and the Revealers statistic says Not used while a source is set. A message names the source; when it is a Unity object, Select Source selects it.
Your own tabs, panels and menu commands in the editors
Game-specific editing, such as placing units, setting up players or writing triggers, belongs next to the terrain tools. Both editors offer the same kinds of extension points:
| What | RTS Terrain Studio window (Unity editor) | In-game editor |
|---|---|---|
| A tab with your tools | A tool category: [ToolCategory] on your tool, an overridden CategoryId, or RTSToolRegistry.RegisterCategory | |
| Your own controls | RTSTerrainStudioWindow.RegisterTab | RTSRuntimeEditor.RegisterPanel |
| Menu commands | Unity's [MenuItem] | RTSRuntimeEditor.RegisterMenuItem |
| Selecting a category from code or a key | RTSSceneViewShortcuts.SelectCategory(id), RTSTerrainStudioWindow.Open(id) | RTSRuntimeEditor.SelectCategory(id) |
Tool categories
Every tool belongs to a category, which is a tab of the window, a button of the Scene View overlay and a button of the in-game editor's toolbar. There are three ways to choose it:
- A built-in tab: override
Category, for exampleToolCategory.Height. - A category of your own: mark the class with
[ToolCategory("mygame.units", "Units", "category.mygame.units", 1000, Description = "…")]. Only the id is required; the name, the icon name and the order are optional. - In code: override
CategoryId, and describe the category withRTSToolRegistry.RegisterCategory.
This tool places the units of the PlacedUnits extension in a Units tab of its own, with undo in both editors:
using RTSTerrainStudio;
using UnityEngine;
using UnityEngine.Scripting;

// A tool in a category of its own: a "Units" tab in the RTS Terrain Studio window and in the in-game editor.
[Preserve]
[ToolCategory("mygame.units", "Units", Description = "Units that the map places before the match starts.")]
public sealed class PlaceUnitTool : RTSTool
{
    public override string Id => "mygame.units.place";
    public override string DisplayName => "Place Unit";
    public override string Hint => "Click: place a unit";
    public override ToolInputMode InputMode => ToolInputMode.Click;
    public override bool UsesBrush => false;
    public override MapLayers ModifiedLayers => MapLayers.Extensions;

    [ToolSetting("Player", Kind = ToolSettingKind.Player, Order = 0, Tooltip = "Owner of the unit.")]
    public int player = 0;

    [ToolSetting("Unit Type", Order = 1, Tooltip = "Your own id of the unit type.")]
    public string unitType = "footman";

    public override void ApplyDab(RTSToolContext ctx, in BrushDab dab)
    {
        if (dab.symmetry.index != 0) return;    // one unit per click, also with symmetry on

        RectInt cells = BrushUtility.GetCellRect(ctx.Map, dab);

        // Record BEFORE the change: the click becomes one undo step, and undo removes the unit again.
        ctx.Session.RecordExtension<PlacedUnits>(cells);

        ctx.Map.GetExtension<PlacedUnits>().units.Add(new PlacedUnits.Unit
        {
            player = player,
            type = unitType,
            position = dab.localPosition
        });

        // Marks the map as changed. Your own previews refresh on MapLayers.Extensions.
        ctx.MarkChanged(MapLayers.Extensions, cells);
    }
}- Ids are compared ignoring case. The built-in ids are the names of the
ToolCategoryvalues:Height,Cliffs,Paint,Vegetation,Decor,Water,PathingandMarkers. A[ToolCategory]with a built-in id puts the tool into that built-in tab. - Order: the built-in categories use 0, 100, … 700 (
RTSToolRegistry.BuiltInCategoryOrderStep), from Height to Markers, and custom categories default to 1000 (DefaultCustomCategoryOrder), after them. An order of 350 places a tab between Vegetation and Decor. - Name and icon:
RegisterCategorytakes precedence over[ToolCategory]; when several attributes describe the same id, the first value given for each field wins. A category that nothing describes takes its name and icon from the id:mygame.unitPlacementbecomes Unit Placement with the iconcategory.mygame.unitplacement. Draw your own icon withRTSIcons.RegisterIcon("category.mygame.units", painter); unknown icon names show a generic icon. - When a tab appears: the eight built-in tabs always. A custom category appears as soon as the session has a tool in it, or when it has content of its own (an in-game editor panel or a window tab). Registering a category alone adds no tab. The Scene View overlay shows the categories that have tools, and its buttons wrap when there are more than eight. All three UIs rebuild when
RTSToolRegistry.CategoriesChangedis raised. - Keys: 1–8 select the built-in categories. Custom categories have no number key; bind one yourself (see below).
- A tool that names no category at all (
CategoryreturnsToolCategory.Customand there is no id) appears in a shared Custom tab (RTSToolRegistry.CustomCategoryId).
using RTSTerrainStudio;
using UnityEngine;

// Describes a category in code, for players and for the Unity editor.
static class MyGameCategories
{
#if UNITY_EDITOR
    [UnityEditor.InitializeOnLoadMethod]
#endif
    [RuntimeInitializeOnLoadMethod(RuntimeInitializeLoadType.BeforeSceneLoad)]
    static void Register() =>
        // Registering the same id again replaces the description, so both calls are fine.
        RTSToolRegistry.RegisterCategory("mygame.rules", "Game Rules", null, 1100,
                                         "Starting resources and victory conditions.");
}
Member (RTSToolRegistry) | Description |
|---|---|
RegisterCategory(id, displayName, iconName = null, order = 1000, description = null), UnregisterCategory(id) | Describe a custom category in code, or remove the description. Registrations last until the domain is reloaded; call them from the main thread. |
IReadOnlyList<ToolCategoryInfo> Categories, GetCategory(id), GetCategory(ToolCategory), TryGetCategory(id, out info) | The described categories sorted by order. ToolCategoryInfo has Id, DisplayName, IconName, Order, Description, BuiltInCategory, IsBuiltIn and IsDeclared. GetCategory never returns null. |
GetCategoryId(ToolCategory), GetCategoryId(RTSTool), TryGetBuiltInCategory(id, out category), CategoryIdsEqual(a, b), IsInCategory(tool, id) | Helpers for ids. |
session.GetTools(categoryId), GetCategories(tools, extraCategoryIds) | The tools of a category by id, and the categories a UI shows as tabs. |
event Action CategoriesChanged | Raised after RegisterCategory or UnregisterCategory. |
ToolCategory has the value Custom (100) for tools of custom categories. Code that enumerates Enum.GetValues(typeof(ToolCategory)) or uses (int)tool.Category as an array index sees it as well; list tabs with RTSToolRegistry.GetCategories instead. RTSEditSession.GetTools(ToolCategory) filters by Category, and GetTools(string) by id. For a built-in tab, override Category rather than CategoryId, so every list agrees.
Panels in the in-game editor
RTSRuntimeEditor.RegisterPanel(categoryId, createPanel) adds UI Toolkit content of your own to a category. A category without tools gets a toolbar button of its own: selecting it shows only your panel and leaves no tool active, so clicks on the map do not edit it. In a category with tools, the panel is a collapsible section below the settings of the active tool. RegisterMenuItem adds commands to the top bar:
using RTSTerrainStudio;
using UnityEngine;
using UnityEngine.UIElements;

/// <summary>Adds a "Game Rules" panel and two menu commands to the in-game editor.</summary>
public class GameRulesEditorExtension : MonoBehaviour
{
    [SerializeField] RTSRuntimeEditor editor;

    IntegerField goldField;

    void OnEnable()
    {
        // The category has no tools, so it gets a toolbar button that shows only this panel.
        editor.RegisterPanel("mygame.rules", CreatePanel);
        editor.RegisterMenuItem("File/Export Unit List...", ExportUnitList,
                                enabled: () => editor.Terrain != null && editor.Terrain.Map != null);
        editor.RegisterMenuItem("Units/Debug/Remove All Placed Units", RemoveAllPlacedUnits,
                                tooltip: "Removes every unit the map places before the match.");
    }

    void OnDisable()
    {
        editor.UnregisterPanel("mygame.rules");
        editor.UnregisterMenuItem("File/Export Unit List...");
        editor.UnregisterMenuItem("Units/Debug/Remove All Placed Units");
    }

    void Start()
    {
        // Keep the field in step with the map: after opening a map and after undo or redo.
        editor.MapLoaded += HandleMapLoaded;
        editor.Session.UndoRedoPerformed += Refresh;
    }

    void OnDestroy()
    {
        if (editor == null) return;
        editor.MapLoaded -= HandleMapLoaded;
        if (editor.Session != null) editor.Session.UndoRedoPerformed -= Refresh;
    }

    // Called the first time the category is shown. The element is kept and shown again later.
    VisualElement CreatePanel()
    {
        var root = new VisualElement();
        goldField = new IntegerField("Starting Gold") { isDelayed = true };   // applies on Enter or when focus leaves
        goldField.AddToClassList("rts-field");                               // the editor's look
        goldField.RegisterValueChangedCallback(e =>
            editor.Session.EditExtension<StartingGold>("Starting Gold", gold => gold.amount = e.newValue));
        root.Add(goldField);
        Refresh();
        return root;
    }

    void HandleMapLoaded(string path) => Refresh();

    void Refresh()
    {
        if (goldField == null) return;
        MapData map = editor.Terrain != null ? editor.Terrain.Map : null;
        // TryGetExtension only looks: GetExtension would add the extension to every map you open.
        int amount = map != null && map.TryGetExtension(out StartingGold gold) ? gold.amount : 500;
        goldField.SetValueWithoutNotify(amount);
    }

    void ExportUnitList() { /* your own code */ }

    void RemoveAllPlacedUnits() =>
        editor.Session.EditExtension<PlacedUnits>("Remove Placed Units", placed => placed.units.Clear());
}- Panels. Name, icon and order of a custom category come from
RegisterCategoryor a[ToolCategory], otherwise from the id. The factory runs the first time the category is shown; the element is kept until the editor's UI is rebuilt (the component is disabled and enabled again) or the panel is registered again. A factory that throws is logged, and the panel shows a warning. Registering works at any time, even before the editor'sAwake. The classesrts-field,rts-button,rts-button-baseandrts-helpgive your controls the editor's look. - Menu paths. The first part names the menu:
File/…andMap/…add commands below the built-in ones (in File before Quit, in Map before the list of terrains that scenes with several terrains show). Any other name adds a menu button after Map, with the icon of a category of the same id if there is one. Further parts become group headers, because the menus have no submenus:Units/Debug/Remove All Placed Unitsis listed under the header Debug. Commands without a group come first, then every group under its header, each in registration order. Registering a path again replaces its command. - Menu callbacks.
enabledis asked every time the menu opens; when it returns false or throws, the command is dimmed. An exception thrown by the action is logged and shown as an error notification.
Member (RTSRuntimeEditor) | Description |
|---|---|
RegisterPanel(categoryId, createPanel), UnregisterPanel(categoryId), HasPanel(categoryId) | Add, remove and check a panel. |
RegisterMenuItem(menuPath, action, enabled = null, tooltip = null), UnregisterMenuItem(menuPath), FileMenuName, MapMenuName | Add and remove menu commands; the names of the built-in menus. |
bool SelectCategory(string categoryId) | Like a toolbar button: the tool last used in the category, the next tool when one of its tools is already active, or its panel. False when the category has neither tools nor a panel. |
string ActiveCategoryId, List<ToolCategoryInfo> GetCategories(), RTSTool GetRememberedTool(string categoryId) | The category shown in the toolbar, all toolbar categories in display order, and the tool last used in a category. |
Tabs in the RTS Terrain Studio window
RTSTerrainStudioWindow.RegisterTab(categoryId, createContent) adds content of your own to the window. A category with tools shows it as a card below the tool settings; this also works for the built-in tabs. A category without tools gets a tab that shows only your content and, like the Map tab, does not change the active tool. Register after every domain reload, from an [InitializeOnLoad] class:
// Put this file into a folder named "Editor".
using RTSTerrainStudio;
using RTSTerrainStudio.Editor;
using UnityEditor;
using UnityEngine.UIElements;

/// <summary>Adds a "Game Rules" tab to the RTS Terrain Studio window.</summary>
[InitializeOnLoad]
static class GameRulesWindowTab
{
    static GameRulesWindowTab()
    {
        RTSTerrainStudioWindow.RegisterTab("mygame.rules", CreateContent);
    }

    // Called whenever the page is built: when the tab opens, after a map was loaded
    // and when the edited terrain changes.
    static VisualElement CreateContent()
    {
        var root = new VisualElement();
        RTSTerrain terrain = RTSEditorContext.Terrain;
        if (terrain == null || terrain.Map == null)
        {
            root.Add(new Label("Open a map to edit its rules."));
            return root;
        }

        int amount = terrain.Map.TryGetExtension(out StartingGold gold) ? gold.amount : 500;
        var field = new IntegerField("Starting Gold") { value = amount, isDelayed = true };
        // One undo step per change: Ctrl+Z works as for every terrain edit.
        field.RegisterValueChangedCallback(e =>
            RTSEditorContext.Session.EditExtension<StartingGold>("Starting Gold", g => g.amount = e.newValue));
        root.Add(field);
        return root;
    }
}- The overload
RegisterTab(categoryId, displayName, icon, createContent)takes a name and aTexture(white on transparent, so the window can tint it). Built-in tabs keep their own name and icon; the name and icon then title your card. - The content is created again when the page is built and stays while the active tool changes. To follow undo and redo as well, listen to
RTSEditorContext.Session.UndoRedoPerformedor to the terrain'sMapChangedwithMapLayers.Extensions. - Return a UI Toolkit element (null shows nothing). Wrap IMGUI code in an
IMGUIContainer. Exceptions are logged and shown on the page. - The tab is placed by the order of its category. The window remembers a custom tab by its id, and its ? button opens Writing a custom tool.
- More members:
UnregisterTab(categoryId),HasRegisteredTab(categoryId),RTSTerrainStudioWindow.Open(categoryId),SelectTab(categoryId)andSelectedCategoryId(null while Map or Settings is shown).
Shortcuts for your categories
Bind a key of the Scene View to a custom category with Unity's Shortcut Manager. The shortcut is active in the same context as the package's own shortcuts, and users can rebind it in :
// Put this file into a folder named "Editor".
using RTSTerrainStudio.Editor;
using UnityEditor.ShortcutManagement;
using UnityEngine;

static class MyGameShortcuts
{
    [Shortcut("My Game/Unit Tools", typeof(RTSSceneViewShortcuts.EditingContext), KeyCode.U)]
    static void UnitTools() => RTSSceneViewShortcuts.SelectCategory("mygame.units");
}
Like the number keys, pressing the key again cycles through the tools of the category. In the in-game editor, call editor.SelectCategory("mygame.units") from your own key handling or button.
Running your own match in the play test
The default play test raises PlaytestChanged(true), and the sample game spawns a few units. A complete game wants to run its real match instead: player slots, factions, AI and the units placed on the map. Take the play test over with RTSRuntimeEditorEvents.PlaytestRequested:
- The player presses Play Test. The editor ends the stroke, takes its snapshot of the map and hides its tools.
- The editor asks the
PlaytestRequestedhandlers in the order they subscribed, with the terrain and the map. The first handler that returnstrueowns the play test, and later handlers are not asked. A handler that throws counts asfalse(the exception is logged). If no handler returnstrue, the default play test runs. IsPlaytestTakenOveris set, thenPlaytestChanged(true)is raised. Your match starts.- Your game calls
RTSRuntimeEditorEvents.EndPlaytest(), for example from its own "Back to Editor" button or when the match is decided. Back to Editor, Esc and F5 of the editor end it as well. PlaytestChanged(false)is raised while the play test map is still loaded, so your game cleans up. Then the editor restores the map.
using RTSTerrainStudio;
using UnityEngine;

/// <summary>Runs this game's own match when the in-game editor play-tests a map with two or more players.</summary>
public class MatchPlaytest : MonoBehaviour
{
    [Tooltip("Your match systems: camera, HUD, AI, unit spawner ... Keep them disabled in the scene.")]
    [SerializeField] Behaviour[] matchSystems = new Behaviour[0];

    RTSTerrain matchTerrain;   // set while our match runs

    void OnEnable()
    {
        RTSRuntimeEditorEvents.PlaytestRequested += HandlePlaytestRequested;
        RTSRuntimeEditorEvents.PlaytestChanged += HandlePlaytestChanged;
    }

    void OnDisable()
    {
        RTSRuntimeEditorEvents.PlaytestRequested -= HandlePlaytestRequested;
        RTSRuntimeEditorEvents.PlaytestChanged -= HandlePlaytestChanged;
    }

    // True: this game runs the play test. False: the default play test runs instead.
    bool HandlePlaytestRequested(RTSTerrain terrain, MapData map)
    {
        if (map.StartLocations.Count < 2) return false;
        matchTerrain = terrain;
        return true;
    }

    void HandlePlaytestChanged(bool playtesting)
    {
        if (matchTerrain == null) return;     // a play test that we did not take over
        if (playtesting)
        {
            SetSystemsEnabled(true);          // start the match: spawn units, start the AI ...
            return;
        }

        // The play test ends (EndPlaytest, Back to Editor, Esc or F5). The map is still loaded.
        SetSystemsEnabled(false);
        matchTerrain.ShowAllTrees();          // state of the terrain, not of the map
        matchTerrain.ClearDynamicPathing();
        matchTerrain = null;
    }

    // Hook this up to your own "Back to Editor" button.
    public void BackToEditor() => RTSRuntimeEditorEvents.EndPlaytest();

    void SetSystemsEnabled(bool enabled)
    {
        foreach (var system in matchSystems)
            if (system != null) system.enabled = enabled;
    }
}- Subscribe at runtime. The events are cleared when Play Mode starts, also without a domain reload. Subscribe in
OnEnableof a component, or in a[RuntimeInitializeOnLoadMethod(RuntimeInitializeLoadType.BeforeSceneLoad)]method. - Remember that your match runs.
IsPlaytestTakenOveris already false whenPlaytestChanged(false)is raised. - While the handlers are asked,
IsPlaytestingis still false,EndPlaytesthas no effect and a nestedBeginPlaytestreturns false. A handler that cannot run the play test returns false. - The map. Your game may change the map during the match or load another one, but must not dispose it. The editor restores the map when the play test ends and keeps its undo history, unless your game loaded, replaced or resized the map. Map extensions, header fields and the kept sections of other tools are restored as well, so match data your game writes into them during the test is gone afterwards.
- State outside the map. The runtime pathing layer, hidden trees and an external fog of war source belong to the terrain and the fog manager, not to the map. Reset them in
PlaytestChanged(false), as the example does. Read map extensions at the start of the match and keep the changing match state in your own objects. - The editor's controls. Playtest Controls When Taken Over on the In-Game Editor (
RTSRuntimeEditor.PlaytestControlsWhenTakenOver, on by default) keeps the play test bar, Esc and F5 during a play test that your game took over. Turn it off when your game has its own way back; it must then callEndPlaytest(). Play tests that no handler took over always keep the controls. - The sample game (
RTSDemoGame) stays idle during a play test that a handler took over.
Member (RTSRuntimeEditorEvents) | Description |
|---|---|
static event Func<RTSTerrain, MapData, bool> PlaytestRequested | Asks game code whether it takes over a play test that is about to start. |
static bool IsPlaytestTakenOver | True while a play test runs that a handler took over. Set before PlaytestChanged(true). |
static void EndPlaytest() | Ends the running play test and returns to the editor, which restores the map. Raises PlaytestEndRequested; when no listener ends the play test (for example in a scene without an in-game editor), it ends it itself. IsPlaytesting is false when it returns. |
static event Action PlaytestEndRequested | Raised by EndPlaytest. The in-game editor listens to it during its play test. |
static bool BeginPlaytest(RTSTerrain terrain, MapData map) | Asks the handlers, then raises PlaytestChanged(true); returns true when a handler took over. The in-game editor calls it. A custom editor of your own calls it instead of SetPlaytesting(true), listens to PlaytestEndRequested and ends with SetPlaytesting(false). |
When a PlaytestChanged listener ends or restarts the play test from its handler, the listeners that were not called yet receive only the newer state.
Letting your gameplay replace the samples: RTSGameplayFramework
The package ships sample gameplay (RTSDemoGame and the sample scripts) so every map is playable right away. When your project, or a framework you use, brings its own units, buildings, camera and HUD, register it once. The samples then step aside and cannot run next to your gameplay by accident:
using RTSTerrainStudio;
using UnityEngine;

static class MyGameRegistration
{
    // Players and Play Mode: before the first scene starts.
    [RuntimeInitializeOnLoadMethod(RuntimeInitializeLoadType.BeforeSceneLoad)]
    static void RegisterGameplay() => RTSGameplayFramework.Register("My RTS Game");

#if UNITY_EDITOR
    // The Unity editor menus: after every domain reload.
    [UnityEditor.InitializeOnLoadMethod]
    static void RegisterGameplayInEditor() => RTSGameplayFramework.Register("My RTS Game");
#endif
}| While a framework is registered… | What happens |
|---|---|
RTSDemoGame in a scene | Logs one message that names the framework and the object, switches the sample gameplay systems of the scene off and stays idle: it starts neither with the scene nor with the play test. StartGame() called from code still runs the sample. |
| Shows a dialog that explains that gameplay comes from the framework, instead of adding the sample. | |
| The in-game editor | Works as usual. Its play test asks game code through PlaytestRequested, so the framework can run it as a match (see Running your own match in the play test). |
| Sample components used on their own | Keep working in scenes without RTSDemoGame, for example RTSCameraController or RTSMinimapUI in your own scene. |
Register(displayName)trims the name; registering a name that is already registered does nothing, so both registrations above can run. An empty name throwsArgumentException.- A second, different framework is kept in
RegisteredFrameworks, but the first one stays active and a warning is logged, because a project normally uses one framework. Unregister(displayName)removes a framework;ActiveFrameworkName(null when none is registered) andIsActivetell what is registered.- The registration is static state of the scripting domain: a domain reload clears it, and entering Play Mode without a domain reload keeps it. Call the methods from the main thread.
Detecting RTS Terrain Studio: scripting define symbols
RTS Terrain Studio is installed into the Assets folder, so other packages cannot detect it with the versionDefines of their assembly definitions, which only see Package Manager packages. Instead, the package writes these symbols into the scripting define symbols of every build target:
| Symbol | Defined while |
|---|---|
RTS_TERRAIN_STUDIO | RTS Terrain Studio is in the project. |
RTS_TERRAIN_STUDIO_1_0_OR_NEWER | The installed version is 1.0 or newer. |
Every minor release adds a symbol of the form RTS_TERRAIN_STUDIO_<major>_<minor>_OR_NEWER and keeps the symbols before it, so a check for RTS_TERRAIN_STUDIO_1_0_OR_NEWER stays true.
An integration of your own goes into an assembly definition that is compiled only while the package is present:
{
    "name": "MyGame.TerrainIntegration",
    "references": [ "RTSTerrainStudio.Runtime" ],
    "defineConstraints": [ "RTS_TERRAIN_STUDIO" ]
}
Code in an assembly that also compiles without the package, for example Assembly-CSharp (which references the package automatically while it is there), checks the symbols with #if:
using UnityEngine;

public static class GroundHeight
{
    public static float At(Vector3 position)
    {
#if RTS_TERRAIN_STUDIO_1_0_OR_NEWER
        var terrain = RTSTerrainStudio.RTSTerrain.FindAt(position);
        if (terrain != null) return terrain.GetHeight(position);
#endif
        return 0f;
    }
}- When the symbols are written. After every domain reload outside Play Mode, while
RTSTerrainStudio.Runtime.asmdefis in the project and URP 17.3 or newer is installed. They go to every build target, including the dedicated server. Only missing symbols are written, every other symbol keeps its place, and nothing is written when the symbols are already correct, so no extra compilation starts. The first write logs a message, and one compilation follows. Without URP the symbols are left as they are. - When they are removed. When the package's runtime assembly definition is deleted inside the Unity editor, also together with the whole package folder: the small editor assembly
RTSTerrainStudio.Defines.Editor, which has no references, removes the symbols from every build target while the deletion is imported. If you delete the package folder while Unity is closed, nothing is left to remove them: delete them in . - Other tools may write
RTS_TERRAIN_STUDIOas well. The package never removes it while it is installed and never reorders symbols, so both agree. If another tool removes the symbols after every compilation, the package stops writing them after three attempts and logs a warning instead of recompiling forever; the warning appears again after every domain reload while the conflict lasts. - brings the symbols up to date at once, resets that guard and shows the result.
- Build Profiles and build servers. The symbols are stored in the Player Settings (
ProjectSettings/ProjectSettings.asset): commit that file, so batch mode and build servers compile with them. A Build Profile that overrides the Player Settings has its own symbol list; add the symbols there yourself. - From editor code,
RTSTerrainStudio.Defines.RTSTerrainStudioDefinesoffersSymbol,VersionSymbols,IsInstalled(),RuntimeCompilesandUpdateDefines(). Its assembly is not referenced automatically.
Frequently Asked Questions
Everything is pink (magenta). What is wrong?
Pink means a shader could not be used. RTS Terrain Studio uses hand-written shaders for the Universal Render Pipeline only.
- Open . The check Universal Render Pipeline is active must be green; Fix All (or the fix button of the check) assigns a URP asset.
- Check Package shaders compile in the same window. If a shader has errors, the Console names it; re-import the
Shadersfolder of the package (right-click ▸ Reimport). - If only your own prefabs are pink (trees, rocks, units), their materials use Built-in pipeline shaders. Convert them with Unity's render pipeline converter or assign URP materials.
I added an RTS Terrain but nothing renders.
- Select the terrain and look at its inspector. When it says that no map is loaded, assign a map asset, create a new map (window ▸ Map tab ▸ New Map) or use the New Map Wizard.
- Make sure the
RTSTerraincomponent is enabled. A disabled component unloads its map. - Check the camera: the chunks are on the layer set in the terrain settings (Chunk Layer), which must be in the camera's culling mask. Frame the terrain with F in the Scene View: a 128-cell map with 2 m cells is 256 m wide.
- A terrain without tileset renders with neutral fallback colours, not invisible. Assign a tileset, or run and use the demo tileset.
- Click Rebuild Terrain in the terrain inspector to recreate all chunks, textures and the pathing map.
The brush paints somewhere other than where my cursor is.
The editor uses Unity's DPI-correct Scene View ray and the brush cursor is drawn by the terrain shader, so with an ordinary setup the cursor and the paint always match, also with display scaling of 150 % or more. If they do not:
- The terrain or a parent is scaled, or rotated around X or Z. Only position and Y rotation are used. The terrain inspector warns about both; reset scale to 1 and X/Z rotation to 0, and change the cell size of the map instead of scaling.
- The terrain uses a Material Override whose shader does not draw the brush cursor. You then paint at the right spot but do not see the cursor. Use the package's terrain shader or include its brush cursor code.
The fog of war is not visible.
- The scene needs exactly one
RTSFogOfWarManager(). - Run and fix Fog of War renderer feature. The renderer feature darkens everything on screen. Without it, only the package's own shaders (terrain, water, vegetation) are fogged, and your own units and props are not.
- In edit mode, enable Preview In Edit Mode on the manager.
- Reveal All must be off. Start Explored makes the whole map look explored (dimmed instead of black).
- Your units need an
RTSFogOfWarRevealerwhose team is the Local Team of the manager. Revealers of other teams reveal nothing for the local team, so without one the map stays covered (black by default).
Vegetation (or water, or the terrain) is missing in builds but fine in the editor.
- Run and fix Shaders included in builds. The package keeps its shaders in a shader references asset under
Resources, which is refreshed automatically before every player build. If you deleted or moved it, the check recreates it. - Fix GPU instancing on instanced prototypes: instanced trees, details and decor need materials with Enable GPU Instancing.
- Make sure the map is in the build: maps assigned as
RTSMapAssetto a terrain in a scene of the build are included automatically; map files loaded from disk must exist on the player's machine (for example inRTSMapSerializer.DefaultMapsFolder). - Shader stripping or a different URP asset for the target platform (Quality settings) can remove features. Check that the URP asset used by the build has the same settings as the one in the editor.
- In a Web build on WebGL 2.0, a URP asset with many features can exceed the 16 textures per draw, and the terrain disappears. See the OpenGL ES and WebGL 2.0 note in Mobile notes.
- Missing fog in builds: see Fog in player builds.
Water looks black, grey or has no refraction.
- The water shader reads the scene depth and colour. Enable Depth Texture and Opaque Texture on the URP asset: ▸ Depth and Opaque Texture enabled ▸ fix.
- Set Opaque Downsampling of the URP asset to None; downsampling blurs the refraction.
- Check the camera: its Depth Texture and Opaque Texture overrides must not be set to Off. The water follows each camera's own setting, and the Scene view always uses the URP asset.
- In a Web build, check the URP asset of the quality level that Web builds use (the check Web quality levels have Depth and Opaque Texture, see Web checks).
- The water colours come from the Water Profile of the tileset. Check the shallow and deep colours there.
How do I get the best performance?
- Burst must be enabled (). Brushes, pathing, fog of war, the generator and the minimap are Burst jobs.
- Chunk size (terrain settings): 16, 32 (default) or 64 cells. Smaller chunks rebuild faster while editing, larger chunks mean fewer draw calls in game.
- Surface Subdivisions: 1 gives the classic RTS look with the fewest triangles, 2–4 smoother hills.
- Collider Mode None skips the mesh colliders when you only use the query API (
Raycast,GetHeight). - Prefer the Instanced spawn mode for trees and decor; use GameObject mode only for objects your gameplay needs as GameObjects (harvestable trees, decor with scripts).
- Lower Detail Density Multiplier and Detail Distance Multiplier on the vegetation renderer for weaker hardware.
- Fog of war: Resolution Per Cell 1 and a larger Update Interval are cheaper.
- Run the map validator: its performance warnings list too many trees, decor, GameObject objects or detail layers.
Can I use several terrains in one scene?
Yes. Every RTSTerrain has its own map, tileset, libraries and transform. RTSTerrain.All lists them, RTSTerrain.FindAt(position) finds the one under a position and RTSTerrain.RaycastAll ray casts against all of them. In the editor window pick the edited terrain in the header (selecting a terrain in the scene picks it too); in the in-game editor use Map ▸ Edited terrain. Notes:
- The undo history belongs to the edited terrain: switching the edited terrain clears it.
- The fog of war manager covers one terrain (its Terrain field, or
RTSTerrain.Mainwhen empty). - A* needs one graph builder with its own graph names per terrain; the NavMesh integration one builder per terrain.
Can I move or rotate a terrain?
Yes: position and Y rotation are fully supported, also at runtime. All queries, brushes, vegetation, decor, water, pathing, fog of war and the integrations follow the transform. Rotation around X or Z and scale are not supported (the inspector warns); to make a map larger, use Resize on the Map tab or a larger cell size.
Does it work with the Input System, the old Input Manager, or both?
All three settings of work. Runtime code reads input through RTSInput, which uses the Input System package when it is installed and active, and the legacy Input Manager otherwise. The Input handling check of shows what your project uses. In your own gameplay code you can use RTSInput as well (PointerPosition, GetMouseButtonDown, GetKey(RTSKey) …) so it runs with either setting. For letter shortcuts that should follow the player's keyboard layout, use GetKeyDownByLabel(RTSKey); for symbol keys such as [ or +, use GetCharacterDown(char).
Can I publish my game or the in-game editor in a web browser?
Yes. Web builds (WebGL 2.0) run the terrain, vegetation, water, fog of war, the in-game editor and the samples in desktop browsers with a mouse and keyboard. Install the full-window template with , and read Web (WebGL) builds for the settings, the browser storage of maps and the hosting notes.
Can I move the package to another folder?
Yes. Nothing relies on a fixed path; the package finds its files relative to its own location.
Troubleshooting
Work through this checklist from top to bottom; most problems are solved in the first three steps.
- Read the Console. Messages of the package start with
[RTS Terrain Studio]and are linked to the object they belong to (click the message to select it). Fix compile errors first: while any script fails to compile, nothing else updates. - Validate the project. checks URP, depth and opaque textures, the fog of war renderer feature, the fog modes kept in builds, colour space, Burst/Collections/Mathematics, input handling, shader compilation, shaders in builds, tileset texture arrays, GPU instancing, terrains with tilesets and terrains that save to map files, and with Web as the active platform also the Web quality levels and the Web template. Click Fix All (a dialog lists every change first), then Run Again.
- Check the terrain inspector. Is a map loaded, a tileset assigned, the component enabled? Are there warnings about scale or rotation? Click Rebuild Terrain.
- Validate the map. Map tab ▸ Validation ▸ Validate Map finds missing prototypes, broken paint, unreachable start locations and performance problems.
- Check the content. Missing textures, plants or decor usually mean a tileset or library is not assigned, or a prototype id of the map does not exist in the library. Re-running restores the demo assets.
- Check the integrations. Compile errors in
Integrationsafter removing Mirror mean theMIRRORsymbol is still defined (Removing Mirror). An integration marked Installed but not Active in the Welcome window has a version that does not match its requirement. - Play mode without domain reload is supported. If something behaves differently after the second Play, enable domain reload once to see whether your own static state is the cause.
- Still stuck? Reproduce the problem in a new scene with a terrain created by and the demo content, and include the Unity version, the URP version, the Console output and the steps when you ask for help.
| Symptom | Likely cause | See |
|---|---|---|
| Pink materials | URP not active, shader errors, Built-in materials on your prefabs | FAQ |
| Terrain invisible | No map loaded, component disabled, chunk layer culled | FAQ |
| Brush lands beside the cursor | Scaled terrain or X/Z rotation | FAQ |
| No fog of war | Renderer feature missing, no revealer of the local team, Reveal All on | FAQ |
| Black water | Depth / Opaque Texture off | FAQ |
| Missing vegetation in builds | Shader references, GPU instancing | FAQ |
| Units do not move | Pathing map not built yet, start or goal unwalkable, provider without graph or NavMesh | Map Validation, Integrations |
| Generator places fewer start locations | Not enough flat space for Flat Radius / Edge Margin | Generator settings |
| Heightmap import is flat or extreme | Height scale 0 in code, wrong RAW size or byte order | Heightmaps |
| Compile errors about Mirror after removing it | Stale MIRROR define | Removing integrations |
| Dialog RTS Terrain Studio requires URP | URP 17.3 is not installed, or the editor is older than Unity 6.3 | Unity and render pipeline |
| Web build: tiny UI, lost maps, keys that open browser functions | Fixed-size template, browser storage, browser shortcuts | Web (WebGL) builds |
A map file does not load (InvalidDataException) | The file is damaged, needs more memory than the limit, or breaks the format rules of strict reading. The message names the problem. | Safety limits and read options |
GetExtension or TryGetExtension throws InvalidDataException | The section of your map extension is damaged, or Read does not read what Write wrote. The map keeps the section unchanged. | Map extensions |
| A custom tool category or panel has no tab | The category has no tool in the session and no content of its own: registering a category alone adds no tab | Editor extensions |
| "Too large for WebGL", "Too large for mobile devices" or "Too large for this device" | The splat textures or the memory of the map exceed the limits of the build target, or of the device the in-game editor runs on | Memory limits and warnings |
| Console: "… needs more undo memory than the limit of … allows" | The step was larger than the undo memory limit. Its change stays, but it cannot be undone. | Undo limits and memory |
| Multiplayer: enemies always or never visible, clients refuse the map | Fog of war or interest management missing on the server, Max Map Memory MB | Mirror troubleshooting |
Changelog
Version 1.0.0 — Initial release
Requires Unity 6.3 LTS (6000.3) and the Universal Render Pipeline 17.3, with Burst, Collections and Mathematics.
Map model
- Classic RTS-style grid of cells and corner vertices, 16 to 1024 cells per side (multiples of 16), free cell size.
- 16 cliff levels with procedurally generated, rounded cliff walls; fine height on top of every level; ramps; 4 cliff types per tileset.
- 16 ground layers per tileset in high-resolution splat maps, height-based blending, optional triplanar mapping and anti-tiling; any texture size and format.
- Per-vertex water with shallow and deep water.
- Pathing map (walkable, buildable, flyable, shallow and deep water) derived automatically, plus painted overrides.
- Regions, start locations, markers, map info and environment lighting stored in the map.
Editing
- One tool set for the Unity Editor and the in-game editor: height, cliffs, paint (soft, tile, fill, auto paint), vegetation, decor, water, pathing and markers.
- Brushes with circle, square, diamond and texture stamp shapes, falloff curve, rotation, spacing and jitter; symmetry painting (mirror X/Z, 4-way, 2- and 4-fold rotation).
- Undo and redo with a memory budget, integrated with Unity's undo. A single step larger than the budget is not kept: its change stays, the history is cleared and a warning is logged. Generate, heightmap imports and the other whole-map operations of the Unity editor, and Generate in the in-game editor, ask before they run without undo (
RTSEditSession.ConfirmRunWithoutUndo,EstimateOperationUndoBytes,FitsUndoBudget,RunOperation(name, layers, operation, recordUndo)andMapEditRecord.IsDiscarded; see Limits and memory). - The New Map Wizard, and New Map and Resize in the editor window and in the in-game editor, show the estimated memory of the map, warn above 1 GB while editing and refuse sizes the target platform cannot run (Memory limits and warnings).
- Dockable RTS Terrain Studio window, Scene View integration with projected brush cursor and overlays, custom inspectors and importers for all assets, Welcome window, New Map Wizard and project validator.
- In-game editor built with UI Toolkit: toolbar, tool and brush panels, palettes, map browser, hotkeys and play test. Open and Import check the size of a map from its first bytes; in web browsers, maps are read with the strict rules and a memory budget that fits the page.
Map tools
- Seeded procedural map generator with six styles, symmetric layouts, ramps, lakes and islands, borders, auto paint, vegetation, decor and start locations; savable presets.
- 16-bit PNG and RAW heightmap import (three modes) and export, splat image export.
- Minimap baker, map validator (with the memory check settings
memoryWarningMBandtargetPlatform), resize with anchor. - Binary
.rtsmapformat shared by editor and game, with custom sections and custom header fields. - Every map file is checked before memory is reserved for it: the map size against a memory limit, decompression only up to the largest size a valid map can have, and every count and length against the data that is left, so a damaged or hostile file cannot use up the memory of the game. A damaged file, for example one with a detail layer of the wrong size, a repeated built-in section or a too short header length, throws
InvalidDataExceptionwith a message that names the problem, and a failed load leaves no memory allocated (Safety limits and read options). RTSMapReadOptionswith the presetsDefault(lenient: for example, cliff levels above 15 and cliff types of 4 or more are clamped with a warning) andStrict, and the overloadsRTSMapSerializer.Deserialize(bytes, options),LoadFromFile(path, options)andRead(stream, options).RTSMapSerializer.TryReadDimensionsandTryReadDimensionsFromFileread the size of a map from its first bytes;RTSMapSerializer.TryValidatechecks a map without keeping it.RTSMapMemory(estimates of the map data, the splat textures, the total in a game and whole-map undo steps) andMapMemoryCheck(limits for desktop, mobile and Web builds).
Runtime systems
- Chunked terrain meshes built in Burst jobs, optional mesh colliders and a physics-free query API.
- GPU-instanced vegetation with wind and culling; trees as instances or GameObjects.
- Water rendering with depth colour and refraction; decor manager for any prefab.
- Classic RTS fog of war: per-team visibility, explored memory, line of sight blocked by cliffs and blockers, shared vision, minimap support.
- Built-in Burst A* pathfinder with clearance-aware unit sizes and path smoothing.
- Samples: RTS camera, selection, move orders with formations, test units, minimap UI, demo scenes and generated demo content.
Building your own game
- Map extensions (
MapDataExtension): your own data saved inside the map file, read when your code requests it, copied byClone, moved on resize (OnResize) and recorded by undo (RTSEditSession.EditExtension,RecordExtension,MapLayers.Extensions). Sections of other games and tools are kept unchanged (MapData.UnknownSections). Tag helpersRTSMapSerializer.MakeTag,GetTagNameandIsReservedTag. - Custom header fields for map browsers and lobbies (
MapData.HeaderFields,RTSMapSerializer.CustomHeaderWriter,RTSMapHeader.GetCustomField). - A runtime pathing layer for buildings, gates and bridges (
RTSTerrain.SetDynamicPathing), an overlay mask for planned buildings (PathingOverlayController.ExtraBlocked), a fixed byte layout of the pathing flags with a CRC-32 checksum (PathingMap.ComputeChecksum), and the flags without trees (RTSTerrain.KeepFlagsWithoutTrees,PathingMap.IsBlockedOnlyByTrees). - Trees hidden for one match without changing the map (
RTSTerrain.SetTreeHidden,SetTreesHidden,ShowAllTrees,HiddenTreesChanged), for harvesting and save games. - Fog of war visibility from your own simulation or server (
IFogOfWarVisibilitySource,FogOfWarVisibilityBuffer,RTSFogOfWarManager.ExternalVisibilitySource). - Custom tool categories (
ToolCategoryAttribute,RTSToolRegistry.RegisterCategory), in-game editor panels and menu commands (RTSRuntimeEditor.RegisterPanel,RegisterMenuItem), tabs in the RTS Terrain Studio window (RTSTerrainStudioWindow.RegisterTab) and Scene View shortcuts for custom categories (RTSSceneViewShortcuts.SelectCategory). - Play test hand-over to your own match (
RTSRuntimeEditorEvents.PlaytestRequested,EndPlaytest,IsPlaytestTakenOverand the Playtest Controls When Taken Over option of the in-game editor). RTSGameplayFramework: a registry that keeps the sample gameplay out of the way of your own gameplay.- The scripting define symbols
RTS_TERRAIN_STUDIOandRTS_TERRAIN_STUDIO_1_0_OR_NEWERfor integrations, with .
Platforms
- Shaders for Shader Model 3.5, so the package also runs on OpenGL ES 3.0 and in Web builds (WebGL 2.0).
- Web builds: maps kept in the browser storage, Download Map, Import Map and drag and drop, a warning before leaving the page with unsaved changes, browser-aware keyboard shortcuts, a full-window Web template and Web checks in the project validator.
- Tileset texture arrays are rebuilt automatically before player builds, for the texture compression of the build.
- Without URP 17.3 the package stays inactive and explains how to install URP, instead of showing compile errors.
Integrations
- Mirror: map streaming with cache, server-authoritative units, per-team fog of war, fog of war interest management. Clients load received and cached maps with
RTSMapReadOptions.Strictand the Max Map Memory MB limit, and refuse a map above the limit from its first downloaded bytes. Downloads are cached only after they loaded, and a cached copy that cannot be loaded is removed and downloaded again in the same join. - Mirror: Show All Without Fog is off by default, so a server without a running fog of war sends no hidden enemy units. The server warns about setups that send units to the wrong clients: no active
RTSFogOfWarInterestManagement, no fog of war running while two or more teams are connected, and networked objects with a renderer but withoutRTSNetworkUnit. - A* Pathfinding Project Pro: grid graphs from the pathing map with incremental updates,
AIPathand RVO units. - Unity AI Navigation: NavMesh built from the terrain and the pathing map, incremental updates, path provider and NavMeshAgent mode.
Documentation
- HTML manual in English, German, French, Spanish, Chinese and Japanese, opened with .
- Memory numbers for every map size, including the CPU copy of the splat textures (Memory numbers), the Mirror network model and scale, restricting who can join, and a chapter about building a game on RTS Terrain Studio.